```html
Kitchen Cabinet Photo: A Guide to Capturing the Essence of Kitchen Design
Kitchen cabinet photography goes beyond simply taking pictures of boxes in a room. It's about showcasing the artistry, functionality, and overall aesthetic appeal of a vital component of the home. High-quality kitchen cabinet photos are crucial for various purposes, from marketing and sales to interior design portfolios and DIY project documentation. Understanding the nuances of lighting, composition, and styling is essential for producing images that effectively communicate the value and beauty of kitchen cabinetry.
The purpose of a kitchen cabinet photo dictates the specific approach. A manufacturer might need photos highlighting construction details and material finishes for online catalogs or brochures. An interior designer requires images that demonstrate how cabinets integrate into the overall kitchen design, emphasizing style and spatial harmony. A homeowner selling their property benefits from photos that make the kitchen appear modern, spacious, and appealing to potential buyers. Each scenario demands careful consideration of the target audience and the message the photo needs to convey.
Key Considerations for Capturing High-Quality Kitchen Cabinet Photos
Achieving professional-looking kitchen cabinet photos involves several key elements. Paying attention to these details will significantly enhance the final product, regardless of the equipment used.
Lighting: Lighting is paramount in photography, and kitchen cabinet photography is no exception. Natural light is often preferred for its soft, even illumination. Shooting during the "golden hour" (shortly after sunrise and before sunset) can produce warm, flattering light that enhances the wood grain and color of the cabinets. However, relying solely on natural light can be unpredictable due to weather conditions. Supplemental lighting, such as studio strobes or continuous LED lights, offers greater control and consistency. A diffused light source is crucial to avoid harsh shadows and hotspots that can detract from the image. Reflectors can also be used to bounce light into darker areas, creating a more balanced exposure. When using artificial light, it's important to match the color temperature to the ambient light to avoid color casts. Pay attention to under-cabinet lighting as it directly affects how the countertops and backsplash appear in the photo.
Composition: The composition of a kitchen cabinet photo refers to how the elements within the frame are arranged. The goal is to create a visually appealing and informative image. Avoid clutter and distracting elements in the foreground or background. Use the "rule of thirds" to position key features, such as cabinet hardware or decorative accents, at the intersections of imaginary lines that divide the frame into nine equal parts. Consider the perspective from which the photo is taken. A straight-on shot is often best for showcasing the overall design of the cabinets, while an angled shot can add depth and visual interest. Pay attention to lines and angles within the frame. Vertical lines can create a sense of height, while horizontal lines can create a sense of width. Ensure that the cabinets are level and that the lines are straight. Use leading lines to draw the viewer's eye into the image. If possible, include elements such as countertops, appliances, and backsplashes in the composition to provide context and create a more complete picture of the kitchen.
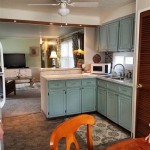
Styling: Styling plays a vital role in making kitchen cabinet photos more engaging and appealing. A well-styled kitchen appears inviting and functional. Start by thoroughly cleaning the cabinets and surrounding areas. Remove any clutter or unnecessary items from the countertops and other surfaces. Stage the scene with carefully selected accessories, such as decorative bowls, cookbooks, or vases of flowers. Consider the color palette of the kitchen and choose accessories that complement the cabinets and countertops. Avoid using too many colors or patterns, as this can create a cluttered and distracting look. Pay attention to the details, such as the placement of utensils or the arrangement of dishes. Ensure that everything is neat and organized. Consider adding elements that suggest activity, such as a cutting board with fresh produce or a coffee mug on the counter. Remember that the goal is to create a realistic and inviting scene, not a sterile or artificial one.
Equipment and Settings for Kitchen Cabinet Photography
The equipment used for kitchen cabinet photography can range from a smartphone to a professional-grade DSLR or mirrorless camera. While high-end equipment offers greater flexibility and image quality, decent results can be achieved with more basic setups, especially when combined with careful technique.
Camera and Lens: A camera with manual control over aperture, shutter speed, and ISO is recommended. A wide-angle lens (e.g., 16-35mm or 24-70mm on a full-frame camera) is often necessary to capture the entire kitchen in a single shot. However, wider lenses can introduce distortion, especially at the edges of the frame. A prime lens (e.g., 50mm or 85mm) can be used for detail shots or to create a shallower depth of field. The choice of lens depends on the specific needs of the shoot. It is crucial that the sensor size is large enough to capture the details when shooting a far away shot and cropping the image to show a specific area. This will ensure that the desired area is clear and crisp.
Tripod: A tripod is essential for maintaining sharpness, especially in low-light conditions. It allows for longer exposures without camera shake. A sturdy tripod is particularly important when using wide-angle lenses, as even slight movements can be magnified. It is helpful to use a tripod that can get low to the ground if you are trying to capture cabinets with under-cabinet lighting and how it illuminates the countertop below.
Lighting Equipment: As mentioned earlier, lighting is crucial. Studio strobes or continuous LED lights with softboxes or umbrellas can provide controlled and consistent illumination. Reflectors can be used to bounce light into darker areas. A light meter can help ensure accurate exposure. The use of supplemental lighting may vary depending on the ambient light already available, but it is imperative to understand how the pre-existing lighting may negatively affect the photo.
Camera Settings: Shoot in RAW format to preserve the maximum amount of image data. Use a low ISO (e.g., 100 or 200) to minimize noise. Set the aperture to f/8 or f/11 for a good depth of field, ensuring that most of the cabinets are in focus. Adjust the shutter speed to achieve proper exposure. Use a white balance preset or custom white balance to ensure accurate color rendition. Consider using bracketing, taking multiple shots at different exposures, to capture a wider dynamic range. Some cameras may have a feature, such as HDR, that does this automatically. It is important to keep in mind how post-processing edits may alter the final look of the photo.
Post-Processing Techniques for Enhancing Kitchen Cabinet Photos
Post-processing is an essential step in kitchen cabinet photography. It allows for correcting imperfections, enhancing colors, and refining the overall look of the image. Software such as Adobe Lightroom or Photoshop is commonly used for this purpose.
Basic Adjustments: Start by adjusting the exposure, contrast, and white balance. Correct any color casts or distortions. Adjust the highlights and shadows to bring out details in both bright and dark areas. Use the clarity and vibrance sliders to enhance the colors and textures. Be careful not to overdo these adjustments, as this can result in an unnatural look. It is important to know how the saturation, brightness, and hue of a photo can be affected by any adjustments or filters that are used. Understanding how these features are affected will help you to create a more professional and artistic shot.
Lens Corrections: Use lens correction tools to remove distortion and vignetting. Distortion is more common with wide-angle lenses, while vignetting is a darkening of the corners of the image. These tools can automatically correct these issues based on the lens profile. If no lens profile is available, use manual adjustments to correct the distortion and vignetting.
Retouching: Remove any blemishes, dust spots, or other distractions from the image. Use the clone stamp tool or healing brush to seamlessly blend these imperfections into the surrounding area. Pay attention to details, such as scratches on the cabinets or smudges on the countertops. Retouching should be subtle and realistic. Over-retouching can make the image look artificial and unappealing. Also, make sure to retouch minor imperfections such as dust, dirt, shadows, and glares. These may seem minor at first, but they can affect how the entire photo looks.
Sharpening: Sharpen the image to enhance the details and textures. Use a moderate amount of sharpening to avoid creating artifacts or noise. Selective sharpening can be used to emphasize specific areas of the image. It is important to keep in mind how post-processing edits may later alter this sharpening effect, so it is important to use sharpening sparingly.
Export Settings: Export the final image in a high-resolution format, such as JPEG or TIFF. Choose a color space that is appropriate for the intended use of the image. For web use, sRGB is recommended. For print use, Adobe RGB or ProPhoto RGB may be preferred. Adjust the image size and resolution to meet the specific requirements of the intended output. Save a backup copy of the original RAW file and the edited version.
By mastering the principles of lighting, composition, styling, and post-processing, anyone can create stunning kitchen cabinet photos that effectively showcase the beauty and functionality of this essential element of the home. Consistent practice and experimentation are key to developing a keen eye and refining one's photographic skills.
```
Wooden Modern Kitchen Cabinet Wall Mounted

15 Stunning Kitchen Cabinet Designs In Singapore With 5 Essential Tips

Contemporary Kitchen Cabinets For Your Home Design Cafe

Kitchen Cabinet Ideas The Home Depot

5 Things To Consider Before Picking Your Perfect Kitchen Cabinet Designs

How To Paint Kitchen Cabinets Like The Pros

How To Choose The Best Kitchen Cabinet Design In Singapore

How To Choose The Right Kitchen Cabinets

13 Popular Wood Grain Aluminium Kitchen Cabinet Designs You Will Love

How To Choose The Best Kitchen Cabinet Design In Singapore
Related Posts