Kitchen Cabinet Refacing Tools: A Comprehensive Guide
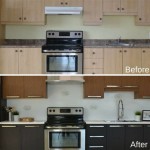
Kitchen cabinet refacing is a cost-effective and efficient way to update a kitchen's appearance without the expense and disruption of a complete remodel. The process involves replacing cabinet doors and drawer fronts, applying new veneer to the existing cabinet boxes, and updating hardware. Successful cabinet refacing hinges on the proper selection and utilization of tools. This article provides a detailed overview of the necessary tools for cabinet refacing, outlining their specific uses and offering guidance on choosing the right equipment for the project.
Essential Preparation and Demolition Tools
Before embarking on the refacing process, thorough preparation is essential. This involves removing existing hardware, cleaning the cabinet surfaces, and potentially addressing minor damage. The following tools are crucial for this initial phase:
Screwdrivers: A variety of screwdrivers, both Phillips head and flathead, are necessary for removing existing cabinet doors, drawer fronts, hinges, and knobs. Having a selection of sizes ensures compatibility with different types of screws. A power screwdriver with variable torque settings can expedite the process, but care must be taken to avoid stripping screw heads or damaging the surrounding wood.
Pry Bar and Putty Knife: A small pry bar or a stiff putty knife assists in gently removing stubborn cabinet doors or drawer fronts that may be stuck due to paint or adhesive. Exercise caution to avoid damaging the cabinet boxes during removal. Applying gentle, even pressure is key to preventing splintering or cracking.
Cleaning Supplies: Preparing the surfaces for veneer application requires thorough cleaning. A degreasing cleaner, such as trisodium phosphate (TSP) or a similar product specifically designed for removing grease and grime, is essential. Clean cloths, sponges, and scrub brushes are also necessary. Ensure the cleaning products are compatible with the existing cabinet finish and do not cause discoloration or damage.
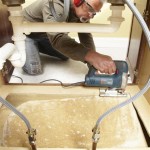
Sandpaper and Sanding Block: Lightly sanding the existing cabinet boxes creates a slightly rough surface, promoting better adhesion of the new veneer. A sanding block helps maintain a flat, even surface during sanding. Using different grits of sandpaper, starting with a medium grit (120-150) and progressing to a finer grit (220), ensures a smooth, paintable surface without excessive material removal.
Dust Mask and Safety Glasses: Sanding creates dust particles that can be harmful to breathe and irritating to the eyes. Wearing a dust mask and safety glasses protects against these hazards. Consider using a respirator for prolonged sanding or when working with materials that produce potentially harmful dust.
Vacuum Cleaner: After sanding, thoroughly vacuuming the surfaces removes dust and debris, ensuring a clean and smooth surface for veneer application. A vacuum cleaner with a brush attachment is ideal for reaching corners and crevices.
Tools for Veneer Application and Cutting
Applying the new veneer is a critical step in the refacing process. Precise cuts and proper adhesion are essential for a professional-looking result. The following tools are indispensable for this stage:
Measuring Tape and Ruler: Accurate measurements are crucial for cutting the veneer to the correct size. A high-quality measuring tape and a metal ruler or straight edge ensure precise measurements and straight cuts. Double-checking measurements before cutting prevents costly errors and material waste.
Utility Knife: A sharp utility knife with replaceable blades is essential for cutting veneer. A fresh blade ensures clean, precise cuts without tearing the veneer. Using a metal straight edge as a guide ensures straight cuts along longer lengths.
Veneer Saw or Fine-Toothed Saw: For more intricate cuts or when working with thicker veneers, a veneer saw or a fine-toothed saw provides greater control and precision. These saws are designed to minimize chipping and splintering, resulting in a cleaner cut.
Contact Cement and Application Tools: Contact cement is commonly used to adhere veneer to the cabinet boxes. A brush, roller, or a specialized contact cement sprayer can be used to apply the adhesive evenly to both the veneer and the cabinet surface. Ensure the adhesive is specifically designed for bonding veneer to wood or laminate surfaces.
J-Roller or Laminate Roller: After applying the veneer, a J-roller or laminate roller is used to apply even pressure to the entire surface, ensuring a strong bond between the veneer and the cabinet box. Rolling from the center outwards eliminates air bubbles and promotes maximum adhesion. Varying pressure may be needed based on the type of veneer and adhesive used.
Edge Banding Trimmer: After the veneer is applied, excess material may need to be trimmed along the edges. An edge banding trimmer is specifically designed for this purpose, providing a clean and consistent edge. Alternatively, a sharp utility knife and a steady hand can be used, but an edge banding trimmer offers greater precision and efficiency.
Heat Gun or Hair Dryer: A heat gun or hair dryer can be used to soften the veneer, making it more pliable for bending around corners or curved surfaces. Applying heat gently prevents scorching or damaging the veneer. Use caution and wear gloves to protect your hands from the heat.
Clamps: Clamps can be useful for holding veneer in place while the adhesive sets, particularly around edges or corners. Choose clamps that won't damage the veneer surface and apply even pressure.
Installation and Finishing Tools
The final stage of cabinet refacing involves installing new cabinet doors and drawer fronts, attaching hardware, and making any necessary adjustments. The following tools are essential for this phase:
Drill and Drill Bits: A power drill is required for installing hinges, knobs, and pulls. A variety of drill bits, including pilot drill bits and countersink bits, ensures precise and clean installations. Using a drill guide can help prevent the drill bit from wandering and ensure accurate hole placement.
Level: A level is essential for ensuring that the new cabinet doors and drawer fronts are properly aligned. Use a level to check the plumb and level of the cabinet boxes before installing the new doors and drawer fronts. Adjusting the hinges and hardware ensures that the doors and drawer fronts hang straight and operate smoothly.
Measuring Tape and Marking Tools: Accurate measurements are essential for positioning the new hardware. Use a measuring tape and a pencil or marker to mark the locations for the hinges, knobs, and pulls. A template or jig can simplify this process and ensure consistent placement across all the cabinets.
Screwdrivers: Screwdrivers are again needed for attaching the new hardware. Use the appropriate screwdriver size and type to avoid stripping the screw heads or damaging the hardware. A power screwdriver can expedite the process, but care must be taken to avoid overtightening the screws.
Wood Filler or Putty: If any imperfections or gaps are present, wood filler or putty can be used to fill them in. Apply the filler smoothly and sand it down after it dries. Choose a color that matches the veneer or the cabinet doors and drawer fronts.
Touch-Up Paint or Stain: Touch-up paint or stain can be used to conceal any scratches or imperfections. Choose a color that matches the veneer or the cabinet doors and drawer fronts. Apply the touch-up paint or stain sparingly and blend it in with the surrounding surface.
Shims: Shims can be used to level cabinet boxes or adjust the alignment of cabinet doors. Insert shims behind the cabinet boxes or under the hinges to achieve the desired alignment.
Cabinet Hardware Jig: A cabinet hardware jig can significantly simplify the process of installing cabinet knobs and pulls. These jigs provide precise and repeatable drilling, ensuring consistent hardware placement and professional results. Different jigs are available for different types of hardware and cabinet styles.
Choosing the right tools for cabinet refacing is crucial for achieving a successful and professional-looking result. Investing in high-quality tools and taking the time to learn how to use them properly will save time, reduce frustration, and ensure that the refaced kitchen cabinets look their best. The careful selection and employment of preparation, application, and installation tools will prove to be a worthwhile endeavor for those seeking to revamp their kitchen's aesthetics.

Diy Cabinet Refacing Budget Friendly Made Easy Wisewood

Diy Cabinet Refacing Budget Friendly Made Easy Wisewood

What To Know About Kitchen Cabinet Refacing The Family Handyman

Residential Refacing Northern Contours

How Do I Prepare My Kitchen For A Cabinet Refacing Project

Cabinet Refacing Essentials Looking At Inside Kitchen Cabinets

Cabinet Refacing From Lowe S

How To Refinish Kitchen Cabinets Diy

Kitchen Cabinet Refacing Vs Painting Cabinets

Kitchen Cabinet Makeovers Dragon Scale Inc