Kitchen Cabinet Stripping: A Guide to Restoring Your Cabinets
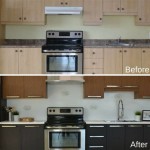
Kitchen cabinets are a significant investment, and over time, they can show signs of wear and tear. Paint can chip, varnish can fade, and the overall finish can become dull. In such cases, cabinet stripping becomes a necessary step before refinishing or painting, restoring their beauty and functionality. This article explores the process of kitchen cabinet stripping, covering essential steps, important considerations, and safety precautions.
Understanding Cabinet Stripping
Cabinet stripping involves removing the existing finish, whether it be paint, varnish, or stain, from the surface of the cabinets. This process is critical for several reasons. Firstly, it ensures a smooth and even surface for the new finish, preventing imperfections and uneven application. Secondly, it allows for a thorough cleaning of the cabinets, removing any accumulated dirt, grease, or grime that can hinder adhesion. Lastly, it helps to identify any underlying wood defects or imperfections that may need addressing before refinishing.
Choosing the Right Stripper
The choice of stripper depends on the type of finish on your cabinets and your personal preferences. There are three primary types of strippers readily available in the market:
- Chemical Strippers: These are the most common and effective strippers, typically containing a blend of chemicals that dissolve the finish. They are available in liquid, gel, and paste forms.
- Heat Strippers: These utilize heat to soften and loosen the finish. Heat guns or heat lamps are commonly used, but caution is required to prevent damage to the wood.
- Natural Strippers: These are eco-friendly alternatives that use natural ingredients like citrus peel oil or baking soda to remove the finish. They are typically less effective than chemical strippers and require more time and effort.
Always consult the manufacturer's instructions regarding the recommended stripper for your specific finish and wood type. This information is crucial for ensuring safe and effective stripping. Moreover, consider the following factors when selecting a stripper:
- Effectiveness: Choose a stripper known for effectively removing the desired finish. Consider the thickness and type of finish and the age of your cabinets.
- Safety: Opt for a stripper with minimal harmful chemicals and a manageable level of toxicity. Ensure adequate ventilation and wear protective gear.
- Ease of Use: Choose a stripper that aligns with your comfort level, whether it's a liquid for easy spreading or a gel for controlled application.
Essential Tools and Materials
To effectively strip your kitchen cabinets, assemble the following tools and materials:
- Stripper: Choose the appropriate stripper based on the finish and cabinet material.
- Paint Scraper: A scraper with sharp edges is essential for removing softened finish.
- Putty Knife: Use a putty knife to scrape off stubborn areas and for cleaning.
- Brushes: Choose brushes suitable for applying and removing the stripper.
- Gloves: Rubber or nitrile gloves are crucial for protecting your skin from the stripper.
- Eye Protection: Safety goggles are essential to guard against any splashes or fumes.
- Respirator: A respirator mask will protect your lungs from harmful fumes.
- Drop Cloths: Cover work areas with drop cloths to prevent contamination and damage.
- Cleaning Supplies: Have cleaning products ready to remove the stripper residue and clean the cabinets.
- Sandpaper: Different grit sandpaper will be needed for sanding down the wood after stripping.
Stripping Procedure
Once you have gathered all necessary tools and materials, follow these steps for successful cabinet stripping:
- Prepare the Work Area: Clear the kitchen space, remove cabinet contents, and cover the floor with drop cloths.
- Remove Hardware: Remove all hardware, including knobs, handles, hinges, and pulls. Take note of their order and placement for reinstallation later.
- Apply the Stripper: Apply the chosen stripper generously to the cabinet surfaces using a brush. Ensure complete coverage, paying attention to corners and edges.
- Dwell Time: Allow the stripper to dwell for the recommended time according to the manufacturer's instructions. This time can vary depending on the stripper and the finish type.
- Scrape and Remove: After the dwell time, use a paint scraper to remove the loosened finish. Work with caution to avoid damaging the wood.
- Repeat and Neutralize: Repeat the process of applying, dwelling, and scraping as needed until all the finish is removed. Once the stripper is removed, neutralize it using the recommended cleaning product.
- Clean and Rinse: Clean the cabinets thoroughly with water and mild detergent, ensuring complete removal of all stripper residue.
- Dry and Sand: Allow the cabinets to dry completely, then sand the surface with different grit sandpaper to achieve a smooth finish.
Remember to prioritize safety throughout the process. Wear protective gear, ensure adequate ventilation, and avoid contact with the stripper and its fumes. Always refer to the manufacturer's instructions for specific safety guidelines and precautions.
Important Considerations
Cabinet stripping is a labor-intensive process that requires time, effort, and meticulous attention to detail. Consider the following factors before embarking on the task:
- Cabinet Material: Understand the type of wood your cabinets are made of, as some wood types are more sensitive to stripping than others.
- Finish Type: Research the specific finish on your cabinets to select the appropriate stripper and follow the recommended instructions.
- Time Commitment: Be prepared to invest considerable time in stripping cabinets. The process can take multiple days, depending on the size, finish, and complexity of the cabinets.
- Ventilation: Ensure adequate ventilation, especially when working with chemical strippers. Open windows and doors or use fans to allow for fresh air circulation.
- Safety Equipment: Prioritize your safety by wearing gloves, eye protection, and a respirator mask to avoid skin irritation, eye damage, or inhalation of harmful fumes.
By taking these considerations into account, you can make an informed decision and approach cabinet stripping with the necessary preparation and precautions.

How To Strip And Re Stain Kitchen Cabinets Clinton Township Mi Eason Painting

5 Steps To Stripping Kitchen Cabinets Smart Tips

Nightwood Ny On Instagram Kitchen Cabinets Hinges Vintage Freestanding

Ideal Home Improvement Blog Refinish Kitchen Cabinets

How To Strip Old Kitchen Cabinets Diy Kitchenremodel

How To Strip Paint Off Kitchen Cabinets And Furniture

Cabinet Door Finish Failure Diagnosis And Repair

How To Install Cabinet Filler Strips

How To Refinish Kitchen Cabinets N Hance

We Solve Vinyl Wrap Issues Kitchen Resurfacing Adelaide
Related Posts