Understanding Kitchen Cabinet Bottom Trim: Function, Aesthetics, and Installation
Kitchen cabinet bottom trim, often referred to as base molding or toe-kick trim, is an essential component of kitchen cabinetry, serving both functional and aesthetic purposes. It is the decorative strip that conceals the unfinished base of the cabinets, providing a finished and polished look to the overall kitchen design. Understanding the different types, materials, installation processes, and considerations for bottom trim can significantly impact the final visual appeal and longevity of a kitchen renovation or construction project.
The primary function of bottom trim is to cover the toe-kick recess. The toe-kick is the recessed space at the bottom of base cabinets designed to allow individuals to stand comfortably at the counter without bumping their toes. Without trim, this recess would expose the cabinet framing, leveling legs, and potentially the subfloor, creating an unfinished and unsightly appearance. Furthermore, the trim protects the cabinet base from moisture and debris accumulation, prolonging the life of the cabinetry.
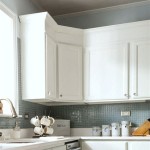
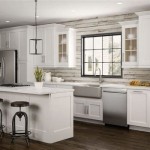
Aesthetically, bottom trim provides a cohesive and integrated look. It unifies the cabinets and creates a visual foundation for the entire kitchen. The style of the trim can be selected to complement the cabinet door style, countertop material, and overall kitchen design theme. From simple, minimalist designs to elaborate, decorative profiles, the choice of bottom trim can significantly impact the kitchen’s character.
Key Point 1: Types of Kitchen Cabinet Bottom Trim
Several types of bottom trim are available, each offering a unique aesthetic and functional benefit. The selection depends on the desired style, budget, and the existing architectural features of the kitchen.
Flat Base Molding: This is the simplest type of bottom trim, featuring a flat, unadorned surface. It is often used in contemporary or minimalist kitchens where a clean, streamlined look is desired. Flat base molding is typically the least expensive option and is easy to install.
Ogee Molding: Ogee molding features an S-shaped curve, adding a touch of elegance and sophistication. It's a versatile choice that can complement various kitchen styles, including traditional and transitional designs. The curved profile can help to soften the sharp lines of the cabinets and create a more visually appealing transition to the floor.
Quarter Round Molding: As the name suggests, quarter round molding is a quarter circle shape. It is often used to fill small gaps or to add a subtle decorative detail. It can also be used to cover the seam between the bottom of the cabinet and the floor, providing a clean and polished finish. This is often paired with other, larger trim styles for added visual interest.
Cove Molding: Cove molding features a concave, inward-curving profile. It is typically used to create a softer, more traditional look. Cove molding is often used in conjunction with other trim profiles to create a more complex and detailed design.
Scalloped Molding: Scalloped molding features a series of repeating curves or "scallops." This type of trim adds a decorative touch and is often used in vintage or farmhouse-style kitchens. It offers a more ornate visual compared to simpler profiles.
Custom Molding: For those seeking a unique and personalized look, custom-designed molding is an option. This allows for the creation of a trim profile that perfectly matches existing architectural details or reflects a specific design aesthetic. Custom molding is generally more expensive and requires a skilled craftsman to fabricate and install.
Key Point 2: Materials for Kitchen Cabinet Bottom Trim
The choice of material for bottom trim impacts its durability, moisture resistance, and overall aesthetic. Common materials include wood, MDF (Medium-Density Fiberboard), and PVC (Polyvinyl Chloride).
Wood: Wood is a classic choice for bottom trim, offering warmth, beauty, and versatility. It can be stained or painted to match the cabinets or complement the overall kitchen design. Hardwoods like maple, oak, and cherry are popular choices for their durability and resistance to dents and scratches. However, wood is susceptible to moisture damage and may require sealing or painting to protect it from spills and humidity. Wood trim is typically more expensive than MDF or PVC options.
MDF (Medium-Density Fiberboard): MDF is an engineered wood product made from wood fibers and resin. It is a more affordable alternative to solid wood and offers a smooth, uniform surface that is ideal for painting. MDF is less susceptible to warping or cracking than solid wood, but it is still vulnerable to moisture damage and should be properly sealed or painted to prevent swelling or disintegration. MDF is a widely popular choice due to its balance of cost and performance.
PVC (Polyvinyl Chloride): PVC is a plastic material that is highly resistant to moisture, making it an excellent choice for kitchens where spills and humidity are common. PVC trim is also resistant to insects and rot. It is available in a variety of colors and styles and can be easily cut and installed. While PVC is a durable and low-maintenance option, it may not offer the same warmth and natural beauty as wood. It’s a practical option, especially in kitchens prone to moisture.
Other materials: While less common, other materials like metal (stainless steel or aluminum) can be used for bottom trim, particularly in modern or industrial-style kitchens. These materials offer a sleek and durable option but may require specialized installation techniques.
Key Point 3: Installation Considerations for Kitchen Cabinet Bottom Trim
Proper installation of bottom trim is crucial for achieving a seamless and professional look. The installation process involves measuring, cutting, and attaching the trim to the base of the cabinets. Attention to detail and proper tools are essential for a successful outcome.
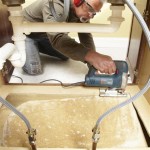
Measurement and Cutting: Accurate measurements are critical for ensuring a tight and seamless fit. Measure the length of each cabinet run and cut the trim pieces accordingly. A miter saw is recommended for making precise angled cuts at corners. Ensure that the cuts are clean and smooth to prevent gaps or uneven edges.
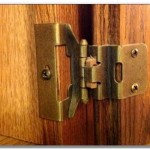
Attachment Methods: Bottom trim can be attached to the cabinets using several methods, including nails, screws, and adhesive. For wood or MDF trim, finish nails or brad nails are commonly used. For PVC trim, screws or construction adhesive may be more appropriate. Ensure that the fasteners are properly countersunk to prevent them from being visible. Using a combination of adhesive and fasteners can provide a more secure and long-lasting attachment.
Sealing and Finishing: After installation, seal any gaps or seams with caulk to prevent moisture penetration and create a smooth, finished look. Caulk should be paintable and applied carefully to avoid unsightly runs or blobs. Once the caulk is dry, paint or stain the trim to match the cabinets or complement the overall kitchen design. Apply multiple coats for a durable and even finish.
Leveling Considerations: Ensure that the floor is level before installing the bottom trim. If the floor is uneven, shims may be necessary to create a level surface for the trim. Use a level to check the alignment of the trim and adjust as needed. A slightly uneven floor can create noticeable gaps if the trim is installed without proper leveling.
Toe-Kick Recess Depth: The depth of the toe-kick recess should be considered when selecting the width of the bottom trim. The trim should be wide enough to completely cover the recess without protruding excessively beyond the cabinet base. Consult the cabinet manufacturer's specifications for recommended trim dimensions.
Ventilation: In some cases, it may be necessary to incorporate ventilation into the bottom trim design. This is particularly important for cabinets that house appliances like dishwashers or refrigerators, which generate heat. Ventilation can be achieved by adding small grilles or perforations to the trim to allow for airflow.
Professional Installation: While installing bottom trim can be a DIY project, complex installations or custom designs may require the expertise of a professional carpenter or cabinet installer. A professional can ensure that the trim is properly installed, leveled, and finished for a seamless and long-lasting result.
Careful consideration of these factors will contribute to a finished kitchen space that combines functional durability with aesthetic appeal. Selecting the right trim, material type, and installation method will ensure the kitchen is both beautiful and long-lasting.

Easy And Inexpensive Cabinet Updates The 15 Minute Fix Adding Trim To Bottom Of Cabinets Rozy Home Kitchen Update

Adding Moldings To Your Kitchen Cabinets Remodelando La Casa

7 Types Of Cabinet Moldings And How To Use Them Properly

How To Get A Custom Cabinet Look Using Trim Sincerely Marie Designs

Moldings Finish And Trim With Gary Striegler Part 14

Easy And Inexpensive Cabinet Updates The 15 Minute Fix Adding Trim To Bottom Of Cabinets Rozy Home

Diy Cabinet End Panels With Shaker Style Trim Average But Inspired

What Is Furniture Base Molding For Cabinets And How To Use It

Easy And Inexpensive Cabinet Updates The 15 Minute Fix Adding Trim To Bottom Of Cabinets Rozy Home Update Remodeling Renovation

3 Types Of Kitchen Cabinet Moldings Wood Factory
Related Posts