Painting Laminate Kitchen Cabinets: A Comprehensive Guide
Laminate kitchen cabinets, a popular and cost-effective choice for many homeowners, often present a challenge when it comes to renovation. Unlike solid wood, laminate surfaces are non-porous and designed to resist paint adhesion. However, with proper preparation and the right techniques, achieving a professional-looking painted finish on laminate cabinets is entirely feasible, offering a budget-friendly alternative to complete replacement.
The key to a successful laminate cabinet painting project lies in meticulous preparation. This involves thoroughly cleaning the cabinets, sanding the glossy surface to create a key for the primer, and applying a high-quality bonding primer specifically formulated for non-porous surfaces. Choosing the right type of paint and applying it in thin, even coats are also crucial for achieving a durable and attractive finish. This article will outline the essential steps involved in painting laminate kitchen cabinets, providing guidance on materials, techniques, and troubleshooting to ensure a professional and lasting result.
Key Point 1: Preparing Laminate Cabinets for Painting
Proper preparation is the most critical stage in painting laminate cabinets. A poorly prepared surface will inevitably lead to paint peeling, chipping, or uneven coverage, negating the time and effort invested in the project. The preparation process includes cleaning, sanding, and priming, each step playing a vital role in ensuring proper paint adhesion.
The first step is a thorough cleaning. Grease, grime, and dirt are common in kitchens and can significantly hinder paint adhesion. Use a strong degreasing cleaner, such as trisodium phosphate (TSP) or a commercially available kitchen degreaser, to remove all contaminants from the cabinet surfaces. Follow the manufacturer's instructions carefully, and rinse the cabinets thoroughly with clean water to remove any residue from the cleaning solution. Allow the cabinets to dry completely before proceeding to the next step.
Sanding laminate cabinets is essential to create a rough surface that the primer can grip. Laminate is a smooth, non-porous material, so sanding is necessary to provide the mechanical adhesion required for the paint to bond correctly. Use 120-grit sandpaper to lightly scuff the entire surface of the cabinets. Focus on creating a uniform, matte finish rather than removing the laminate layer itself. Avoid excessive pressure, as this can damage the laminate. After sanding, remove all sanding dust with a tack cloth or a damp cloth. Repeat the cleaning process if necessary to ensure a dust-free surface.
Priming is the final and arguably the most important step in preparing laminate cabinets for painting. A high-quality bonding primer is specifically designed to adhere to non-porous surfaces like laminate. These primers contain special resins that create a strong bond between the laminate and the subsequent layers of paint. Apply the primer according to the manufacturer's instructions, using a brush, roller, or sprayer, depending on the product and your preference. Ensure that the primer is applied in a thin, even coat, avoiding drips or runs. Allow the primer to dry completely, following the recommended drying time specified by the manufacturer. A second coat of primer may be necessary for optimal adhesion, especially on cabinets with a particularly glossy or smooth surface. Lightly sand the primed surface with fine-grit sandpaper (220-grit or higher) to smooth out any imperfections before applying the paint.
Key Point 2: Choosing the Right Paint for Laminate Cabinets
Selecting the appropriate paint is crucial for achieving a durable and aesthetically pleasing finish on laminate cabinets. While various types of paint can be used, some are better suited for laminate surfaces than others. Factors to consider include adhesion, durability, ease of application, and desired finish.
Acrylic latex paint is a popular choice for painting kitchen cabinets, including those made of laminate. Acrylic latex paints offer good adhesion, durability, and cleanability. They are also water-based, making them low in VOCs (volatile organic compounds) and easier to clean up. When selecting acrylic latex paint for laminate cabinets, choose a high-quality product specifically formulated for kitchen and bathroom use. These paints are typically more resistant to moisture, grease, and stains, making them ideal for the demanding environment of a kitchen.
Alkyd paint, also known as oil-based paint, is another option for painting laminate cabinets. Alkyd paints offer excellent adhesion and durability, creating a hard, enamel-like finish that is resistant to scratches and chipping. However, alkyd paints have several drawbacks compared to acrylic latex paints. They contain higher levels of VOCs, requiring better ventilation during application and drying. They also require mineral spirits for cleanup, which can be more cumbersome than water-based cleanup. Alkyd paints also tend to yellow over time, especially in areas with limited sunlight exposure. Therefore, alkyd paints are generally not recommended for painting laminate cabinets unless a particularly durable and scratch-resistant finish is required.
Specialty cabinet paints are becoming increasingly popular for painting kitchen cabinets. These paints are formulated specifically for cabinets and offer enhanced adhesion, durability, and ease of application. They are often self-leveling, meaning they flow smoothly and minimize brushstrokes or roller marks. Specialty cabinet paints are available in both acrylic latex and alkyd formulations, allowing you to choose the best option based on your preferences and project requirements. Regardless of the type of paint chosen, it is essential to select a product with a sheen level that suits your aesthetic preferences. Satin or semi-gloss finishes are commonly used for kitchen cabinets, as they offer a balance of durability and ease of cleaning.
Key Point 3: Applying Paint to Laminate Cabinets for a Professional Finish
The application process is just as important as the preparation and paint selection stages. Proper application techniques ensure a smooth, even finish that is free from brushstrokes, roller marks, or drips. Key aspects of the application process include using the correct tools, applying thin coats, and allowing sufficient drying time between coats.
The choice of applicators significantly impacts the final result. For most laminate cabinet painting projects, a combination of brushes and rollers is recommended. Use a high-quality angled brush for painting recessed areas, corners, and trim. Opt for a fine-finish roller with a short nap (1/4 inch or less) for painting the flat surfaces of the cabinet doors and frames. This will minimize stippling and create a smoother finish. A paint sprayer can also achieve a professional-looking finish, especially for larger projects with many cabinet doors. However, using a paint sprayer requires more skill and experience, as well as proper ventilation and safety precautions.
Applying thin, even coats of paint is crucial for achieving a durable and attractive finish. Multiple thin coats are always preferable to a single thick coat, as thick coats are more prone to drips, runs, and uneven drying. Apply the paint in long, even strokes, overlapping each stroke slightly to ensure complete coverage. Avoid applying excessive pressure to the brush or roller, as this can create brushstrokes or roller marks. If using a paint sprayer, maintain a consistent distance from the cabinet surface and use a smooth, even motion to apply the paint. Allow each coat of paint to dry completely before applying the next coat, following the manufacturer's recommended drying time. Lightly sand between coats with fine-grit sandpaper (220-grit or higher) to smooth out any imperfections and improve adhesion.
Curing is the final stage of the painting process and is often overlooked. Curing refers to the time it takes for the paint to fully harden and reach its maximum durability. While the paint may feel dry to the touch after a few hours, it can take several days or even weeks for it to fully cure. During the curing process, avoid putting the cabinets back together or subjecting them to heavy use. Protect the painted surfaces from scratches, dents, and moisture. Allow ample ventilation to facilitate the curing process. Following the manufacturer's recommendations for curing time is essential for achieving a long-lasting and durable finish on your laminate kitchen cabinets.

How To Paint Laminate Kitchen Cabinets Perfect Finish Tips

How To Paint Laminate Cabinets The Interiors Addict

How To Paint Laminate Cabinets Everything You Need Know

How To Paint Kitchen Cabinets Like The Pros

How To Paint Laminate Kitchen Cabinets Perfect Finish Tips

Painting Laminate Cupboards Crowies Paints

What Is The Best Way To Use Appliance Paint On Laminated Kitchen Cabinets

How To Paint Laminate Kitchen Cabinets Angela Marie Made

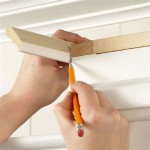
How To Add Trim And Paint Your Laminate Cabinets

How To Paint Laminate Kitchen Cabinets Eatwell101
Related Posts