Kitchen Cabinets Restaining Oak: A Comprehensive Guide
Oak kitchen cabinets, prized for their durability and distinctive grain patterns, are a staple in many homes. Over time, however, the existing stain may fade, become outdated, or simply no longer suit the homeowner's aesthetic preferences. Restaining oak cabinets offers an affordable and effective way to refresh the kitchen's appearance without the expense and disruption of a complete cabinet replacement. This guide provides a comprehensive overview of the process, from preparation to finishing, ensuring a successful restaining project.
Key Point 1: Preparing Oak Cabinets for Restaining
Proper preparation is paramount for achieving a professional-looking restained finish. Neglecting this step can lead to uneven stain absorption, poor adhesion, and ultimately, an unsatisfactory result. The preparation process involves several critical steps:
1. Removal and Organization: Begin by removing all cabinet doors and drawers. Label each door and drawer to correspond with its cabinet opening. This ensures accurate reinstallation after the restaining process. Remove all hardware, including knobs, pulls, hinges, and any other attached accessories. Store the hardware in labeled containers to prevent loss or misplacement.
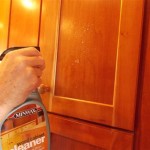
2. Thorough Cleaning: Years of accumulated grease, grime, and food splatters can prevent the new stain from properly adhering. Use a strong degreasing cleaner specifically formulated for kitchen cabinets. Apply the cleaner according to the manufacturer's instructions, paying close attention to areas around handles and hinges where grease is likely to accumulate. Rinse thoroughly with clean water and allow the cabinets to dry completely.
3. Sanding: Sanding is essential for creating a smooth, receptive surface for the new stain. Use a medium-grit sandpaper (120-150 grit) to remove the existing finish and any surface imperfections. Sand with the grain of the wood to avoid creating unsightly scratches. After the initial sanding, switch to a finer-grit sandpaper (220 grit) to further refine the surface. This step helps to achieve a more even stain absorption and a smoother final finish. For intricate details, use sanding sponges or detail sanders. Pay particular attention to corners and edges to ensure a consistent level of sanding throughout the cabinet surfaces.
4. Dust Removal: After sanding, thoroughly remove all sanding dust. Use a vacuum cleaner with a brush attachment to remove the bulk of the dust. Follow this with a tack cloth to pick up any remaining fine particles. A tack cloth is a sticky cloth specifically designed to remove dust without leaving behind any residue. Ensure all surfaces are completely dust-free before proceeding to the next step.
5. Repairing Imperfections: Inspect the cabinets for any dents, scratches, or other imperfections. Use wood filler to fill any imperfections. Allow the wood filler to dry completely according to the manufacturer’s instructions. Once dry, sand the filled areas smooth to blend seamlessly with the surrounding wood. Remove any dust created during the sanding process.
Key Point 2: Stain Selection and Application
Choosing the right stain and applying it correctly are crucial for achieving the desired aesthetic and ensuring a durable finish. The selection process should consider the existing wood tone, the desired color, and the type of stain.
1. Stain Selection: Selecting the appropriate stain is crucial. Gel stains are often preferred for oak because they tend to sit on the surface, highlighting the grain patterns. Oil-based stains penetrate the wood more deeply and offer excellent durability. Water-based stains are low-odor and easy to clean up but may require more coats to achieve the desired color depth. Consider testing different stain colors on a hidden area of the cabinet or a piece of scrap wood to ensure the desired outcome. Factors such as the existing wood tone and the amount of light in the kitchen should influence the color choice.
2. Stain Application Techniques: Apply the stain evenly using a high-quality brush, foam brush, or clean rag. Work in manageable sections, following the grain of the wood. Avoid applying too much stain at once, as this can lead to uneven color and blotching. Allow the stain to penetrate the wood for the recommended time specified by the manufacturer. Use a clean rag to wipe off any excess stain. Wiping off the excess is critical for achieving the desired color depth and preventing a sticky or uneven finish. The longer the stain remains on the surface, the darker the resulting color will be. Experiment with different dwell times on a test piece to determine the optimal application time.
3. Multiple Coats (If Necessary): Depending on the desired color intensity, multiple coats of stain may be required. Allow each coat to dry completely according to the manufacturer's instructions before applying the next coat. Lightly sand between coats with a fine-grit sandpaper (320 grit) to ensure a smooth and even finish. Remember to remove all sanding dust before applying the next coat of stain.
4. Controlling Grain Pop: Oak is a porous wood with a prominent grain. Restaining can sometimes exaggerate this grain, creating what's known as "grain pop." To minimize this, consider using a wood conditioner before staining. Wood conditioner seals the wood pores, preventing excessive stain absorption and promoting a more even color distribution. Apply the wood conditioner according to the manufacturer's instructions, allow it to dry completely, and lightly sand the surface before applying the stain.
5. Safety Precautions: When working with stains, it is essential to take appropriate safety precautions. Work in a well-ventilated area to avoid inhaling harmful fumes. Wear gloves to protect skin from irritation and staining. Wear eye protection to prevent splashes. Dispose of used rags properly, as they can be a fire hazard. Follow all safety instructions provided by the stain manufacturer.
Key Point 3: Sealing and Protecting the Restained Oak Cabinets
Applying a protective topcoat is essential for preserving the restained finish and protecting the cabinets from daily wear and tear. The topcoat provides a barrier against moisture, scratches, and stains, extending the life of the restained finish.
1. Choosing a Topcoat: Several types of topcoats are available, each with its own advantages and disadvantages. Polyurethane is a durable and water-resistant option that provides excellent protection against scratches and stains. It is available in oil-based and water-based formulations. Oil-based polyurethane offers a warmer tone and is more durable, while water-based polyurethane is low-odor and dries faster. Varnish provides a more traditional look and is relatively easy to apply, but it is not as durable as polyurethane. Lacquer dries quickly and provides a smooth, glossy finish, but it is less durable and requires specialized spray equipment for application. Consider the desired level of durability, the ease of application, and the appearance of the finish when selecting a topcoat.
2. Topcoat Application: Apply the topcoat in thin, even coats using a high-quality brush, foam brush, or spray gun. Avoid applying too much topcoat at once, as this can lead to drips and runs. Allow each coat to dry completely according to the manufacturer's instructions before applying the next coat. Lightly sand between coats with a fine-grit sandpaper (320-400 grit) to ensure a smooth and even finish. Remove all sanding dust before applying the next coat of topcoat. Multiple coats of topcoat provide better protection and durability than a single thick coat.
3. Sanding Between Coats: Light sanding between coats of the topcoat is important to remove any imperfections and create a smooth surface for the next coat to adhere to. This process, known as “de-nibbing,” involves using a very fine-grit sandpaper (320-400 grit) to lightly smooth the surface. Be careful not to sand through the previous coat of topcoat. The goal is simply to remove any dust particles or imperfections that may have settled on the surface. Remove all sanding dust with a tack cloth before applying the next coat.
4. Curing Time: Allow the topcoat to cure completely before reinstalling the hardware and reattaching the cabinet doors and drawers. Curing time is the period it takes for the topcoat to fully harden and reach its maximum durability. The manufacturer's instructions will specify the recommended curing time. Prematurely reinstalling the hardware or using the cabinets before the topcoat is fully cured can damage the finish.
5. Reinstallation: Once the topcoat is fully cured, carefully reinstall the hardware and reattach the cabinet doors and drawers. Use the labels created during the removal process to ensure that each door and drawer is reinstalled in its correct location. Tighten all screws securely but avoid over-tightening, which can damage the wood. Inspect the finished cabinets for any imperfections or areas that may require touch-up. Address any issues promptly to ensure a long-lasting and professional-looking finish.
By following these detailed steps, homeowners can successfully restain their oak kitchen cabinets, transforming the look of their kitchen without the need for costly replacements. Patience and attention to detail are essential for achieving a professional-looking and durable finish that will enhance the beauty and value of the home.

Diy Staining Oak Cabinets Eclectic Spark

Tips Tricks To Paint Honey Oak Kitchen Cabinets Cottage Living And Style

Refinishing Kitchen Cabinets Modern Refacing Made Easy Wisewood

Staining Your Wood Cabinets Darker Young House Love

Restaining Kitchen Cabinets Pictures Options Tips Ideas

Kitchen Cabinet Makeover 2 Coats Of Minwax Polyshade Tudor Satin On Cabinets Restaining Oak

Diy Painted Oak Kitchen Cabinets Makeover

Painting Oak Kitchen Cabinets Jaworski

Cabinet Refinishing Guide

Refinishing Golden Oak Cabinets Pinnacle Homes Inc
Related Posts