Kitchen Wall Unit Fixing Height: A Comprehensive Guide
Determining the correct fixing height for kitchen wall units is a crucial aspect of kitchen design and installation. This height impacts not only the aesthetic appeal of the kitchen but also significantly influences its functionality and user ergonomics. Improper placement can lead to difficulties in accessing items, potential safety hazards, and an overall unpleasant kitchen experience. This article delves into the factors that influence the ideal fixing height for kitchen wall units, providing a comprehensive understanding of the considerations involved in achieving optimal results.
The standard practice often revolves around adhering to established guidelines; however, a truly bespoke kitchen design requires careful evaluation of individual needs and kitchen dimensions. This involves considering the height of the users, the depth of the base cabinets, the type of worktops installed, and the overall design style envisioned for the space. By understanding these interdependencies, individuals can make informed decisions that result in a kitchen that is both beautiful and ergonomically sound.
Understanding Standard Measurement Practices
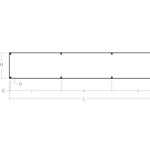
The most commonly cited standard for kitchen wall unit fixing height places the bottom edge of the wall unit approximately 48 to 54 inches (122 to 137 cm) above the finished floor. This measurement is generally predicated on a standard base cabinet height of 36 inches (91 cm), which includes the cabinet carcass, legs, and countertop. With this configuration, a gap of 12 to 18 inches (30 to 46 cm) is created between the countertop and the bottom of the wall unit. This gap is intended to provide adequate workspace and prevent users from feeling cramped while working at the countertop.
It's important to recognize that these measurements are merely guidelines. The ideal height may vary depending on specific circumstances. Kitchen design professionals frequently adjust these dimensions to accommodate varying ceiling heights, user preferences, and appliance placements. For example, in kitchens with lower ceilings, the wall units may need to be mounted slightly lower to maintain a visually balanced aesthetic and ensure accessibility. Conversely, in kitchens with high ceilings, raising the wall units might be desirable to maximize storage space and create a more proportional appearance.
Furthermore, the depth of the wall unit cabinets themselves can influence the perceived "crowdedness" of the workspace. Deeper wall units can make a kitchen feel smaller, especially if the gap between the countertop and the unit is at the lower end of the recommended range. In such cases, increasing the gap may be necessary to create a more open and comfortable working environment. It's also vital to consider the presence of under-cabinet lighting, which requires adequate vertical space for installation and functionality.
Factors Influencing Wall Unit Height
Several factors dictate the optimal height for fixing kitchen wall units. These factors should be carefully considered before commencing the installation process to ensure a functional and visually appealing kitchen design. Ignoring these factors can lead to user dissatisfaction and costly rework.
User Height and Accessibility: The height of the primary users of the kitchen is arguably the most crucial factor. Individuals of shorter stature may find it difficult to reach items stored in wall units mounted at the standard height. Conversely, taller individuals may find the standard height uncomfortable, requiring them to bend over excessively to access items. To address these concerns, it's beneficial to conduct usability tests, simulating common kitchen tasks, to determine the most comfortable and accessible height for the wall units. This may involve adjusting the height based on the user's reach and ergonomic considerations. In households with multiple users of varying heights, a compromise may be necessary, prioritizing the needs of the most frequent user or opting for adjustable shelving within the wall units to accommodate different reach preferences.
Kitchen Layout and Design Style: The overall layout of the kitchen and the desired design style also play a significant role. In galley kitchens, where space is often limited, careful consideration must be given to the placement of wall units to avoid creating a cramped or claustrophobic feel. In open-plan kitchens, the height of the wall units may need to be coordinated with other elements in the space, such as shelving or decorative features, to create a cohesive and visually balanced aesthetic. The design style, whether contemporary, traditional, or minimalist, can also influence the perceived appropriateness of different wall unit heights. For example, in minimalist kitchens, a streamlined and uncluttered look may be achieved by mounting the wall units higher, creating a greater sense of openness.
Appliance Integration: The presence and placement of appliances, such as range hoods and microwaves, must be taken into account when determining the fixing height of wall units. A range hood, for example, typically requires specific clearance above the cooktop to ensure proper ventilation. This clearance can influence the height at which adjacent wall units are mounted. Similarly, if a microwave is to be integrated into the wall units, the dimensions of the microwave and the surrounding cabinetry must be carefully considered to ensure a seamless and functional installation. The height of these appliances should be factored into the overall wall unit placement to maintain a consistent visual line and prevent obstructions.
Installation Techniques and Considerations
Once the ideal fixing height for the kitchen wall units has been determined, the installation process requires careful attention to detail. Precise measurements, proper leveling, and secure anchoring are essential to ensure the stability and longevity of the installation. Rushing the installation process or neglecting these key steps can lead to structural problems and potential safety hazards.
Before commencing the installation, it's crucial to locate and mark the wall studs. Wall studs provide the necessary support for securely mounting the wall units. Using a stud finder, accurately locate the studs and mark their positions on the wall. These markings will serve as anchor points for the mounting hardware. If wall studs are not ideally positioned, additional support, such as blocking or plywood backing, may be required to provide adequate anchoring. In such cases, consulting with a qualified professional is recommended to ensure the structural integrity of the installation.
Leveling is another critical aspect of the installation process. Using a level, ensure that the top edge of the first wall unit is perfectly horizontal. This will serve as a reference point for installing the remaining units. Any deviations from level can result in misaligned cabinets and a visually unappealing outcome. Shims can be used to make minor adjustments and ensure that the wall units are perfectly level. It's also important to check the plumb of the wall, as uneven walls can affect the alignment of the cabinets. In cases of significant wall irregularities, professional assistance may be required to correct the surface before proceeding with the installation.
Proper anchoring is essential for the safety and stability of the wall units. Use appropriate mounting hardware, such as heavy-duty screws and wall anchors, to secure the wall units to the wall studs. The type of wall anchor will depend on the wall material (e.g., drywall, plaster, concrete). Ensure that the screws are long enough to penetrate the wall studs sufficiently to provide a secure hold. Over-tightening the screws can damage the wall studs or the cabinets, so exercise caution during this step. After securing each wall unit, double-check its stability by gently pushing and pulling on it. If there is any movement or wobble, adjust the anchoring as needed to ensure a solid and secure installation.
Finally, consider the aesthetic details of the installation. Gaps between the wall units and the wall, or between adjacent wall units, can detract from the overall appearance of the kitchen. Use filler strips or caulk to fill any gaps and create a seamless and professional-looking finish. Ensure that the screws and mounting hardware are concealed or covered with decorative caps to maintain a clean and uncluttered aesthetic. Attention to these details will elevate the overall quality of the kitchen design and create a space that is both functional and visually appealing.
By carefully considering these factors and following these installation techniques, individuals can successfully determine and implement the ideal fixing height for their kitchen wall units, resulting in a kitchen that is both beautiful and ergonomically optimized.

What Gap Do I Need Between The Worktop And Bottom Of Wall Units

How To Install Kitchen Cabinets The Wall And Floor With Ease

How High To Hang Kitchen Cabinets On Wall

What Should Your Cabinets Height From The Floor Be Metropolitan

What Height Should Kitchen Wall Units Be

Kitchen Cabinet Sizes What Are Standard Dimensions Of Cabinets

How To Install Wall Cabinets The Home Depot

What To Know About Installing Kitchen Cabinets And Drawers Remodeling 101 Remodelista

Wall Units Kitchen Diy Kitchens

Goodhome White Wall Hanging Bracket Kit W 175mm Diy At B Q
Related Posts