Light Grey Distressed Kitchen Cabinets DIY: A Guide to Achieve a Stylish and Rustic Look
Light grey distressed kitchen cabinets offer a unique blend of modern elegance and rustic charm. The subtle grey hue provides a clean backdrop while the distressed finish adds a touch of vintage character. Achieving this look through a DIY project is a rewarding experience that can transform the heart of your home while saving on professional costs. This guide provides a detailed breakdown of the process, covering everything from preparation to finishing touches.
Preparing for the Transformation:
Before diving into the distressing process, proper preparation is key. Begin by removing all cabinet doors and hardware, and then thoroughly clean the surfaces with a degreaser. Sanding is essential to create a smooth base for the paint and to help the distressing effect later on. Use a fine-grit sandpaper (120-150 grit) for a smooth finish, followed by a medium-grit sandpaper (80-100 grit) for roughing up the surface. This rough texture allows the paint to adhere better.
Painting the Cabinets:
Choosing the right light grey paint is crucial for achieving your desired look. Opt for a high-quality paint that is specifically designed for cabinets. It should offer good coverage, durability, and a smooth finish. Apply two coats of the light grey paint, ensuring to let each coat dry completely before applying the next. Allow ample drying time between coats to prevent streaks or unevenness.
Distressing the Cabinets:
Distressing the cabinets is the most exciting part of the process. It adds depth and character, enhancing the rustic aesthetic. There are different methods for distressing, each offering a unique look. One common approach is to use sandpaper with varying grits. Start with a coarse-grit sandpaper (60-80 grit) to create deeper grooves and scratches, then switch to a finer-grit sandpaper (120-150 grit) for subtle distressing. Another method involves using a paint scraper or a wire brush for creating more prominent scratches and chipped edges.
For a more controlled distressed look, you can use a damp cloth or a sponge to selectively remove paint from specific areas. Aim for areas that would naturally wear over time, such as corners, edges, and around handles. You can also use a paint stripper to remove paint in certain areas, creating a more dramatic distressed effect.
Finishing Touches:
Once you're satisfied with the distressing, it's time to add finishing touches. You can apply a clear coat sealant to protect the paint and the distressed finish from wear and tear. Choose a sealant that offers a satin or matte finish to complement the rustic look. Avoid glossy finishes that can detract from the distressed effect.
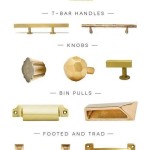
Consider replacing old cabinet hardware with new pieces that complement the distressed style. Antique-style handles or knobs can enhance the vintage aesthetic. You can also add a touch of color with decorative accents like floral or geometric patterns that can be painted or decoupaged onto the cabinet doors.
Light grey distressed kitchen cabinets create a beautiful and unique ambiance. By following this guide, you can transform your kitchen with a touch of rustic charm and a sense of personalized style without the need for professional help.

How To Use Distressed Kitchen Cabinets Stylize Your Home

Give Your Kitchen A Whole New Look Without Spending Thousands Of Dollars By Glazing C Cabinets Makeover Renovation Glazed

Cabinet Weathered Kitchen Cabinets Gray Black Distressed Painted Wood C Grey Designs Glazed

Distressed Kitchen Cabinets How To Distress Your

20 Distressed Kitchen Cabinets You Have To See Hunker

Grey Distressed Kitchen Cabinets Painting

Gray Stained Kitchen Cabinets Seasons Of Home Glazed Painted Grey

What Are The Color Choices For Distressed Kitchen Cabinets

Beautiful Diy Distressed Gray Chalk Paint Furniture Makeover Abbotts At Home

Beautiful Diy Distressed Gray Chalk Paint Furniture Makeover Abbotts At Home
Related Posts