Making A Kitchen Sink Base Cabinet
The kitchen sink base cabinet is a crucial element in any kitchen design. It provides the structural support for the sink, plumbing, and often, storage space for cleaning supplies. Constructing this cabinet requires careful planning, precise measurements, and a solid understanding of woodworking techniques. This article will outline the process of building a kitchen sink base cabinet, from material selection to final assembly.
Before embarking on the project, it's essential to consider the dimensions of the sink that will be installed. This will directly influence the overall size of the cabinet. Account for the sink's bowl depth, the faucet's height, and any under-sink plumbing connections. Additionally, consider the desired door or drawer configuration, and how this impacts the internal space available for storage.
Materials and Tools Required
Selecting the correct materials is paramount for a durable and long-lasting sink base cabinet. The most common material choices are plywood, medium-density fiberboard (MDF), and solid wood. Each has its own advantages and disadvantages that must be considered. Accurate tools are just as important to ensure cuts are precise and the project is assembled correctly.
Plywood: Plywood is a popular choice because of its strength, stability, and resistance to warping. It is available in a variety of thicknesses and grades. For cabinet construction, ¾-inch plywood is often recommended for the sides, bottom, and top, while ½-inch plywood can be used for the back. When selecting plywood, look for void-free varieties, particularly if the edges will be exposed.
MDF: MDF provides a smooth surface ideal for painting. It is less expensive than plywood, but also less resistant to moisture. Therefore, MDF is often used for cabinet doors and drawer fronts where painting is desired, and the risk of water damage is minimal. If choosing MDF, ensure it is sealed properly to prevent swelling from moisture.
Solid Wood: Solid wood offers a classic look and exceptional durability. However, it is more expensive than plywood or MDF and is prone to expansion and contraction with changes in humidity. Solid wood requires careful joinery to prevent warping or cracking over time. It is often used for face frames or decorative elements of the cabinet.
Hardware: Essential hardware includes screws, wood glue, hinges, drawer slides (if applicable), and cabinet pulls or knobs. Select high-quality hardware to ensure smooth operation and longevity.
Tools: The following tools are essential for building a kitchen sink base cabinet:
- Table saw or circular saw with a guide
- Miter saw
- Drill and driver
- Pocket-hole jig
- Measuring tape
- Square
- Clamps
- Sander
- Safety glasses
- Hearing protection
Cutting and Assembling the Cabinet Box
With the materials and tools ready, the next step involves cutting the components to the correct dimensions and assembling the main cabinet box.
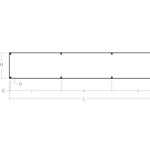
Cutting the Components: Refer to the plan and cutting list to accurately measure and cut the cabinet sides, bottom, top, and back. Use a table saw or circular saw with a guide to ensure straight and accurate cuts. If using a circular saw, a clamped straight edge will act as a reliable cutting guide.
Assembling the Sides and Bottom: Join the sides to the bottom using either screws and wood glue, or a pocket-hole joinery system. If using screws, pre-drill pilot holes to prevent the wood from splitting. Apply wood glue to the mating surfaces before driving in the screws. Clamps should be used to hold the pieces together while the glue dries. Pocket-hole joinery is a faster and more concealed method, using angled screws inserted into pre-drilled pockets.
Attaching the Top: Attach the top of the cabinet box in the same manner as the bottom, using screws and glue or pocket-hole joinery. Ensure the top is flush with the sides and that all corners are square. Clamps are crucial for a strong and accurate bond.
Installing the Back: The cabinet back provides structural support and a surface for attaching the cabinet to the wall. The back can be made from ½-inch plywood or solid wood. Attach the back to the cabinet box using screws and glue. Ensure the back is square and flush with the edges of the cabinet box.
Squaring the Cabinet: After assembling the cabinet box, check for squareness using a square. If the cabinet is not square, use clamps to adjust the corners until it is square. Secure the corners with screws or clamps and allow the glue to dry completely.
Adding a Face Frame (Optional): A face frame adds structural support and a decorative element to the cabinet. The face frame is typically made from solid wood and is attached to the front of the cabinet box using glue and nails or screws. The face frame can be flush with the cabinet sides or have a slight overhang.
Installing Doors, Drawers, and Plumbing Access
The final stages of constructing a kitchen sink base cabinet involve installing the doors, drawers (if included), and creating access for the plumbing.
Installing Doors: The type of hinges used will determine the method of door installation. Concealed hinges are a popular choice, offering a clean and modern look. Mortise the hinges into the door and cabinet frame, ensuring proper alignment and smooth operation. Adjust the hinges as needed to achieve the desired door alignment.
Installing Drawers (Optional): If the cabinet includes drawers, install drawer slides on the sides of the cabinet box and on the sides of the drawer boxes. Ensure the slides are properly aligned and secured with screws. Insert the drawer boxes into the slides and check for smooth operation. Install drawer fronts to the drawer boxes, aligning them with the cabinet doors. Drawer fronts can be attached with screws or adhesive.
Creating Plumbing Access: A crucial step is to create access holes for the sink's plumbing. This typically involves cutting holes in the back or bottom of the cabinet for the drainpipe, water supply lines, and potentially a garbage disposal power cord. Use a hole saw or jigsaw to carefully cut the holes to the required size. Ensure the holes are large enough to accommodate the plumbing lines, but not so large that they compromise the structural integrity of the cabinet.
Finishing and Installation: Once the cabinet is assembled, sand all surfaces smooth and apply a finish of choice. This could be paint, stain, or a clear coat. Ensure the finish is water-resistant and durable to withstand the rigors of a kitchen environment. After the finish has dried completely, install the cabinet in the kitchen. Secure the cabinet to the wall using screws and shims to ensure it is level and plumb.
Reinforcing the Cabinet Top: Given that the cabinet top is intended to support the weight of the sink, it's often beneficial to reinforce it, especially for heavier sinks. This can be achieved by adding cleats along the inside edges of the cabinet sides, providing additional support for the top. Apply wood glue and screw the cleats securely to the cabinet sides before attaching the cabinet top.
Sealing the Interior: The interior of the sink base cabinet is particularly vulnerable to moisture exposure. To protect the cabinet from water damage, consider sealing the interior surfaces with a water-resistant sealant or paint. This will help prevent water from seeping into the wood and causing swelling or rot. Pay particular attention to sealing the edges and corners of the cabinet.
Installing a Drip Tray: To further protect the cabinet from water damage, consider installing a drip tray beneath the sink. This tray will catch any leaks or spills from the sink or plumbing, preventing them from damaging the cabinet. Drip trays are available in various materials, such as plastic or metal, and can be easily installed using adhesive or screws.
Addressing Toe Kick: The toe kick is the recessed space at the bottom of the cabinet that allows for comfortable standing while working at the sink. The toe kick is usually built into the cabinet frame or can be created by recessing the bottom of the cabinet. The standard toe kick height is 3.5 inches, but can be adjusted to suit individual preferences. The toe kick can be finished with a separate piece of trim or can be integrated into the cabinet's face frame.
Ventilation: In some cases, it may be beneficial to provide ventilation within the sink base cabinet to prevent moisture buildup. This can be achieved by drilling small holes in the back or sides of the cabinet to allow air to circulate. Alternatively, a small vent can be installed in the cabinet door.

How To Build A Farmhouse Sink Base Cabinet Houseful Of Handmade

How To Build A Farmhouse Sink Base Cabinet Houseful Of Handmade

Kitchen Cabinet Sink Base 36 Full Overlay Face Frame Ana White

Euro Style Kitchen Sink Base Cabinet For Our Tiny House Ana White

Free Woodworking Plans To Build An Under Sink Base Cabinet The Design Confidential

How To Build A Kitchen Sink Base Cabinet

Kitchen Cabinet Sink Base 36 Full Overlay Face Frame Diy Cabinets Woodworking

How To Build Your Own Kitchen Sink Base Do It Yourself

How To Build A Kitchen Sink Base Cabinet

How To Build A Farmhouse Sink Base Cabinet Houseful Of Handmade
Related Posts