Moulding Kitchen Cabinet Doors: A Comprehensive Guide
Kitchen cabinets are a significant investment in any home, influencing both the functionality and aesthetic appeal of the kitchen space. The doors of these cabinets play a critical role in defining the overall style. One key element that elevates the design of kitchen cabinet doors is molding. Molding, refers to the decorative profiles applied to the edges or surfaces of the doors, adds depth, dimension, and visual interest. This article will delve into the various aspects of molding kitchen cabinet doors, covering materials, styles, application techniques, and considerations for achieving a professional and durable finish.
Choosing the right type of molding for kitchen cabinet doors requires careful consideration of several factors, including the desired aesthetic, the construction of the cabinet doors, and the overall budget. The material of the molding, the style of the profile, and the method of attachment all contribute to the final look and durability of the cabinets.
Key Considerations for Selecting Molding Materials
The selection of molding material significantly impacts the longevity, appearance, and cost of the kitchen cabinets. Common materials include wood, MDF (Medium-Density Fiberboard), and polymer-based options. Each material possesses unique characteristics that make it suitable for different applications.
Wood: Solid wood moldings are a traditional choice, offering a natural beauty and the ability to be stained or painted to match any kitchen décor. Hardwoods like maple, oak, and cherry are popular for their durability and distinct grain patterns. Softwoods like pine can also be used, especially for painted cabinets, but may be more susceptible to dents and scratches. Wood moldings are generally more expensive than other options and require careful sealing to prevent moisture damage, which can lead to warping or cracking.
MDF: Medium-Density Fiberboard (MDF) is an engineered wood product made from wood fibers combined with resin and compressed under high pressure and heat. MDF offers a smooth, consistent surface that is ideal for painting. It is less prone to warping or cracking than solid wood and is generally more affordable. MDF moldings are a good choice for painted cabinets, as they provide a uniform surface that accepts paint well. However, MDF is more susceptible to water damage than solid wood, so it is crucial to seal it properly, especially in areas prone to moisture exposure.
Polymer-Based Moldings: Polymer-based moldings, such as polyurethane or PVC, are resistant to moisture, insects, and rot, making them a durable option for kitchens. They are available in a wide range of profiles and can be painted to match any color scheme. Polymer moldings are lightweight and easy to install, making them a popular choice for both DIY enthusiasts and professional installers. While they are more expensive than MDF, their durability and resistance to moisture make them a worthwhile investment for kitchens where moisture is a concern.
Exploring Different Molding Styles and Profiles
The style of the molding plays a pivotal role in defining the overall aesthetic of the kitchen. From classic to contemporary, various molding profiles can be employed to create different design effects. Understanding the characteristics of each style is essential for achieving the desired look.
Traditional Moldings: Traditional molding styles are characterized by ornate details, intricate curves, and classical motifs. These profiles often include elements like crown molding, dentil molding, and rope molding. Crown molding is typically installed at the top of the cabinet doors, adding a sense of grandeur and formality. Dentil molding features a series of small, evenly spaced blocks, providing a textured and elegant detail. Rope molding, with its twisted rope-like pattern, adds a touch of sophistication. Traditional moldings are well-suited for kitchens with a classic or formal design.
Contemporary Moldings: Contemporary molding styles are characterized by clean lines, minimalist designs, and a focus on simplicity. These profiles often feature flat surfaces, sharp angles, and a lack of intricate details. Square edge moldings, bevel edge moldings, and simple cove moldings are common choices for contemporary kitchen cabinets. These sleek and understated profiles complement modern and minimalist kitchen designs, adding a touch of sophistication without overwhelming the space.
Shaker-Style Moldings: Shaker-style moldings are a popular choice for kitchen cabinets due to their simple yet elegant design. These moldings typically feature a flat center panel surrounded by a simple, square-edged frame. The clean lines and minimalist profile of Shaker-style moldings make them versatile and suitable for a wide range of kitchen styles, from traditional to contemporary. The emphasis on simplicity and functionality aligns with the principles of Shaker design, creating a timeless and understated look.
Ogee Moldings: Ogee moldings feature a distinctive S-shaped curve, adding a touch of elegance and sophistication to kitchen cabinets. This profile is often used in traditional and transitional kitchen designs, providing a subtle decorative element that complements various cabinet styles. The gentle curve of the ogee molding adds visual interest without being overly ornate, making it a versatile choice for enhancing the aesthetic appeal of kitchen cabinets.
Techniques for Applying Molding to Kitchen Cabinet Doors
The application method is crucial for ensuring a secure and aesthetically pleasing attachment of the molding to the cabinet doors. Proper techniques, including accurate measurements, precise cuts, and secure fastening, are essential for achieving a professional finish.
Measuring and Cutting: Accurate measurements are essential for achieving a seamless and professional look. Use a measuring tape and a square to ensure precise measurements of the cabinet door edges. When cutting the molding, use a miter saw to create accurate angles for the corners. A miter saw allows for precise angle cuts, ensuring that the molding pieces fit together seamlessly at the corners. Always double-check the measurements before cutting to avoid costly mistakes.
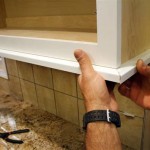
Adhesive and Fasteners: A combination of adhesive and fasteners is typically used to secure the molding to the cabinet doors. Construction adhesive provides a strong bond between the molding and the door surface. Apply a thin bead of adhesive to the back of the molding before positioning it on the door. In addition to adhesive, use finish nails or brad nails to secure the molding in place while the adhesive dries. The nails provide added strength and prevent the molding from shifting during the drying process. Ensure that the nails are countersunk to avoid protruding heads, which can detract from the overall appearance.
Filling and Sanding: After the molding is attached, fill any nail holes or gaps with wood filler. Allow the wood filler to dry completely before sanding it smooth with fine-grit sandpaper. Sanding helps to blend the wood filler seamlessly with the surrounding wood surface, creating a smooth and uniform finish. Use a sanding block to ensure a flat and even surface, avoiding any unevenness or ridges. Wipe away any dust with a tack cloth before proceeding to the finishing stage.
Finishing: The final step in the process is to finish the molding to match the rest of the kitchen cabinets. This may involve painting, staining, or applying a clear coat. If painting, apply a primer first to ensure proper adhesion and coverage. Use a high-quality paint that is specifically designed for wood or MDF surfaces. Apply multiple thin coats of paint, allowing each coat to dry completely before applying the next. If staining, choose a stain that complements the existing cabinetry. Apply the stain evenly with a brush or cloth, following the manufacturer's instructions. After the stain has dried, apply a clear coat to protect the finish and enhance its durability. A clear coat will help to resist scratches, stains, and moisture damage, ensuring that the molding maintains its appearance for years to come.
Properly applied and finished molding can dramatically enhance the look of kitchen cabinet doors, adding value and visual appeal to the entire kitchen space. The selection of appropriate materials, styles, and application techniques is vital for achieving a long-lasting and aesthetically pleasing result.

Add Moulding To Flat Cabinet Doors Home Kitchens Cabinets Kitchen

Kitchen Cabinet Doors With Applied Moulding By Allstyle

Adding Molding To Old Cabinets Diy Tutorial Kitchen Cabinet Doors

From Drab To Fab Adding Trim Cabinets

From Drab To Fab Adding Trim Cabinets

Adding Moldings To Your Kitchen Cabinets Remodelando La Casa

How To Add Trim And Paint Your Laminate Cabinets

Home Dzine Kitchen Add Moulding And Trim To Cabinets Kitchens Redo Remodel Idea

10 Types Of Kitchen Cabinet Molding For Your Home

Home Dzine Add Moulding And Trim To Cabinets Easy Upgrades Renovation
Related Posts