Old Kitchen Cabinets Before and After: A Transformation Guide
Kitchen cabinets often represent a significant investment within a home. Over time, even the most well-maintained cabinets can begin to show their age in the form of worn finishes, outdated styles, or simple incompatibility with evolving aesthetic preferences. Rather than undertaking a complete kitchen renovation, many homeowners opt to refinish or reface their existing cabinets. This approach allows for a significant visual upgrade at a fraction of the cost and with less disruption to daily life.
The decision to renovate existing cabinets requires careful consideration of the cabinet's structural integrity and the desired outcome. A thorough assessment will determine the feasibility of different renovation options, ranging from a simple coat of paint to a more comprehensive refacing project. Understanding the available options and the necessary steps is crucial for achieving a successful before and after transformation.
Assessing the Condition of Existing Cabinets
Before embarking on any renovation project, a comprehensive evaluation of the existing cabinets is essential. This assessment should focus on several key aspects, including the structural integrity of the cabinet boxes, the condition of the doors and drawer fronts, and the presence of any damage, such as water stains, warping, or insect infestations. If the cabinet boxes themselves are significantly damaged or structurally unsound, replacement may be the more practical option.
Assuming the cabinet boxes are in good condition, the next step is to evaluate the doors and drawer fronts. Are the hinges and hardware functioning properly? Are the doors warped or cracked? Is the existing finish peeling or heavily scratched? Minor damage can often be repaired, while more extensive damage may necessitate replacement doors and drawer fronts. The type of wood used also plays a role in determining the appropriate renovation approach. Solid wood cabinets are generally more durable and easier to refinish than cabinets made from particleboard or laminate.
The presence of lead paint is a further consideration, particularly in older homes. If lead paint is suspected, it is crucial to have the cabinets tested and to take appropriate safety precautions during the renovation process, including wearing appropriate protective gear and using specialized lead-safe cleaning and stripping products. Failure to do so can pose serious health risks.
Refinishing vs. Refacing: Choosing the Right Approach
Once the condition of the cabinets has been assessed, the next step is to decide between refinishing and refacing. These two approaches offer different levels of transformation and involve varying degrees of effort and expense.
Refinishing involves stripping the existing finish from the cabinet doors, drawer fronts, and exposed cabinet boxes, then sanding and preparing the surfaces for a new coat of paint or stain. This option is best suited for cabinets that are structurally sound and have a desirable style, but simply need a fresh coat of paint or a color change. Refinishing allows for a significant visual upgrade without altering the underlying structure or design of the cabinets.
Refacing, on the other hand, is a more comprehensive approach that involves replacing the cabinet doors and drawer fronts with new ones, and then applying a veneer to the exposed cabinet boxes to match the new doors. This option is ideal for cabinets that are structurally sound but have outdated doors or drawer fronts, or when a more dramatic style change is desired. Refacing allows for a complete transformation of the cabinets' aesthetic without the expense and disruption of a full replacement.
The choice between refinishing and refacing will depend on several factors, including the budget, the desired level of transformation, and the condition of the existing cabinets. Refinishing is generally the more affordable option, while refacing offers a more dramatic change and can address issues with outdated door styles or damaged drawer fronts.
Steps Involved in a Cabinet Refinishing Project
A successful cabinet refinishing project requires careful planning and execution. The following steps outline the typical process involved:
Preparation: This is arguably the most important step in the refinishing process. It involves removing the cabinet doors and drawer fronts, removing all hardware (hinges, knobs, pulls), and thoroughly cleaning the surfaces to be refinished. Degreasing is particularly important, as grease and grime can prevent the new finish from adhering properly.
Stripping: The existing finish must be removed from the cabinet doors, drawer fronts, and exposed cabinet boxes. This can be accomplished using chemical strippers, sanding, or a combination of both. Chemical strippers are effective at removing multiple layers of paint or varnish, but they require careful handling and proper ventilation. Sanding is a more labor-intensive option, but it allows for greater control and precision. For cabinets with intricate detailing, a combination of both methods may be necessary.
Sanding: After stripping, the surfaces must be sanded smooth to create a suitable base for the new finish. Start with a coarser grit sandpaper (e.g., 120-grit) to remove any remaining residue or imperfections, then gradually move to finer grits (e.g., 220-grit) to achieve a smooth, even surface. Sanding should be done in the direction of the wood grain to avoid creating unsightly scratches.
Priming: Applying a primer is essential for ensuring proper adhesion of the new finish and for blocking stains from bleeding through. Choose a high-quality primer that is compatible with the type of paint or stain being used. Apply the primer in thin, even coats, allowing it to dry completely between coats. Sand lightly with fine-grit sandpaper after each coat of primer to create a smooth surface for the final finish.
Painting or Staining: Once the primer is dry, the cabinets are ready to be painted or stained. If painting, apply several thin coats of paint, allowing each coat to dry completely before applying the next. For a more durable finish, consider using a paint specifically designed for cabinets and trim. If staining, apply the stain evenly and wipe off any excess with a clean cloth. Allow the stain to dry completely before applying a clear topcoat to protect the finish.
Sealing: Applying a clear topcoat is crucial for protecting the painted or stained finish and making it more durable and resistant to scratches, stains, and moisture. Choose a topcoat that is compatible with the type of paint or stain being used. Apply the topcoat in thin, even coats, allowing it to dry completely between coats. Sand lightly with fine-grit sandpaper after each coat of topcoat to create a smooth, flawless finish.
Reassembly: Once the paint or stain and topcoat are completely dry, the hardware can be reinstalled, and the cabinet doors and drawer fronts can be reattached to the cabinet boxes. Ensure that all screws and hinges are tightened securely. Replace any damaged or worn hardware to complete the renovation.
Considerations for a Cabinet Refacing Project
Cabinet refacing projects involve a slightly different set of steps than refinishing. While the cabinet boxes still require thorough cleaning and preparation, the focus shifts to selecting and installing new doors, drawer fronts, and veneer.
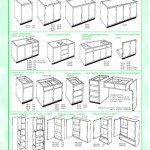
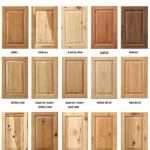
Selecting New Doors and Drawer Fronts: This is a crucial step in the refacing process, as the new doors and drawer fronts will determine the overall aesthetic of the kitchen. Consider the style of the kitchen and choose doors and drawer fronts that complement the existing décor. There are a wide variety of styles available, from traditional raised-panel designs to sleek, modern flat-panel doors. The material is also an important consideration. Solid wood doors are generally more durable and have a higher-quality appearance than laminate or MDF doors.
Applying Veneer: Once the new doors and drawer fronts have been selected, the next step is to apply veneer to the exposed cabinet boxes to match the new doors. Veneer is a thin layer of wood or laminate that is applied to the surface of the cabinet boxes using adhesive. It is important to choose a veneer that is the same color and grain as the new doors to create a seamless, cohesive look. The veneer should be carefully applied to avoid air bubbles or wrinkles.
Installation: Installing the new doors and drawer fronts is the final step in the refacing process. Ensure that the hinges and hardware are properly aligned and that the doors and drawers open and close smoothly. Replace any worn or damaged hardware to complete the renovation.
Professional Installation vs. DIY: Both refinishing and refacing projects can be undertaken as DIY endeavors; however, a professional installation is often recommended, particularly for more complex projects. Professionals have the experience and expertise to ensure a high-quality finish and to avoid common mistakes that can lead to costly repairs. If attempting a DIY project, thorough research and careful planning are essential to achieving a successful outcome.
Ultimately, transforming old kitchen cabinets into a refreshed and modern space breathes new life into the heart of the home. By understanding the options available and paying close attention to detail, homeowners can achieve a dramatic and aesthetically pleasing before and after result.

15 Diy Kitchen Cabinet Makeovers Before After Photos Of Cabinets

Painted Cabinets Nashville Tn Before And After Photos

9 Inspiring Kitchen Cabinet Makeovers Before And After Remodel Small Builder Grade Renovation

Here S How To Spray Paint Kitchen Cabinets Old New Before And After

Mind Blowing Kitchen Cabinet Refacing Before And After Results In Just 3 Days

Painted Cabinets Nashville Tn Before And After Photos

Are Your Kitchen Cabinets Dated Before After Photos The Purple Painted Lady

How To Clean Kitchen Cabinets Everyday Skate

Kitchen Cabinet Colors Before After The Inspired Room

Are Your Kitchen Cabinets Dated Before After Photos The Purple Painted Lady
Related Posts