Essential Aspects of Old Kitchen Cabinets Makeover
Old kitchen cabinets can be a great way to update the look of your kitchen without breaking the bank. However, there are a few things you need to keep in mind when refinishing old kitchen cabinets to ensure that they look their best and last for years to come.
This article will discuss the essential aspects of old kitchen cabinets makeover, including:
- Cleaning and preparing the cabinets
- Choosing the right paint or stain
- Applying the finish
- Adding new hardware
By following these steps, you can give your old kitchen cabinets a new lease on life and create a beautiful, updated kitchen that you'll love for years to come.
Cleaning and preparing the cabinets
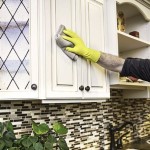
The first step in any kitchen cabinet makeover is to clean and prepare the cabinets. This will remove any dirt, grease, or grime that has accumulated over time and will help the new finish to adhere properly.
To clean the cabinets, use a mild detergent and water solution. Be sure to rinse the cabinets thoroughly with clean water and allow them to dry completely before proceeding.
Once the cabinets are clean, you need to prepare them for painting or staining. This involves sanding the cabinets to remove any rough edges or imperfections. You can sand the cabinets by hand or with an electric sander. Be sure to wear a dust mask when sanding to avoid inhaling any dust particles.
Choosing the right paint or stain
The next step is to choose the right paint or stain for your cabinets. There are a wide variety of paints and stains available, so you'll need to decide what look you want to achieve.
If you want a classic look, you can choose a white or cream paint. If you want a more modern look, you can choose a bold color like navy blue or black. You can also choose to stain your cabinets, which will give them a more natural look.
When choosing a paint or stain, be sure to consider the color of your kitchen walls and countertops. You want the cabinets to complement the rest of the kitchen and create a cohesive look.
Applying the finish
Once you have chosen the right paint or stain, it's time to apply the finish. If you are painting the cabinets, you will need to apply two coats of paint. Be sure to allow the first coat to dry completely before applying the second coat.
If you are staining the cabinets, you will need to apply one coat of stain. Be sure to follow the manufacturer's instructions for applying the stain.
Once the finish has been applied, you need to allow it to dry completely before using the cabinets. This will help to ensure that the finish is durable and will last for years to come.
Adding new hardware
The final step in your kitchen cabinet makeover is to add new hardware. This will give the cabinets a fresh, updated look and will help to complete the overall design.
There are a wide variety of hardware available, so you can choose the style that best suits your kitchen. You can choose from knobs, pulls, or handles in a variety of finishes. Be sure to choose hardware that is proportional to the size of your cabinets.
Once you have chosen the hardware, install it according to the manufacturer's instructions. Be sure to tighten the hardware securely so that it will not come loose over time.
By following these steps, you can give your old kitchen cabinets a new lease on life and create a beautiful, updated kitchen that you'll love for years to come.

How To Make Old Cabinets Look New With Paint

Roundup 10 Inspiring Kitchen Cabinet Makeovers Old Cabinets Makeover Styles

How To Paint Kitchen Cabinets Like The Pros

Budget Friendly Kitchen Makeover Ideas To Update Your

21 Diy Affordable Ways To Redo Kitchen Cabinets Extra Space Storage

26 Kitchen Makeovers With Before And After Photos Best Transformations Ever

15 Diy Kitchen Cabinet Makeovers Before After Photos Of Cabinets

Shaker Style Cabinet Door Makeover Diy Kitchen Remodel Cabinets

Kitchen Makeover On A Budget Refinishing Cabinets Ideas

Raised Kitchen Cabinet Makeover Sawdust 2 Stitches
Related Posts


