Paint Kitchen Cabinets With Chalk Paint: A Step-by-Step Guide
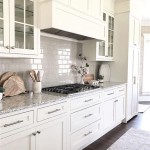
Chalk paint has become increasingly popular for transforming kitchen cabinets due to its ease of use, affordability, and the beautiful matte finish it creates. Unlike traditional latex or oil-based paints, chalk paint adheres well to most surfaces without the need for priming. This makes it an excellent option for revamping your kitchen cabinets without the time-consuming and costly process of removing the existing finish.
Materials You'll Need:
- Chalk paint in your desired color
- High-density foam roller (for smooth surfaces) or brush (for detailed areas)
- Chalk paint sealer
- Clean rags or cloths
- Sandpaper (optional, for distressing)
Step-by-Step Instructions:
- Clean and Prep the Cabinets: Remove all cabinet doors and hardware. Use a degreaser or denatured alcohol to clean the surfaces and remove any grease or grime.
- Apply Chalk Paint: Stir the chalk paint thoroughly. Apply a thin, even coat using a foam roller or brush, working in the direction of the wood grain. Allow the first coat to dry for several hours or overnight, depending on the manufacturer's instructions.
- Sand for Distress (Optional): If you want to create a distressed look, lightly sand the edges or areas where you want to show wear. Use fine-grit sandpaper and work gently.
- Apply Second Coat: Apply a second coat of chalk paint. This will help to ensure full coverage and a richer color.
- Seal the Finish: Once the paint is completely dry, apply a clear chalk paint sealer to protect the finish and make it more durable. Use a foam brush or roller to apply a thin, even coat. Allow the sealer to dry according to the manufacturer's instructions.
- Reassemble the Cabinets: After the sealer is dry, reattach the cabinet doors and hardware. Your newly painted kitchen cabinets are now ready to enjoy!
- Use high-quality chalk paint for best results.
- Stir the paint thoroughly before each use.
- Apply thin, even coats and allow ample drying time.
- Protect the newly painted cabinets from water and heat for several days after applying the sealer.
- For a more durable finish, consider applying multiple coats of sealer or a polyurethane topcoat.
Tips for Success:
Conclusion:
Painting kitchen cabinets with chalk paint is a straightforward and cost-effective way to refresh the look of your kitchen. By following these simple steps and using high-quality materials, you can achieve a professional-looking finish that will enhance the aesthetic appeal of your home.
Painting Kitchen Cabinets With Chalk Paint Simply Today Life

Chalk Painted Kitchen Cabinets 2 Years Later Our Storied Home

How 500 And Some Chalk Paint Totally Transformed This Kitchen

Why I Repainted My Chalk Painted Cabinets Sincerely Sara D Home Decor Diy Projects

Paint Your Kitchen Cabinets With Chalkboard Jessica Rayome

Why I Repainted My Chalk Painted Cabinets Sincerely Sara D Home Decor Diy Projects

Chalk Painted Kitchen Cabinets 2 Years Later Our Storied Home

Annie Sloan Chalk Paint Kitchen Cabinets A Créé Une Peintu Painting

Cabinet Painting Nashville Tn Kitchen Makeover

Step By Kitchen Cabinet Painting With Annie Sloan Chalk Paint Jeanne Oliver
Related Posts