Painting Wood Kitchen Cabinets Grey: A Comprehensive Guide
Grey has become a dominant color in interior design, prized for its versatility and sophisticated neutrality. Applying this color to kitchen cabinets can revitalize a space, offering a fresh aesthetic without the commitment of a bolder hue. This article provides a detailed guide on how to effectively paint wood kitchen cabinets grey, covering preparation, painting techniques, and considerations for achieving a professional finish.
Understanding the Appeal of Grey Cabinets
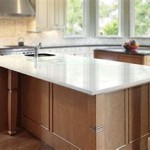
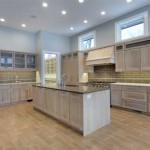
The popularity of grey kitchen cabinets stems from several factors. Grey serves as an excellent backdrop for various design styles, from modern minimalist to farmhouse chic. It complements a wide range of countertop materials, flooring options, and hardware finishes. Furthermore, the spectrum of grey shades allows for customization. Light greys can brighten a kitchen, while darker greys can add depth and drama. The neutral nature of grey also means it is less likely to clash with existing appliances or the overall color scheme of the surrounding rooms.
When considering grey, it is important to understand its undertones. Some greys lean towards warmer tones with hints of brown or beige ("greige"), while others are cooler with blue or green undertones. Selecting a grey that complements the existing lighting and other elements within the kitchen is crucial for a cohesive design. A warm grey can soften a space with warm lighting, while a cool grey can balance a kitchen with ample natural light.
Beyond aesthetics, grey is also considered a practical choice because it is generally more forgiving than white cabinets when it comes to showing dirt and fingerprints. While not a substitute for regular cleaning, grey cabinets can maintain a cleaner appearance for longer periods.
Preparation: The Foundation for a Professional Finish
Proper preparation is arguably the most important step in painting kitchen cabinets. Skimping on this stage will invariably result in a subpar finish, regardless of the quality of paint used. The preparation process involves cleaning, removing hardware, sanding, and priming.
The first step is thorough cleaning. Cabinets accumulate grease, grime, and food splatters over time. These contaminants prevent paint from adhering properly and can lead to peeling or chipping. A degreasing cleaner, specifically formulated for kitchen use, should be applied to all cabinet surfaces. Follow the manufacturer's instructions carefully and ensure all residue is removed with clean water and a lint-free cloth. Allow the cabinets to dry completely before proceeding.
Next, remove all hardware, including knobs, pulls, hinges, and any decorative elements. Label each piece of hardware and its corresponding cabinet door or drawer to ensure easy reinstallation. Store hardware in a safe place to prevent loss or damage. If replacing hardware, now is the ideal time to fill any existing holes with wood filler and sand them smooth once dry.
Sanding is crucial for creating a smooth surface and ensuring proper paint adhesion. Use medium-grit sandpaper (120-180 grit) to lightly sand all cabinet surfaces. This removes any existing gloss and creates "tooth" for the primer to grip onto. Pay particular attention to edges and corners. After sanding, thoroughly clean the cabinets again to remove all sanding dust. A tack cloth is effective for this purpose.
Priming is an essential step that should not be skipped. Primer seals the wood, prevents tannins from bleeding through the paint, and provides a uniform surface for the paint to adhere to. Choose a high-quality primer specifically designed for wood cabinets. Apply the primer evenly using a brush, roller, or sprayer, following the manufacturer's instructions. Allow the primer to dry completely before proceeding to the next step. Depending on the type of wood and the shade of grey being used, two coats of primer may be necessary.
Painting Techniques for a Durable and Appealing Result
Selecting the right painting technique and materials is crucial for achieving a professional-looking finish on kitchen cabinets. Factors to consider include the type of paint, the application method, and the number of coats.
For kitchen cabinets, it is recommended to use a high-quality paint specifically formulated for cabinetry. Options include acrylic latex paint, alkyd paint, and water-based enamel. Acrylic latex paints are durable, easy to clean, and low in VOCs (volatile organic compounds). Alkyd paints offer a hard, durable finish but require more ventilation and cleanup. Water-based enamels provide a smooth, durable finish and are easier to apply than alkyd paints. Consider the pros and cons of each type of paint before making a decision.
The application method also plays a significant role in the final result. Brushing, rolling, and spraying are all viable options. Brushing is the most traditional method and allows for precise control, especially in tight corners. However, it can leave brush marks if not done carefully. Rolling is a faster method for covering large surfaces, but it can also leave a slight texture. Spraying provides the smoothest, most professional finish, but it requires specialized equipment and careful masking to protect surrounding surfaces.
When painting with a brush or roller, use high-quality tools designed for fine finishing. A brush with synthetic bristles is ideal for latex paints, while a brush with natural bristles is better suited for oil-based paints. Use a foam roller or a roller with a short nap to minimize texture. Apply thin, even coats of paint, working with the grain of the wood. Avoid applying too much paint at once, as this can lead to drips and runs.
Regardless of the application method, multiple thin coats of paint are always better than one thick coat. Allow each coat of paint to dry completely before applying the next one. Lightly sand between coats with fine-grit sandpaper (220-grit or higher) to remove any imperfections and create a smoother surface for the next coat. This process, known as "deglossing," ensures optimal adhesion and a flawless finish. Two to three coats of paint are typically required for adequate coverage and durability.
Considerations for Specific Cabinet Types and Styles
The approach to painting kitchen cabinets may vary depending on the type of cabinets and their existing style. This section addresses considerations for different materials and design features.
Solid wood cabinets are the most straightforward to paint. However, it is important to identify the type of wood to select the appropriate primer and paint. Some hardwoods, such as oak, have open grains that may require filling before painting to achieve a perfectly smooth finish. Wood filler can be used to fill the grain, followed by sanding to create a level surface.
Laminate or veneer cabinets require special attention. These materials have a smooth, non-porous surface that is difficult for paint to adhere to. A bonding primer specifically designed for laminate or melamine is essential for ensuring proper adhesion. Sanding these surfaces lightly with fine-grit sandpaper can also improve adhesion. Avoid using oil-based paints on laminate or veneer cabinets, as they may not adhere well.
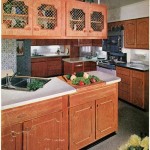
Cabinets with intricate designs or raised panels can be more challenging to paint. Use a brush to reach into the grooves and crevices. A sprayer can also be effective for these types of cabinets, but it requires careful masking to prevent overspray. Pay close attention to the details and ensure that all surfaces are evenly coated.
If the cabinets have glass panels, these should be carefully masked off before painting. Painter's tape is the most common material used for masking. Apply the tape carefully and press it firmly along the edges of the glass to prevent paint from seeping underneath. Consider removing the glass panels entirely for easier painting, if possible.
Once the painting is complete, allow the cabinets to dry completely before reinstalling the hardware. This may take several days, depending on the type of paint and the humidity levels. Handle the painted cabinets with care during reinstallation to avoid scratching or chipping the finish.

Pin On Gretchen

How To Paint Kitchen Cabinets

These Gray Kitchen Cabinets Offer A Neutral Twist Bob Vila

How To Paint Kitchen Cabinets

How To Paint Kitchen Cabinets

These Gray Kitchen Cabinets Offer A Neutral Twist Bob Vila

Behr Premium 1 Gal N520 3 Flannel Gray Semi Gloss Enamel Interior Exterior Cabinet Door Trim Paint 712001 The Home Depot

A Step By Guide To Painting Kitchen Cabinets With Kilz Primer Blog

Gives A Fresh Look To Cabinets Kitchen Remodel Small Painting Inspiration Design

Gray Painted Kitchen Cabinets Traditional Home
Related Posts