Paint Your Own Kitchen Cabinets
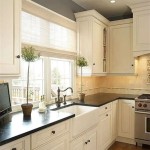
Painting kitchen cabinets is a cost-effective way to update a kitchen's appearance dramatically. It allows homeowners to achieve a fresh, modern look without the expense of a complete remodel. This process involves several crucial steps, from preparation to the final coat, ensuring a professional-looking finish.
Key Preparation Steps
Proper preparation is essential for successful cabinet painting. Skipping these steps can lead to a less-than-perfect result, with paint that chips or peels prematurely.
- Remove Hardware: Begin by removing all cabinet hardware, including knobs, pulls, hinges, and any other attached elements.
- Clean Thoroughly: Clean the cabinet surfaces thoroughly to remove grease, grime, and food residue. A degreasing cleaner is recommended for best results.
- Repair Imperfections: Fill any holes or dents with wood filler, allowing it to dry completely and then sanding smooth.
- Sanding: Lightly sand all surfaces to create a slightly rough texture for better paint adhesion. Use fine-grit sandpaper (150-220 grit) to avoid deep scratches.
- Protect Surroundings: Cover countertops, floors, and appliances with drop cloths or plastic sheeting to protect them from paint splatters.
- Tape Off Areas: Use painter's tape to mask off areas that should not be painted, such as the inside of the cabinets or adjacent walls.
Primer Application
Primer creates a smooth base for the paint and improves its adhesion to the cabinet surface. It is particularly important when painting over darker cabinets or when using a lighter paint color.
- Choose the Correct Primer: Select a primer specifically designed for use on kitchen cabinets, preferably one that blocks stains and provides excellent adhesion.
- Apply Evenly: Apply a thin, even coat of primer using a brush or roller. Avoid drips and runs by working in small sections.
- Allow to Dry: Allow the primer to dry completely according to the manufacturer's instructions before applying the topcoat.
Painting Techniques
The paint application process requires patience and attention to detail to achieve a smooth, professional-looking finish.
- Select High-Quality Paint: Choose a high-quality paint specifically formulated for cabinets. Durable, scrubbable finishes are ideal for kitchen environments.
- Thin Coats: Apply multiple thin coats of paint rather than one thick coat. Thin coats dry more evenly and are less likely to drip or sag.
- Brush or Roller: Use a high-quality brush or roller designed for smooth finishes. A sprayer can also be used for a more even application, but it requires proper ventilation and safety precautions.
- Maintain Consistent Strokes: Maintain consistent brushstrokes or roller direction to avoid visible lap marks.
- Drying Time: Allow each coat of paint to dry completely before applying the next coat. Refer to the manufacturer's instructions for recommended drying times.
- Sand Between Coats (Optional): Lightly sand between coats with very fine-grit sandpaper (320 grit or higher) to remove any imperfections and create a smoother surface.
Finishing Touches
The final steps involve reassembling the cabinets and allowing the paint to cure fully.
- Remove Tape: Carefully remove the painter's tape while the paint is still slightly wet to prevent pulling up dried paint.
- Reinstall Hardware: Once the paint is completely dry, reinstall the cabinet hardware.
- Curing Time: Allow the paint to cure fully for several days before subjecting the cabinets to heavy use. The paint may feel dry to the touch, but it may take longer to reach full hardness.
Choosing the Right Paint
Selecting the appropriate paint type is crucial for durability and aesthetics.
- Oil-Based vs. Water-Based: Oil-based paints offer excellent durability and a smooth finish but have longer drying times and require more cleanup. Water-based paints are easier to clean up and dry faster, but they may not be as durable as oil-based paints.
- Satin, Semi-Gloss, or Gloss: Consider the desired sheen. Satin provides a subtle sheen, while semi-gloss and gloss offer higher shine and greater washability.
Troubleshooting Common Problems
Addressing potential issues promptly can ensure a successful outcome.
- Drips and Runs: If drips or runs occur, lightly sand the affected area after the paint dries and apply another thin coat.
- Uneven Coverage: Ensure proper mixing and application techniques to prevent uneven coverage. Multiple thin coats can help achieve a uniform finish.
- Peeling Paint: Peeling paint may indicate inadequate surface preparation or incompatible primer and paint. Ensure proper cleaning and sanding before painting.
Ventilation and Safety
Proper ventilation and safety precautions are essential during the painting process.
- Ventilation: Work in a well-ventilated area to avoid inhaling paint fumes.
- Protective Gear: Wear appropriate protective gear, such as gloves and a respirator, when working with paint, primers, and solvents.

How To Paint Kitchen Cabinets Like The Pros

Pa Wedding Photographer Diy Painted Kitchen Cabinets Before After

How To Paint Kitchen Cabinets Without Sanding Sustain My Craft Habit

How To Paint Kitchen Cabinets Budget Friendly Makeover

A Diy Project Painting Kitchen Cabinets

Update On Our Diy White Painted Kitchen Cabinets 2 Years Later

Diy Painting Your Kitchen Cabinets The Right Way

How To Paint Kitchen Cabinets A Step By Guide Confessions Of Serial Do It Yourselfer

Budget Kitchen Renovation With Diy Shaker Painted Cabinets I

20 Diy Painted Kichen Cabinet Ideas A Cultivated Nest
Related Posts