Painted Kitchen Cabinets: A Dramatic Before and After Transformation
The kitchen, often considered the heart of the home, frequently reflects the overall aesthetic and functionality of a living space. Outdated or worn-looking kitchen cabinets can significantly detract from the kitchen's appeal, making it feel drab and unwelcoming. Replacing cabinets can be a substantial investment, involving significant demolition, construction, and material costs. A cost-effective and transformative alternative is painting existing kitchen cabinets, which can breathe new life into the space and dramatically alter its appearance. The "Painted Kitchen Cabinets Before After" scenario represents a powerful illustration of the potential for rejuvenation and modernization without incurring the expense of a complete kitchen renovation.
This article explores the process of painting kitchen cabinets, detailing the steps involved, the considerations necessary for a successful outcome, and showcasing the remarkable difference a fresh coat of paint can make. The transformation from aged, stained, or simply unfashionable cabinets to a vibrant, updated kitchen is a testament to the power of paint and careful preparation.
Preparation: The Foundation for a Flawless Finish
The success of any painting project, including the transformation of kitchen cabinets, hinges on thorough and meticulous preparation. This phase is critical as it ensures proper adhesion of the paint, a smooth and even surface, and a long-lasting, durable finish. Skipping or shortcutting preparation steps can lead to peeling, chipping, and an overall unsatisfactory result.
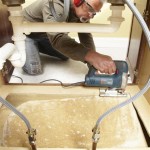
The initial step involves the complete removal of all cabinet doors and drawers. This allows for easier access to all surfaces and prevents paint drips and runs on vertical surfaces. All hardware, including hinges, knobs, and pulls, must also be removed. This not only protects the hardware from paint but also facilitates a cleaner and more professional finish on the cabinet doors and frames. Store the hardware in labeled bags to ensure easy reinstallation later.
Cleaning is paramount. Kitchen cabinets accumulate grease, grime, and food splatters over time. These contaminants can prevent paint from adhering properly and can even leach through the paint, resulting in discoloration. Use a degreasing cleaner specifically designed for kitchen surfaces. Trisodium phosphate (TSP) is a powerful cleaner but requires careful handling and thorough rinsing. Alternatively, a milder soap-based cleaner can be used, followed by a clear water rinse. Ensure all surfaces are completely dry before proceeding to the next step.
Sanding is a critical step in preparing the cabinets for painting. Sanding creates a slightly rough surface, providing the paint with increased adhesion. Use a medium-grit sandpaper (around 120-grit) to scuff the entire surface of the cabinets, paying particular attention to areas with glossy or varnished finishes. Avoid excessive sanding, as this can damage the wood. After sanding, use a tack cloth or a damp cloth to remove all sanding dust. Dust is a major enemy of a smooth paint finish, so ensure all surfaces are completely clean.
Priming is often an essential step, particularly for cabinets that have been previously stained or varnished, or for cabinets made of porous materials like oak. A primer creates a uniform surface, seals any existing stains, and provides a good base for the paint to adhere to. Choose a high-quality primer specifically designed for cabinets. Apply the primer in thin, even coats, allowing each coat to dry completely before applying the next. Lightly sand the primed surface with a fine-grit sandpaper (around 220-grit) to create an even smoother surface for painting.
Filling any imperfections, such as dents, scratches, or holes, is important for achieving a flawless finish. Use wood filler to fill these imperfections, allowing the filler to dry completely before sanding it smooth. Ensure the filler is flush with the surrounding surface and that no residue remains before proceeding to painting.
Selecting the Right Materials and Tools
The choice of materials and tools significantly impacts the quality and durability of the painted kitchen cabinets. Investing in high-quality products can make the painting process easier and result in a more professional and long-lasting finish.
Paint selection is crucial. Consider the type of paint, its durability, and its finish. Acrylic latex paints are a popular choice for kitchen cabinets due to their durability, ease of cleaning, and low odor. Alkyd paints, also known as oil-based paints, offer excellent durability and a smooth, hard finish. However, they have a stronger odor, require mineral spirits for cleanup, and take longer to dry. The choice between latex and alkyd paint often depends on personal preference and the desired finish.
The finish of the paint influences the overall aesthetic of the kitchen. Semi-gloss and gloss finishes are popular choices for kitchen cabinets because they are durable and easy to clean. Satin and eggshell finishes offer a softer look but may be slightly less durable and harder to clean. Matte finishes are generally not recommended for kitchen cabinets due to their low durability and difficulty in cleaning.
Brushes and rollers play a crucial role in achieving a smooth and even paint finish. Use high-quality brushes with synthetic bristles for applying paint to cabinets. Synthetic bristles are less likely to leave brushstrokes and are compatible with both latex and alkyd paints. Foam rollers or rollers with a short nap are ideal for painting large, flat surfaces, providing a smooth and even finish. Consider using a paint sprayer for an even more professional and flawless finish. However, paint sprayers require practice and proper ventilation.
Other essential tools include painter's tape for masking off areas that should not be painted, sandpaper in various grits for preparing and sanding surfaces, drop cloths for protecting floors and countertops, a paint tray or bucket, and rags for cleaning up spills.
The Painting Process: Achieving a Professional Finish
With proper preparation and the right materials, the painting process becomes more manageable and the chances of achieving a professional finish are significantly increased. Patience and attention to detail are key to a successful outcome.
Apply the paint in thin, even coats. Avoid applying too much paint in one coat, as this can lead to drips and runs. Allow each coat to dry completely before applying the next. Multiple thin coats are always better than one thick coat.
Use a combination of brushes and rollers to achieve a smooth and even finish. Use a brush to paint edges, corners, and intricate details, and use a roller to paint large, flat surfaces. Overlap each stroke slightly to ensure complete coverage and avoid leaving any gaps.
Sanding between coats can further enhance the smoothness of the finish. After each coat of paint has dried completely, lightly sand the surface with a fine-grit sandpaper (around 320-grit) to remove any imperfections or brushstrokes. Be sure to remove all sanding dust before applying the next coat of paint.
Pay close attention to details. Check for drips, runs, and uneven areas. Use a brush or a rag to smooth out any imperfections before the paint dries completely.
Allow the paint to cure completely before reinstalling the hardware and reattaching the cabinet doors and drawers. Curing is the process by which the paint hardens and becomes more durable. The curing time typically takes several days to a week, depending on the type of paint and the ambient temperature. Handle the painted cabinets with care during the curing process to avoid scratching or damaging the finish.
Reinstall the hardware and reattach the cabinet doors and drawers. Ensure the hardware is securely fastened and that the doors and drawers align properly. Make any necessary adjustments to the hinges to ensure smooth and proper operation.
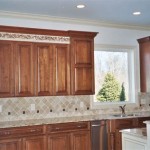
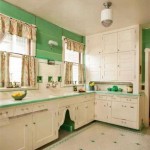
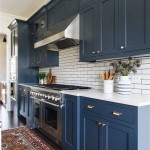
The "Painted Kitchen Cabinets Before After" transformation is a testament to the power of paint and meticulous preparation. The revitalized kitchen cabinets can significantly enhance the overall appearance of the kitchen, creating a more modern, inviting, and functional space. The cost-effectiveness of painting cabinets compared to replacing them makes it an attractive option for homeowners looking to update their kitchens without breaking the bank.
By following these steps and paying attention to detail, homeowners can achieve a professional-looking finish and enjoy the dramatic transformation of their painted kitchen cabinets for years to come. The key lies in thorough preparation, using high-quality materials, and applying the paint with patience and precision. The before and after results speak for themselves, demonstrating the significant impact that painted kitchen cabinets can have on the heart of the home.
Ultimately, the decision to paint kitchen cabinets is a personal one, driven by individual needs, preferences, and budget considerations. However, the potential for a dramatic and cost-effective transformation makes it a compelling option for homeowners seeking to revitalize their kitchens and enhance the overall value of their homes. The visual impact of a well-executed painted kitchen cabinet project is undeniable, offering a fresh and updated look that can significantly improve the aesthetic appeal and functionality of the kitchen space.

15 Diy Kitchen Cabinet Makeovers Before After Photos Of Cabinets

Our Painted Cabinets Five Years Later Nina Hendrick Home

Kitchen Painting Projects Before And After Paper Moon

How To Paint Kitchen Cabinets So They Look Amazing And Last Weekend Diy Projects

Painted Cabinets Nashville Tn Before And After Photos

Update On Our Diy White Painted Kitchen Cabinets 2 Years Later

Should I Paint My Kitchen Cabinets

Painted Cabinets Nashville Tn Before And After Photos

Painted Kitchen Cabinet Ideas And Makeover Reveal The Polka Dot Chair

Painted Kitchen Cabinets One Year Later The Palette Muse
Related Posts