Painting Inside Kitchen Cabinets White: A Comprehensive Guide
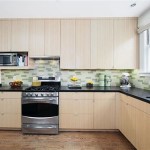
Transforming your kitchen's ambiance can be as simple as revitalizing the interior of your cabinets. Painting them white is a timeless and versatile choice that brightens up the space, creates an illusion of space, and complements both classic and contemporary kitchen designs.
While painting kitchen cabinets white may appear straightforward, meticulous attention to detail is paramount for a flawless finish. Here's a comprehensive guide to help you embark on this DIY project with confidence, ensuring a stunning outcome.
Preparation: A Foundation for Success
Thorough preparation is essential before you wield your paintbrush. First, remove all cabinet doors and hardware. Clean the surfaces with a degreasing cleaner to remove any dirt, grease, or grime that might interfere with paint adhesion.
Next, sand the cabinet surfaces lightly to smooth out any imperfections and improve paint adherence. Use fine-grit sandpaper to avoid damaging the existing finish. After sanding, wipe away any dust with a tack cloth.
Primer: The Invisible Foundation
Applying a coat of primer is a crucial step that promotes paint adhesion, prevents stains from seeping through, and ensures a more uniform finish. Choose a high-quality primer specifically designed for kitchen cabinets.
Apply the primer evenly using a brush or roller, ensuring coverage of all surfaces. Allow the primer to dry completely according to the manufacturer's instructions before proceeding to painting.
Paint Choice: A Matter of Sheen and Durability
Opt for a high-quality, durable paint in a white finish. Semi-gloss or satin finishes are ideal for kitchen cabinets, as they offer a balance between sheen and durability, resisting stains, scratches, and moisture effectively.
Test the paint on an inconspicuous area to ensure the desired color and finish before painting the entire cabinet.
Painting Techniques: Achieving a Flawless Finish
Use a high-quality brush or roller for smooth, even application. Start by painting the edges and corners, then use long, even strokes to paint the flat surfaces. Allow each coat to dry completely before applying the next.
Apply multiple thin coats rather than one thick coat. This prevents runs, drips, and ensures a smoother, more durable finish.
Drying and Curing: Essential for Longevity
Allow the painted cabinets ample time to dry before reassembling them. Refer to the paint manufacturer's instructions for specific drying times.
After drying, allow the cabinets to cure for several days before putting them back into service. This curing period allows the paint to fully harden, ensuring a durable and long-lasting finish.
Hardware and Reinstallation: Completing the Transformation
Attach the cabinet hardware once the paint has cured completely. Clean the hardware and screw them back into place securely.
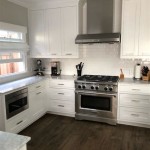
Reinstall the cabinet doors and marvel at your newly transformed kitchen. The bright white interiors will instantly elevate the space, creating a fresh, inviting, and functional kitchen.

Classic White Kitchen Makeover Inside Cabinets Painting

Nesting Colored Kitchen Cabinets A Beautiful Mess

Decked Styled Spring Home Tour Painted Kitchen Cabinets Colors Painting Inside

Painting The Inside Of Kitchen Cabinets Eatwell101

What Color Should You Paint The Inside Of Kitchen Cabinets

Diy Kitchen Makeover How To Paint Cabinets Inmyownstyle

Turn Kitchen Cabinets Into Open Shelving Sherwin Williams

Painting Our Upper Cabinets White Young House Love

The Magic Of Paint Inside Kitchen Cabinets Painting Remodel

Painting Kitchen Cabinets With Chalk Paint Simply Today Life
Related Posts