Painting Kitchen Cabinets: A Comprehensive Guide
Painting kitchen cabinets represents a cost-effective alternative to complete kitchen remodels. It allows homeowners to refresh the aesthetic appeal of their kitchen without incurring the significant expense and disruption associated with replacing existing cabinetry. This article provides a comprehensive guide to painting kitchen cabinets, covering preparation, material selection, application techniques, and post-painting care.
The success of a cabinet painting project hinges on meticulous preparation. Thorough cleaning, surface preparation, and proper priming are crucial steps that ensure optimal paint adhesion and a durable, long-lasting finish. Neglecting these foundational elements often results in peeling, chipping, and an overall unsatisfactory outcome.
Thorough Preparation: The Foundation of a Flawless Finish
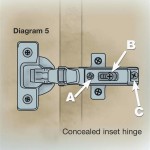
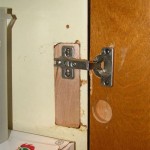
The initial step involves removing all cabinet doors and drawers. Labeling each door and drawer with corresponding cabinet frame locations is essential for reassembly. This prevents confusion and ensures that hardware and alignments remain consistent after painting. Hardware, including knobs, pulls, and hinges, should also be removed and stored in labeled containers to avoid misplacement.
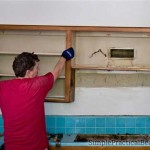
Once the doors and drawers are removed, clean all cabinet surfaces meticulously. Grease, grime, and food residue impede paint adhesion and must be thoroughly eliminated. A strong degreaser, such as trisodium phosphate (TSP) or a commercially available kitchen cleaner, is recommended. Apply the cleaner according to the manufacturer's instructions, paying close attention to areas around the stove and sink, which tend to accumulate the most grease. Rinse the surfaces thoroughly with clean water and allow them to dry completely.
Sanding is a critical step in preparing cabinet surfaces for painting. Sanding creates a slightly roughened surface that allows the primer and paint to adhere effectively. Use a medium-grit sandpaper (around 120-grit) to sand the entire surface of the cabinets, including doors, drawers, and frames. Focus on removing any existing gloss or imperfections. For particularly stubborn areas or intricate details, a sanding sponge may be more effective. After sanding, use a tack cloth or a damp cloth to remove all sanding dust. Dust particles can interfere with paint adhesion and create a textured, uneven finish.
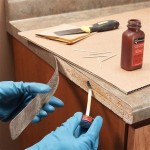
Filling any imperfections, such as dents, scratches, or holes, is vital for achieving a smooth and professional-looking finish. Use a wood filler or putty specifically designed for paintable surfaces. Apply the filler according to the manufacturer's instructions, overfilling slightly to allow for sanding. Once the filler is dry, sand it smooth with fine-grit sandpaper (around 220-grit) to blend it seamlessly with the surrounding surface. Again, remove all dust with a tack cloth.
Masking off areas that should not be painted, such as walls, countertops, and appliances, is essential for preventing unwanted paint splatters. Use painter's tape to create clean, crisp lines. Protect floors with drop cloths or plastic sheeting to catch any drips or spills. Careful masking ensures a professional and clean paint job.
Selecting the Right Materials: Primer and Paint
Choosing the appropriate primer and paint is crucial for achieving a durable and aesthetically pleasing finish. The primer acts as a bonding agent between the cabinet surface and the paint, promoting adhesion and preventing the paint from absorbing into the wood or existing finish. The paint provides the color, protection, and overall appearance of the cabinets.
For priming kitchen cabinets, an oil-based or a high-quality water-based primer is generally recommended. Oil-based primers offer excellent adhesion and stain-blocking properties, making them suitable for cabinets with stubborn stains or oily residue that may not have been completely removed during cleaning. However, oil-based primers require longer drying times and can emit strong odors. Water-based primers are a more environmentally friendly option and dry faster, but may not be as effective at blocking stains. A shellac-based primer is also a good option for stain blocking but also has strong odors and requires special cleaning solvents. The selection of primer depends on the type of cabinet material and the desired outcome.
When selecting paint for kitchen cabinets, consider durability, ease of cleaning, and the desired sheen. Semi-gloss and satin finishes are popular choices for kitchen cabinets because they are durable, easy to clean, and offer a subtle sheen that reflects light without being overly glossy. High-gloss finishes are more reflective and easier to clean, but they can also highlight imperfections in the cabinet surface. Matte finishes offer a low sheen and can hide imperfections, but they are generally less durable and harder to clean. Acrylic latex paints are a common choice for kitchen cabinets due to their durability, low odor, and ease of application. Alkyd paints offer a harder, more durable finish but require longer drying times and may emit stronger odors.
The selection of paint color is a matter of personal preference. Consider the overall style of the kitchen and the existing color scheme. Lighter colors can make a small kitchen appear larger and brighter, while darker colors can create a more dramatic and sophisticated look. It is recommended to test paint samples on a small, inconspicuous area of the cabinet before committing to a full application. This allows you to assess the color in different lighting conditions and ensures that it complements the existing elements of the kitchen.
Application Techniques: Achieving a Professional Finish
Proper application techniques are essential for achieving a smooth, even, and professional-looking paint finish. The choice of application method, whether it be brushing, rolling, or spraying, depends on the desired outcome, the skill level of the painter, and the type of paint being used.
Brushing is a common method for painting kitchen cabinets, particularly for smaller projects or intricate details. Use a high-quality synthetic brush designed for the type of paint being used. Apply the paint in thin, even strokes, following the grain of the wood. Avoid applying too much paint at once, as this can lead to drips and runs. Smooth out any brush marks with light, even strokes. Multiple thin coats are preferable to one thick coat, as they result in a more durable and even finish.
Rolling is another popular method for painting kitchen cabinets, particularly for larger, flatter surfaces. Use a high-density foam roller or a microfiber roller for a smooth, even finish. Apply the paint in thin, even coats, overlapping each stroke slightly to avoid leaving gaps. Use a brush to paint any corners or edges that the roller cannot reach. Smooth out any roller marks with light, even strokes. As with brushing, multiple thin coats are preferable to one thick coat.
Spraying offers the most professional-looking finish, but it requires specialized equipment and a higher level of skill. An airless sprayer or a high-volume low-pressure (HVLP) sprayer can be used to apply the paint in a fine, even mist. Spraying provides excellent coverage and minimizes brush marks or roller marks. However, it also requires careful masking and ventilation to prevent overspray and health hazards. Practice spraying on a scrap piece of material before applying paint to the cabinets to ensure proper technique and paint flow. Apply multiple thin coats, allowing each coat to dry completely before applying the next.
Regardless of the application method chosen, allow each coat of primer and paint to dry completely according to the manufacturer's instructions. Sand lightly between coats with fine-grit sandpaper (around 320-grit) to remove any imperfections and create a smooth surface for the next coat. Remove all dust with a tack cloth before applying the next coat.
After the final coat of paint has dried completely, carefully remove the painter's tape, pulling it away at a 45-degree angle to prevent chipping the paint. Reinstall the hardware and reattach the cabinet doors and drawers. Ensure that all screws are tightened securely. Clean up any paint splatters or drips with a damp cloth. Allow the paint to cure completely for several days before using the cabinets extensively. This allows the paint to harden and become more resistant to scratches and abrasions.

7 Expert Tips For Flawless Kitchen Cabinet Painting

How To Paint Kitchen Cabinets The Love Notes Blog

Durable Kitchen Cabinet Painting 10 Year Warranty Columbus Oh

How To Paint Kitchen Cabinets Best Color Ideas Cost

How To Paint Kitchen Cabinets In 7 Simple Steps

How To Paint Kitchen Cabinets In Four Easy Steps For Really Smooth Results Express Co

Painted Kitchen Cabinets One Year Later The Palette Muse

How To Paint Kitchen Cabinets In 7 Simple Steps

Light Vs Dark Paint Ideas For Your Kitchen Cabinets

6 Tips For Painting Your Kitchen Cabinets
Related Posts