Painting Kitchen Cabinets: A Visual Transformation Before & After
Refacing or replacing kitchen cabinets can be a significant home improvement project, often involving considerable expense and disruption. Painting, on the other hand, offers a cost-effective and relatively less invasive alternative to revitalize a kitchen's aesthetic. Examining before-and-after pictures of painted kitchen cabinets reveals the dramatic impact this simple update can have on the overall look and feel of a kitchen space. These visuals showcase the transformative power of paint, highlighting how a fresh coat can modernize outdated styles, brighten dim spaces, and inject personality into a central area of the home.
The process of painting kitchen cabinets requires careful planning, preparation, and execution to achieve a professional and enduring finish. The quality of the paint job directly influences its longevity and visual appeal. Therefore, meticulous attention to detail is paramount, encompassing everything from surface preparation to the application of appropriate primers and topcoats.
The following sections will explore key aspects of painting kitchen cabinets, supported by visual examples that illustrate the transformative potential of this project. These examples will demonstrate the range of styles and finishes achievable, and how careful execution can result in a kitchen that appears entirely new, without the cost of complete replacement.
Surface Preparation: The Foundation for a Flawless Finish
The success of any paint job, particularly on kitchen cabinets, hinges on thorough surface preparation. This initial stage is arguably the most crucial, as it directly affects the adhesion, durability, and final appearance of the paint. Before-and-after pictures frequently demonstrate the difference between cabinets that were properly prepped and those that were not. Neglecting this step can lead to peeling, chipping, and an uneven finish, negating the effort and expense invested in the project.
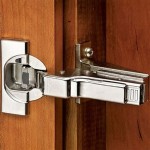
The first step involves removing all hardware, including knobs, pulls, hinges, and any other attached elements. This allows for unobstructed painting of the cabinet surfaces and prevents paint from adhering to the hardware. Each piece of hardware should be carefully stored and labeled to ensure easy reinstallation.
Next, the cabinets must be thoroughly cleaned to remove grease, grime, and any other contaminants that may hinder paint adhesion. A strong degreasing cleaner specifically formulated for kitchen surfaces is recommended. After cleaning, the cabinets should be rinsed with clean water and allowed to dry completely.
Sanding is an essential part of surface preparation, creating a slightly textured surface that promotes better paint adhesion. The grit of sandpaper used will depend on the existing finish of the cabinets. For glossy or previously painted surfaces, a medium-grit sandpaper (around 120-180 grit) is suitable for removing the sheen and creating a "key" for the primer to grip. For raw wood, a finer grit sandpaper (around 220 grit) can be used to smooth out the surface.
After sanding, all dust must be meticulously removed using a tack cloth or a vacuum cleaner with a brush attachment. Any remaining dust particles can compromise the paint finish, resulting in an uneven and unprofessional appearance.
Finally, applying a high-quality primer is crucial for sealing the surface, blocking stains, and providing a uniform base for the paint. A primer designed for use on wood is generally recommended for kitchen cabinets. Tinting the primer to a similar color as the topcoat can enhance the paint's coverage and color saturation. The primer should be applied evenly and allowed to dry completely according to the manufacturer's instructions. After the primer dries, a light sanding with fine-grit sandpaper can further smooth the surface before applying the paint.
Before-and-after images often highlight the improved smoothness and evenness of painted cabinets when proper priming and sanding have been performed. Cabinets that were not adequately prepared may exhibit visible imperfections, such as brush strokes, uneven color, and areas where the paint has not adhered properly.
Choosing the Right Paint and Application Techniques
Selecting the appropriate paint type and employing the correct application techniques are critical to achieving a durable and aesthetically pleasing finish on kitchen cabinets. The type of paint used affects its durability, ease of cleaning, and overall appearance. Similarly, the application method influences the smoothness, evenness, and professional look of the finished product.
Several paint options are available for kitchen cabinets, each with its own advantages and disadvantages. Oil-based paints offer excellent durability and a hard, enamel-like finish. However, they require longer drying times, emit strong odors, and require mineral spirits for cleanup. Latex or water-based paints are a more environmentally friendly option, offering lower odor, faster drying times, and easy cleanup with soap and water. However, they may not be as durable as oil-based paints and may require more coats for adequate coverage.
Acrylic paints are another popular choice, known for their excellent color retention, durability, and resistance to chipping and cracking. Acrylic-alkyd hybrids combine the benefits of both acrylic and alkyd paints, offering the durability of oil-based paints with the ease of use and cleanup of water-based paints. These hybrid paints are becoming increasingly popular for kitchen cabinet painting.
Beyond the type of paint, the sheen or finish also plays a significant role in the overall appearance. High-gloss paints offer a shiny, reflective surface that is easy to clean but may highlight imperfections. Semi-gloss paints provide a balance between durability and ease of cleaning, while satin paints offer a softer, more subtle sheen. Matte paints provide a non-reflective finish that can hide imperfections but may be more difficult to clean.
The application method significantly impacts the final look of the painted cabinets. Brushing and rolling are the most common application techniques for DIY projects. When using a brush, choose a high-quality brush designed for the type of paint being used. Apply the paint in thin, even coats, following the grain of the wood. Avoid applying too much paint at once, as this can lead to drips and runs. When using a roller, choose a roller with a short nap to minimize texture. Again, apply the paint in thin, even coats, working in small sections at a time.
Spraying provides the smoothest and most professional-looking finish, but requires specialized equipment and more extensive preparation. An airless sprayer or a high-volume, low-pressure (HVLP) sprayer can be used to apply the paint in a fine, even mist. Spraying requires careful masking and ventilation to protect surrounding surfaces and ensure proper air quality. Before-and-after pictures frequently illustrate the difference between brushed or rolled cabinets and those that have been sprayed, with the sprayed cabinets exhibiting a noticeably smoother and more uniform finish.
Regardless of the application method chosen, multiple thin coats of paint are always preferable to a single thick coat. This allows the paint to dry properly and prevents drips, runs, and uneven coverage. Each coat should be allowed to dry completely according to the manufacturer's instructions before applying the next coat. Light sanding between coats with fine-grit sandpaper can further smooth the surface and improve the adhesion of subsequent coats.
Color Selection and Design Considerations
The color choice for kitchen cabinets significantly impacts the overall aesthetic of the kitchen. Before-and-after pictures vividly demonstrate how a change in color can transform a dated or uninspired kitchen into a modern and inviting space. Selecting the right color involves considering the kitchen's existing features, such as countertops, flooring, and appliances, as well as the desired style and mood.
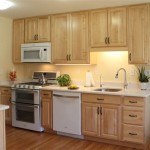
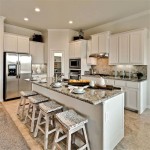
White and off-white cabinets remain a popular choice, offering a clean, classic, and timeless look. White cabinets brighten the space and create a sense of openness, making them ideal for smaller kitchens or kitchens with limited natural light. Different shades of white can evoke different moods, from a crisp, modern white to a warm, inviting cream. Before-and-after images often show dark, outdated cabinets being transformed into bright, airy spaces with a fresh coat of white paint.
Gray cabinets have also gained popularity in recent years, offering a versatile and sophisticated alternative to white. Gray can range from light and airy to dark and dramatic, providing a wide range of design options. Light gray cabinets can create a calm and neutral backdrop, while dark gray cabinets can add a touch of drama and elegance. Before-and-after comparisons often showcase how gray cabinets can modernize a kitchen and create a more contemporary feel.
Beyond neutrals, bolder colors can be used to create a more personalized and unique kitchen. Navy blue, forest green, and even bright pops of color like yellow or red can be incorporated to add character and visual interest. When using bolder colors, it is important to consider the overall balance of the kitchen and avoid overwhelming the space. Often, a bold color is used on the lower cabinets, while the upper cabinets are painted a neutral color to maintain a sense of lightness and openness.
Two-toned cabinets are another popular design trend, involving painting the upper and lower cabinets in different colors. This can create a more dynamic and visually interesting look, adding depth and dimension to the kitchen. For example, white upper cabinets paired with navy blue lower cabinets can create a classic and sophisticated look, while light gray upper cabinets paired with dark gray lower cabinets can create a modern and dramatic feel. Before-and-after images often illustrate how two-toned cabinets can transform a kitchen from ordinary to extraordinary.
In addition to color, the finish of the paint can also influence the overall aesthetic. A glossy finish can create a sleek and modern look, while a matte finish can create a more rustic and traditional feel. The hardware chosen for the cabinets also plays a significant role, adding a finishing touch and complementing the color and style of the cabinets. New hardware can often dramatically update the look of painted cabinets, as showcased in numerous before-and-after examples. Consider the style of the kitchen and choose hardware that complements the overall design. Brushed nickel, chrome, and black hardware are all popular choices.

Diy Painting Your Kitchen Cabinets The Right Way

Painting Kitchen Cabinets Before After The Stonybrook House

Builder Grade Kitchen Makeover With Gray Cabinets

Update On Our Diy White Painted Kitchen Cabinets 2 Years Later

Our Painted Cabinets Five Years Later Nina Hendrick

15 Diy Kitchen Cabinet Makeovers Before After Photos Of Cabinets

Pa Wedding Photographer Diy Painted Kitchen Cabinets Before After

Kitchen Cabinet Colors Before After The Inspired Room

Painted Kitchen Cabinet Ideas And Makeover Reveal The Polka Dot Chair

Before After Grey Kitchen Makeover Home Decor Remodel Small
Related Posts