Painting Kitchen Cabinets White And Gray: A Comprehensive Guide
Painting kitchen cabinets is a popular and cost-effective method for updating the look of a kitchen without undertaking a full renovation. White and gray are versatile and timeless color choices that can brighten the space, create a modern aesthetic, or complement existing décor. This article provides a detailed guide on how to paint kitchen cabinets white and gray, covering preparation, painting techniques, and essential considerations for achieving a professional-looking finish.
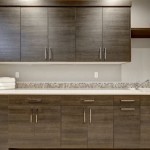
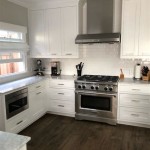
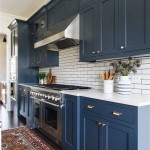
The decision to paint kitchen cabinets white or gray often stems from a desire to modernize or lighten the kitchen. White cabinets reflect light, making the room feel larger and more open. Gray, on the other hand, can introduce a sense of sophistication and neutrality, providing a backdrop that allows other design elements to shine. The choice between white and gray, or a combination of both, should be based on personal preference, existing kitchen features, and the desired overall aesthetic.
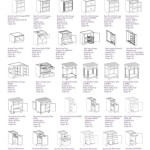
Before embarking on the painting process, a thorough assessment of the existing cabinets is crucial. Consider the cabinet's material (wood, laminate, or metal), its condition (any existing damage or wear), and the type of finish currently on it. This assessment will inform the selection of appropriate cleaning agents, primers, and paints. Certain materials, such as laminate, require specific primers designed to adhere properly to the slick surface. Furthermore, the condition of the cabinets will dictate the necessary repairs, such as filling holes, patching cracks, or addressing peeling paint.
Preparing the Kitchen Cabinets for Painting
Proper preparation is the most critical step in achieving a durable and professional-looking paint job. Neglecting this phase can lead to paint adhesion issues, uneven surfaces, and a final product that lacks longevity. The preparation process involves several key steps, each contributing to the success of the overall project.
First, remove all cabinet doors and drawers. Label each one and its corresponding cabinet frame to ensure easy reassembly. This can be done using painter's tape and a permanent marker. Disassemble the hardware, including hinges, knobs, and pulls. Store these items in labeled bags to prevent loss and ensure they are readily available when it’s time to reassemble the cabinets.
Next, thoroughly clean all cabinet surfaces. Use a degreasing cleaner to remove grease, grime, and food residue. Kitchen cabinets, especially those near the stove, tend to accumulate a significant amount of grease. A strong degreaser is essential for removing this buildup to ensure proper paint adhesion. Rinse the cabinets with clean water to remove any remaining cleaner residue and allow them to dry completely.
After cleaning, inspect the cabinets for any damage that needs repair. Fill any holes, dents, or cracks with wood filler. Allow the filler to dry completely according to the manufacturer's instructions. Once dry, sand the filled areas smooth with fine-grit sandpaper (220-grit or higher). Sanding helps create a smooth, even surface for the primer and paint.
Sanding the entire surface of the cabinets is the next crucial step. Sanding roughens the surface, providing a better grip for the primer and paint. Use medium-grit sandpaper (120-grit to 180-grit) to lightly sand the entire surface of each cabinet door and frame. Focus on removing any existing gloss or imperfections. After sanding, wipe down the cabinets with a tack cloth to remove any sanding dust. This step is critical for preventing dust particles from becoming embedded in the paint finish.
Consider the removal of any existing finish. Depending on the type of paint already on the cabinets, it may be necessary to strip the existing finish before priming. This is especially important if the existing finish is chipped, peeling, or incompatible with the new paint. Paint strippers can be used to effectively remove old paint, but they require careful handling and proper ventilation. Follow the manufacturer's instructions carefully when using paint strippers.
Finally, tape off any areas that you do not want to paint, such as the inside of the cabinet frames or the surrounding walls. Use high-quality painter's tape to create clean, crisp lines. Ensure the tape is firmly adhered to the surface to prevent paint bleed-through.
Priming and Painting Techniques
Once the cabinets are properly prepared, the next step is to prime them. Primer serves as a base coat, providing a uniform surface for the paint to adhere to. It also helps to block stains, seal the surface, and improve the paint's durability. Choose a high-quality primer that is compatible with both the cabinet material and the type of paint you intend to use. For example, if you are painting laminate cabinets, use a bonding primer specifically designed for slick surfaces.
Apply the primer in thin, even coats using a high-quality brush, roller, or sprayer. The choice of application method depends on personal preference and the desired finish. Brushes are ideal for getting into corners and crevices, while rollers are better for covering large, flat surfaces. Sprayers provide the smoothest, most professional-looking finish, but they require more preparation and skill to use effectively. Regardless of the application method, avoid applying the primer too thickly, as this can lead to drips and runs. Allow the primer to dry completely according to the manufacturer's instructions before proceeding to the next step.
After the primer is dry, lightly sand the primed surface with fine-grit sandpaper (220-grit or higher) to remove any imperfections or brushstrokes. Wipe down the cabinets with a tack cloth to remove any sanding dust. This step will ensure a smooth, flawless finish for the paint.
Now, it’s time to apply the paint. Choose a high-quality paint that is specifically designed for cabinets and trim. Alkyd or acrylic enamel paints are generally recommended for cabinets due to their durability and resistance to chipping and scratching. Consider using a paint with a satin or semi-gloss finish, as these finishes are easier to clean and maintain than matte finishes. Select your desired white or gray shade based on your preferred aesthetic and the existing color palette of your kitchen.
Apply the paint in thin, even coats using the same application method you used for the primer. Again, avoid applying the paint too thickly, as this can lead to drips and runs. Allow each coat of paint to dry completely according to the manufacturer's instructions before applying the next coat. Typically, two coats of paint are sufficient to achieve full coverage and a durable finish. However, depending on the color and opacity of the paint, a third coat may be necessary.
Pay close attention to detail when painting the cabinets. Use a small brush to carefully paint around edges, corners, and hardware openings. Avoid getting paint on the hinges or other hardware that you intend to reuse. If you are using a sprayer, practice on a piece of cardboard or scrap wood before painting the cabinets to get a feel for the spray pattern and the amount of paint being applied. Maintain a consistent distance between the sprayer and the cabinet surface to ensure an even coat of paint.
Essential Considerations for a Successful Cabinet Painting Project
Achieving a professional-looking finish when painting kitchen cabinets requires careful attention to detail and a consideration of several key factors. From selecting the right tools and materials to ensuring proper ventilation, these considerations can significantly impact the outcome of the project.
First, consider the working environment. Ensure the painting area is well-ventilated to prevent the buildup of fumes from the primer and paint. Open windows and use fans to circulate air. If possible, paint the cabinets outdoors or in a garage to minimize the risk of fumes affecting the rest of the house. Protect the surrounding surfaces with drop cloths or plastic sheeting to prevent paint splatters and spills.
The selection of high-quality tools and materials is also crucial. Invest in good-quality brushes, rollers, and sandpaper. Cheap tools can leave streaks and imperfections in the paint finish. Choose a primer and paint that are specifically designed for cabinets and trim. These products are formulated to provide a durable, long-lasting finish that can withstand the wear and tear of daily use. Consider using a paint additive, such as a leveling additive, to improve the flow and leveling of the paint, resulting in a smoother finish.
Proper drying time is essential for achieving a durable and professional-looking finish. Allow each coat of primer and paint to dry completely according to the manufacturer's instructions before proceeding to the next step. Rushing the drying process can lead to adhesion issues and an uneven finish. Avoid handling the cabinets until the paint is fully cured, which can take several days or even weeks. Curing time allows the paint to harden and become more resistant to scratches and chips.
After the paint has fully cured, carefully reassemble the hardware and reinstall the cabinet doors and drawers. Ensure the hinges are properly aligned and the doors and drawers close smoothly. Clean any excess paint from the hardware with a damp cloth. Take your time during the reassembly process to avoid damaging the newly painted surfaces.
Finally, maintain the painted cabinets with regular cleaning. Use a mild detergent and a soft cloth to wipe down the cabinets as needed. Avoid using abrasive cleaners or scouring pads, as these can scratch the paint finish. Promptly clean up any spills or splatters to prevent staining. With proper care and maintenance, your freshly painted kitchen cabinets will provide years of beauty and functionality.

18 Ways To Make Your White Kitchen Cabinets The Star Of Space New Remodel Painting

Remodelaholic Grey And White Kitchen Makeover Gray

These Gray Kitchen Cabinets Offer A Neutral Twist Bob Vila

These Gray Kitchen Cabinets Offer A Neutral Twist Bob Vila

White And Gray Kitchen Transitional Chrdauer Architects Bungalow Grey Walls

How To Paint Kitchen Cabinets

Painting Dark Kitchen Cabinets White My Weathered Home

How To Paint Kitchen Cabinets

20 Cabinet Paint Color Combos For The Kitchen Cabinets Combination Interior Renovation

Painting Kitchen Cabinets Popular Cabinet Color Ideas
Related Posts