Painting Kitchen Cupboards Light Grey: A Comprehensive Guide
Painting kitchen cupboards can dramatically alter the appearance of a kitchen, providing a cost-effective alternative to complete replacement. Light grey is a particularly popular choice, offering a versatile and sophisticated aesthetic that complements various kitchen styles and color schemes. This article provides a detailed guide to painting kitchen cupboards light grey, covering preparation, material selection, the painting process, and essential considerations for achieving a professional finish.
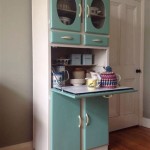
The selection of light grey as the primary color for kitchen cupboards provides numerous advantages. It offers a neutral backdrop that allows other design elements, such as countertops, backsplashes, and appliances, to stand out. Light grey also reflects light, making the kitchen appear brighter and more spacious. Furthermore, it is a timeless color that maintains its appeal across changing trends, ensuring a durable and stylish kitchen aesthetic.
Key Point 1: Preparation is Paramount
Achieving a smooth and durable finish when painting kitchen cupboards hinges on meticulous preparation. This involves several critical steps, including cleaning, hardware removal, sanding, priming, and protecting the surrounding surfaces.
The initial step is thoroughly cleaning the cupboard doors, drawers, and frames. Grease, grime, and food splatters are common in kitchens and can significantly interfere with paint adhesion. Use a degreasing cleaner specifically designed for kitchen surfaces. Trisodium phosphate (TSP) is a powerful cleaning agent, but it requires careful handling and adherence to safety precautions. Alternatively, a mixture of warm water and dish soap can be effective for less stubborn grime. Rinse thoroughly with clean water and allow the surfaces to dry completely before proceeding.
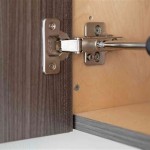
Next, remove all hardware, including knobs, pulls, hinges, and any other attached components. This ensures unobstructed access to the cupboard surfaces and prevents paint from accumulating on the hardware. Store the hardware in labeled bags to facilitate reinstallation later. For hinges that are not easily removable, consider carefully covering them with painter's tape to protect them from paint.
Sanding is crucial for creating a suitable surface for paint adhesion. Use medium-grit sandpaper (around 120-grit) to lightly sand the existing finish. The goal is not to remove the existing finish entirely but to create a slightly rough surface that the primer can grip onto. For glossy or particularly smooth surfaces, a heavier grit sandpaper (around 80-grit) may be necessary. After sanding, thoroughly remove the sanding dust with a tack cloth or a vacuum cleaner with a brush attachment. This step is essential, as any remaining dust can create imperfections in the final paint finish.
Priming is a critical step in the painting process, especially when painting over previously painted or stained surfaces. Primer creates a uniform surface, seals the existing finish, and improves paint adhesion. Select a high-quality primer that is compatible with both the existing finish and the chosen paint. Oil-based primers are generally more effective at sealing stains and preventing bleed-through, but they require longer drying times and emit stronger odors. Water-based primers are a more environmentally friendly option and dry faster, but they may not be as effective at blocking stains. Apply the primer in thin, even coats, following the manufacturer's instructions for drying time. Lightly sand the primed surface with fine-grit sandpaper (around 220-grit) to smooth out any imperfections before applying the paint.
Finally, protect the surrounding surfaces with painter's tape and drop cloths. Cover countertops, floors, appliances, and any other areas that you do not want to paint. Use high-quality painter's tape to create crisp, clean lines and prevent paint bleed. Secure the drop cloths with tape to prevent them from shifting during the painting process.
Key Point 2: Material Selection for Optimal Results
Choosing the right materials is essential for achieving a durable and aesthetically pleasing finish. The paint type, application tools, and supporting materials all contribute to the overall quality of the paint job.
For painting kitchen cupboards, acrylic latex paint is generally recommended. It is durable, easy to clean, and available in a wide range of colors and sheens. Choose a paint specifically formulated for kitchen cabinets, as these paints are designed to withstand the rigors of a kitchen environment, including moisture, grease, and frequent cleaning. Consider a paint with a satin or semi-gloss finish, as these sheens are more durable and easier to wipe clean than matte finishes. Avoid high-gloss finishes, as they tend to highlight imperfections in the surface.
Proper application tools are crucial for achieving a smooth and even finish. Use high-quality paint brushes and rollers designed for use with latex paint. For flat surfaces, a foam roller can provide a smooth, even coat. For detailed areas and tight corners, use a high-quality angled brush. Consider using a paint sprayer for a professional-looking finish, especially if you are painting a large number of cupboards. However, paint sprayers require practice and proper ventilation to avoid overspray and an uneven finish.
In addition to paint, primer, and application tools, several other materials are essential for a successful painting project. These include: painter's tape, drop cloths, sandpaper (various grits), a tack cloth, a degreasing cleaner, putty knife (for filling holes), wood filler (if needed), and safety glasses and gloves. Ensure that these materials are readily available before starting the painting process.
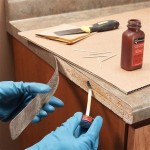
Wood filler is essential for repairing any imperfections, such as dents, scratches, or holes, in the cupboard surfaces. Apply the wood filler according to the manufacturer's instructions, allow it to dry completely, and then sand it smooth to blend seamlessly with the surrounding surface. A putty knife is useful for applying wood filler and smoothing out any imperfections in the surface.
Key Point 3: The Painting Process: Application Techniques
The painting process involves applying multiple thin, even coats of paint, allowing sufficient drying time between coats. The application technique significantly impacts the final finish. This section outlines the steps involved in applying the paint and achieving a professional result.
Begin by applying the first coat of paint to the prepared cupboard surfaces. Use a brush or roller to apply the paint in thin, even strokes, following the grain of the wood. Avoid applying too much paint at once, as this can lead to drips, runs, and an uneven finish. If using a roller, roll off excess paint onto a paint tray to prevent overloading the roller. For detailed areas and tight corners, use an angled brush to carefully apply the paint. Overlap each stroke slightly to ensure complete coverage and avoid leaving any gaps.
Allow the first coat of paint to dry completely according to the manufacturer's instructions. Drying times can vary depending on the type of paint, humidity, and temperature. Avoid rushing the drying process, as this can lead to an uneven finish and poor adhesion. Once the first coat is completely dry, lightly sand the surface with fine-grit sandpaper (around 220-grit) to smooth out any imperfections. Remove the sanding dust with a tack cloth before proceeding to the next coat.
Apply the second coat of paint using the same technique as the first coat. Again, use thin, even strokes and avoid applying too much paint at once. Pay particular attention to areas that may have been missed during the first coat. Allow the second coat to dry completely according to the manufacturer's instructions. For optimal durability and color saturation, consider applying a third coat of paint, especially if using a lighter color. Repeat the sanding process after each coat to ensure a smooth and even finish.
After the final coat of paint has dried completely, carefully remove the painter's tape. Pull the tape away from the painted surface at a 45-degree angle to prevent chipping or peeling the paint. Reinstall the hardware, ensuring that it is securely attached. Inspect the finished cupboards for any imperfections, such as drips, runs, or uneven areas. Touch up any imperfections with a small brush and allow the touch-up paint to dry completely.
Finally, allow the painted cupboards to cure for several days before using them. Curing allows the paint to fully harden and develop its maximum durability. Avoid placing heavy objects on the painted surfaces during the curing process. Once the paint has fully cured, the kitchen cupboards can be cleaned and maintained as usual. Use a mild soap and water solution to clean the surfaces, avoiding harsh chemicals or abrasive cleaners.
By following these detailed steps, homeowners can successfully paint their kitchen cupboards light grey, achieving a professional-looking finish that enhances the beauty and functionality of their kitchen.

20 Favorite Kitchen Cabinet Paint Colors According To Designers Blue Gray Cabinets Design Grey

Most Popular Cabinet Paint Colors Painted Kitchen Cabinets Grey Light

Grey Kitchen Ideas 10 Ways To Style It Cash Carry Kitchens

These Gray Kitchen Cabinets Offer A Neutral Twist Bob Vila

These Gray Kitchen Cabinets Offer A Neutral Twist Bob Vila

Top 10 Gray Cabinet Paint Colors Painted Kitchen Cabinets Grey Designs Makeover

Grey Kitchen Ideas 10 Ways To Style It Cash Carry Kitchens

The Six Best Paint Colors For Gray Kitchen Cabinets

Casual Pale Gray Kitchen Design Home Bunch Interior Ideas

40 Gray Kitchens That Are Anything But Dull
Related Posts