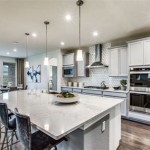
Painting Old Kitchen Cabinets: A Transformation with Before & After Pictures
Kitchen cabinets often bear the brunt of daily life, enduring spills, splatters, and the general wear and tear of a bustling household. Over time, even well-constructed cabinets can appear dated or worn, impacting the overall aesthetic of the kitchen. Replacing kitchen cabinets is a significant investment, both financially and in terms of time and disruption. A more economical and less invasive alternative is to repaint the existing cabinets. This article explores the process of painting old kitchen cabinets, illustrating the transformative potential with before and after visuals, and providing a comprehensive guide to achieving professional-looking results.
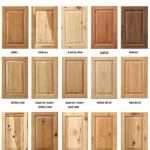
The decision to paint kitchen cabinets involves careful consideration. Factors to assess include the condition of the existing cabinets, the desired aesthetic outcome, and the level of commitment the project entails. Cabinets in good structural condition, with solid frames and minimal damage, are ideal candidates for painting. Cabinets with significant structural issues, such as warping, rotting, or extensive delamination, may require replacement rather than a cosmetic fix. The desired aesthetic should align with the overall style of the kitchen and the homeowner’s preferences. Finally, painting kitchen cabinets is a time-consuming process that requires patience and attention to detail. A realistic assessment of one’s capabilities and available time is crucial before embarking on the project.
Key Point 1: Preparation is Paramount
The success of any cabinet painting project hinges on thorough preparation. This stage involves cleaning, sanding, and priming, each playing a vital role in ensuring proper paint adhesion and a flawless finish. Neglecting any of these steps can lead to peeling, chipping, or an uneven appearance.
The first step is to remove all cabinet doors and drawers. Label each door and drawer with its corresponding cabinet location to facilitate reinstallation. Remove all hardware, including knobs, pulls, hinges, and any other decorative elements. Store the hardware in a safe place to prevent loss or damage. If the hardware is outdated or damaged, consider replacing it with new pieces to further enhance the transformation.
Next, thoroughly clean the cabinet doors, drawers, and frames. Use a degreasing cleaner to remove years of accumulated grease, grime, and food residue. A solution of trisodium phosphate (TSP) is highly effective for this purpose, but it is essential to wear gloves and eye protection when working with TSP. Rinse the surfaces thoroughly with clean water and allow them to dry completely.
Once the surfaces are clean and dry, sanding is necessary to create a slightly rough texture that will allow the primer to adhere properly. Use a medium-grit sandpaper (around 120-grit) to sand all surfaces, paying particular attention to areas with existing finishes or imperfections. Sand in the direction of the wood grain to avoid creating scratches. After sanding, use a tack cloth to remove all sanding dust. Dust is the enemy of a smooth paint finish, so meticulous dust removal is crucial.
Priming is the final step in the preparation process. Primer serves several important functions: it seals the existing finish, provides a uniform surface for the paint to adhere to, and blocks stains from bleeding through the new paint. Choose a high-quality primer that is specifically designed for use on cabinets. Oil-based primers are generally considered to be more durable and stain-blocking than water-based primers, but they also require more cleanup and have a stronger odor. Apply the primer in thin, even coats, using a brush, roller, or sprayer. Allow the primer to dry completely according to the manufacturer’s instructions before proceeding to the painting stage. Lightly sand the primed surfaces with a fine-grit sandpaper (around 220-grit) to create an even smoother surface before applying the paint.
Visual evidence of this stage is often seen in before-and-after galleries. The “before” pictures show cabinets coated in years of grime, perhaps with a glossy or damaged finish. The “after” preparation photos showcase clean, uniformly sanded, and primed surfaces, ready to receive the color.
Key Point 2: Selecting the Right Paint and Application Techniques
Choosing the right paint and applying it correctly are essential for achieving a durable and aesthetically pleasing finish on kitchen cabinets. The type of paint, its sheen, and the application method all contribute to the overall outcome of the project.
For kitchen cabinets, alkyd or acrylic-alkyd paints are generally recommended. Alkyd paints, also known as oil-based paints, offer excellent durability and a hard, washable finish. However, they require more cleanup and have a stronger odor compared to acrylic paints. Acrylic-alkyd paints offer a good balance of durability, ease of use, and low odor. Water-based acrylic paints are also an option, but they may not be as durable as alkyd or acrylic-alkyd paints. Consider using a paint specifically formulated for cabinets and furniture. These paints typically contain additives that improve adhesion, leveling, and durability.
The paint sheen is another important consideration. Sheen refers to the amount of light that reflects off the paint surface. Higher sheen paints, such as gloss or semi-gloss, are more durable and easier to clean, but they also tend to highlight imperfections. Lower sheen paints, such as matte or eggshell, are more forgiving of imperfections and create a softer look, but they may not be as durable or easy to clean. A satin or semi-gloss sheen is generally a good compromise for kitchen cabinets, providing a balance of durability, cleanability, and aesthetic appeal.
There are several methods for applying paint to kitchen cabinets: brushing, rolling, and spraying. Brushing is the most common method, particularly for smaller projects. Use a high-quality brush with synthetic bristles for the best results. Apply the paint in thin, even coats, using long, smooth strokes. Avoid applying too much paint at once, as this can lead to drips and runs. Rolling is a good option for larger, flat surfaces. Use a foam roller for the smoothest finish. Apply the paint in thin, even coats, overlapping each stroke slightly. Spraying is the fastest and most efficient method for painting kitchen cabinets, but it requires specialized equipment and a well-ventilated workspace. A sprayer will provide the most even and professional-looking finish.
Regardless of the application method, apply multiple thin coats of paint rather than one thick coat. Thin coats dry more evenly and are less prone to drips and runs. Allow each coat of paint to dry completely according to the manufacturer’s instructions before applying the next coat. Lightly sand between coats with a fine-grit sandpaper (around 320-grit) to remove any imperfections and create a smoother surface for the next coat of paint. After the final coat of paint has dried, consider applying a clear topcoat for added protection and durability. A polyurethane topcoat is a good option for kitchen cabinets, as it is resistant to scratches, stains, and moisture.
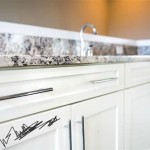
Before-and-after photos often showcase the difference between the applied paint and how it transforms the cabinets. Close-up shots might detail the smooth, even finish achieved by proper application techniques.
Key Point 3: Reassembly and Hardware Considerations
The final stage of the cabinet painting project involves reassembling the cabinets and installing the hardware. This stage is just as important as the preparation and painting stages, as it can significantly impact the overall look and functionality of the finished project.
Before reassembling the cabinets, allow the paint to cure completely. Curing is the process by which the paint fully hardens and becomes resistant to scratches and chips. The curing time will vary depending on the type of paint and the environmental conditions, but it is generally recommended to wait at least 24-48 hours before reassembling the cabinets.
Reinstall the cabinet doors and drawers, using the labels to ensure that each piece is placed in its correct location. Be careful not to scratch or damage the painted surfaces during reinstallation. If necessary, use shims to adjust the alignment of the doors and drawers. Reinstall the hardware, including knobs, pulls, and hinges. If you are using new hardware, be sure to select pieces that complement the new paint color and style of the kitchen. Consider using a drill with a screw-driving attachment to make the reinstallation process easier and faster.
Take this opportunity to address any other issues with the cabinets, such as loose hinges or damaged drawer slides. Tighten loose screws and replace any damaged parts. Lubricate the drawer slides to ensure smooth operation. Adding soft-close mechanisms to doors and drawers will provide a premium feel and prevent slamming.
After reassembling the cabinets and installing the hardware, inspect the finished project carefully. Touch up any areas where the paint is chipped or scratched. Clean the cabinets with a mild soap and water solution to remove any dust or fingerprints. Allow the cabinets to dry completely before using them. Displaying before-and-after shots of the hardware upgrade and properly reassembled cabinets demonstrates the complete renovation.
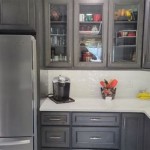
The before-and-after images in this final stage illustrate the stark contrast between the old, potentially uncoordinated hardware and the streamlined, updated look achieved with new or refinished hardware. They also highlight the overall transformation, showcasing the difference between the dated or worn cabinets and the freshly painted, revitalized kitchen.

Painting Kitchen Cabinets Before After The Stonybrook House

15 Diy Kitchen Cabinet Makeovers Before After Photos Of Cabinets

Our Painted Cabinets Five Years Later Nina Hendrick Home

9 Inspiring Kitchen Cabinet Makeovers Before And After Remodel Small Builder Grade Renovation

Kitchen Cabinet Colors Before After The Inspired Room

20 Pictures Of Before And After Kitchen Makeovers With Cost Painting Cabinets
How To Paint Fake Wood Kitchen Cabinets Simple Made Pretty 2024

Update On Our Diy White Painted Kitchen Cabinets 2 Years Later

Pa Wedding Photographer Diy Painted Kitchen Cabinets Before After

Diy Painting Your Kitchen Cabinets The Right Way
Related Posts