Painting Particle Board Kitchen Cabinets: A Comprehensive Guide
Particle board kitchen cabinets are a cost-effective and versatile option for homeowners seeking to upgrade their kitchens. However, painting these cabinets can be a challenging task if not approached properly. This article outlines the essential steps involved in painting particle board kitchen cabinets, ensuring a professional and durable finish.
1. Preparation:
Prior to painting, thorough preparation of the cabinet surfaces is crucial. Begin by removing all hardware, including handles, knobs, and hinges. Wipe down the cabinets with a damp cloth to remove any dirt or debris. Sand the surfaces lightly with fine-grit sandpaper to smooth any imperfections and enhance the paint adhesion.
2. Priming:
Priming is a critical step that helps create a smooth base for the paint. Apply a coat of high-quality primer specifically designed for particle board. Ensure even coverage and allow ample drying time before proceeding to the next step.
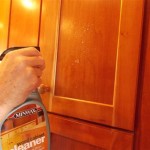
3. Painting:
Choose a paint that is specifically formulated for use on particle board, as it will provide superior adhesion and durability. Use a high-quality brush or roller to apply thin, even coats of paint. Allow each coat to dry completely before applying the next. Apply two to three coats until desired coverage is achieved.
4. Finishing:
Once the final coat of paint has dried, apply a protective finish to enhance the cabinet's longevity and durability. A polyurethane or clear varnish is recommended, as these products provide a glossy or matte finish while protecting the paint from scratches and stains. Allow the finish to cure according to the manufacturer's instructions.
5. Hardware Installation:
Once the cabinets are completely dry, reinstall the hardware. Make sure to use screws that are appropriate for the size and weight of the hardware. Tighten the screws securely to ensure a sturdy hold.
Tips:
- Always test the paint and finish on an inconspicuous area before applying it to the entire cabinet.
- Use a tack cloth to remove any dust or particles before applying the paint or finish.
- Allow ample drying time between coats to prevent imperfections. li>Use a light touch when sanding to avoid damaging the particle board.
- If painting white or light-colored cabinets, apply several thin coats to prevent brushstrokes.
How To Paint Fake Wood Kitchen Cabinets Simple Made Pretty 2024

How To Paint Pressed Wood Kitchen Cabinets Choice Cabinet

How To Paint Laminate Kitchen Cabinets Perfect Finish Tips

How To Paint Fake Wood Kitchen Cabinets Simple Made Pretty 2024

How To Paint Particle Board Or Pressed Wood Cabinets

Before After Plain Particleboard Cabinets Get A Cheery Spring Paint Job Kitchen Makeover Projects Diy

How To Paint Your Kitchen Cabinets Back Them In Bead Board And Not Die

5 Tips For Painting Melamine Cabinets Real Milk Paint Co

How To Paint Veneer Cabinets For A Long Lasting Finish Anika S Diy Life

How To Paint Laminate Cabinets Everything You Need Know
Related Posts