Painting Raw Wood Kitchen Cabinets: A Comprehensive Guide
Painting raw wood kitchen cabinets can dramatically transform the look and feel of a kitchen, breathing new life into the space and adding value to the home. This endeavor, however, requires careful planning, preparation, and execution to achieve a professional, durable finish. This article provides a comprehensive guide to painting raw wood kitchen cabinets, covering essential steps from surface preparation to the final coat of paint.
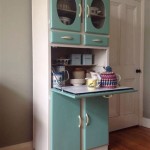
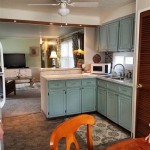
The decision to paint raw wood cabinets stems from various motivations. Homeowners may desire a stylistic change, opting for a brighter, more modern aesthetic. Others might seek to protect the wood from moisture, stains, and general wear and tear, extending the lifespan of the cabinets. Regardless of the reason, understanding the intricacies of painting raw wood is crucial for achieving optimal results.
Raw wood possesses unique characteristics that differentiate it from pre-finished surfaces. Its porous nature readily absorbs liquids, making it susceptible to uneven paint application if not properly primed. The grain of the wood also influences how the paint adheres and appears. Moreover, raw wood often contains knots and imperfections that necessitate specific preparation techniques to ensure a smooth, flawless finish.
Key Point 1: Essential Preparation Steps for Raw Wood Cabinets
Proper preparation is undeniably the most critical phase of painting raw wood kitchen cabinets. Skimping on preparation can lead to paint adhesion problems, uneven coverage, and a less-than-desirable final result. The following steps outline the necessary preparation procedures:
1. Disassembly and Hardware Removal: Begin by meticulously removing all cabinet doors and drawers. Label each piece clearly to facilitate reassembly later. Remove all hardware, including knobs, pulls, hinges, and any other decorative elements. Store the hardware in a safe place to avoid loss or damage. Consider replacing old hardware with new options to further enhance the updated look of the cabinets.
2. Cleaning and Degreasing: Even seemingly clean raw wood cabinets can harbor dust, dirt, and oils that can impede paint adhesion. Thoroughly clean all surfaces with a degreasing cleaner and a sponge or cloth. Pay particular attention to areas around handles and knobs, where grease and grime tend to accumulate. Rinse the cabinets with clean water and allow them to dry completely before proceeding.
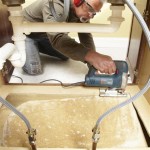
3. Sanding: Sanding is essential for creating a smooth, even surface and improving paint adhesion. Use a medium-grit sandpaper (120-150 grit) to sand the entire surface of the cabinets. Focus on removing any imperfections, such as raised grain or rough spots. After the initial sanding, switch to a finer-grit sandpaper (220 grit) to create an even smoother surface. This step is crucial for minimizing the appearance of the wood grain and achieving a professional finish. Remember to sand lightly and evenly, avoiding excessive pressure that could damage the wood.
4. Filling Imperfections: Raw wood often contains knots, cracks, and other imperfections that require filling. Use a high-quality wood filler to fill any imperfections, following the manufacturer's instructions. Allow the wood filler to dry completely and then sand it smooth with fine-grit sandpaper. It may be necessary to apply multiple coats of wood filler to completely fill larger imperfections. Ensure the wood filler is compatible with both the primer and the paint being used.
5. Dust Removal: After sanding and filling, thoroughly remove all dust particles from the cabinets. Use a vacuum cleaner with a brush attachment to remove loose dust. Follow this with a tack cloth to pick up any remaining dust particles. A clean surface is essential for optimal primer and paint adhesion.
Key Point 2: Priming for Optimal Paint Adhesion and Coverage
Priming is a crucial step in painting raw wood cabinets. Primer not only provides a uniform surface for the paint to adhere to but also seals the wood, preventing it from absorbing excessive amounts of paint. This can result in better coverage, a more durable finish, and a more consistent color.
Choosing the Right Primer: Selecting the appropriate primer is vital for achieving the desired results. Oil-based primers are generally recommended for raw wood because they provide excellent sealing and stain-blocking properties. They are particularly effective at preventing tannin bleed-through, which can occur with certain types of wood. However, oil-based primers have a longer drying time and require mineral spirits for cleanup. Latex primers are another option. While they are easier to clean up and have a lower odor, they may not be as effective at sealing the wood or preventing tannin bleed-through. Shellac-based primers are also available and offer excellent sealing and stain-blocking properties. They dry quickly but can be more difficult to work with.
Applying the Primer: Apply the primer in thin, even coats using a brush, roller, or sprayer. Brushes are ideal for detail work and corners, while rollers are better suited for large, flat surfaces. Paint sprayers can provide a smooth, even finish but require more skill and experience to operate effectively. Allow the primer to dry completely according to the manufacturer's instructions before proceeding to the next step. Sand the primed surface lightly with fine-grit sandpaper to create an even smoother surface for painting. Remove any dust particles with a tack cloth before applying the paint.
Addressing Specific Wood Types: Certain wood types, such as knotty pine or cedar, may require special attention during priming. These woods tend to have a high oil content, which can interfere with paint adhesion. In such cases, it may be necessary to apply two coats of primer or use a specialized primer designed for oily woods. Always consult the manufacturer's recommendations for the specific primer being used.
Key Point 3: Painting Techniques and Material Selection
The final step in painting raw wood kitchen cabinets involves selecting the right paint and applying it effectively. This phase determines the overall aesthetic of the cabinets and contributes significantly to their durability and longevity.
Choosing the Right Paint: Selecting the appropriate paint type and finish is crucial. Alkyd or acrylic-based paints are recommended for kitchen cabinets due to their durability, ease of cleaning, and resistance to moisture and stains. Alkyd paints provide a harder, more durable finish than acrylic paints but have a longer drying time and require mineral spirits for cleanup. Acrylic paints are easier to clean up and have a lower odor. As for finish, semi-gloss or gloss finishes are popular choices for kitchen cabinets because they are easy to clean and provide a durable, moisture-resistant surface. Satin finishes are also a viable option, offering a slightly more subdued sheen. Matte finishes, while aesthetically pleasing, are generally not recommended for kitchen cabinets because they are more difficult to clean and less resistant to moisture and stains.
Applying the Paint: Apply the paint in thin, even coats using a brush, roller, or sprayer. Similar to priming, brushes are ideal for detail work and corners, while rollers are better suited for large, flat surfaces. Paint sprayers can provide a smooth, even finish but require more skill and experience to operate effectively. Avoid applying the paint too thickly, as this can lead to drips, runs, and uneven drying. Allow each coat of paint to dry completely according to the manufacturer's instructions before applying the next coat. Lightly sand the painted surface with fine-grit sandpaper between coats to create an even smoother finish. Remove any dust particles with a tack cloth before applying the final coat of paint.
Number of Coats: Typically, two coats of paint are sufficient to achieve full coverage and a durable finish. However, depending on the color and the type of paint being used, it may be necessary to apply three coats. Always follow the manufacturer's recommendations for the specific paint being used.
Curing Time: Allow the painted cabinets to cure completely before reassembling them and installing the hardware. Curing time varies depending on the type of paint being used and the environmental conditions. Typically, it takes several days or even a week for the paint to fully cure. During the curing process, avoid touching or scratching the painted surfaces.
By adhering to these detailed preparation, priming, and painting techniques, individuals can effectively transform raw wood kitchen cabinets into beautiful and durable focal points of the home. The key to success lies in meticulous attention to detail and a commitment to quality throughout the entire process.

How To Paint Unfinished Cabinets Houseful Of Handmade

All You Need To Know About Unfinished Cabinets Cc

How To Stain Unfinished Cabinets Painting By The Penny

How To Paint Kitchen Cabinets Without Sanding Or Priming

How To Paint Pressed Wood Kitchen Cabinets Choice Cabinet

Should I Paint Or Refinish My Kitchen Cabinets

How To Paint Kitchen Cabinets In 7 Simple Steps

How To Stain Unfinished Cabinets Painting By The Penny

How To Paint Pine Cabinets Confessions Of A Serial Do It Yourselfer
How To Paint Kitchen Cabinets In 7 Simple Steps
Related Posts