Painting St. Charles Kitchen Cabinets With Doors: A Comprehensive Guide
St. Charles kitchen cabinets represent a legacy of quality and timeless design. However, even the most enduring materials can benefit from a refresh. Painting these cabinets offers a cost-effective way to update a kitchen's aesthetic without the expense of a complete renovation. The process, particularly when involving the cabinet doors, requires careful planning and execution to achieve a professional and lasting finish. This article provides a thorough guide to painting St. Charles kitchen cabinets, with a specific focus on techniques and considerations related to the doors.
Preparing St. Charles Kitchen Cabinets for Painting
Proper preparation is paramount to a successful paint job. This stage involves cleaning, sanding, and priming, each serving a vital role in ensuring the new paint adheres correctly and provides a durable finish. Unlike some modern cabinets, St. Charles cabinets often feature robust construction and a durable original finish. This necessitates a more thorough preparation process to create a suitable surface for the new paint.
The initial step involves removing all hardware, including hinges, knobs, and handles. This facilitates thorough cleaning and prevents paint from damaging or adhering to the hardware. Store the hardware in labeled containers to ease reinstallation later. Take photographs of the cabinet and drawer configurations before disassembly to aid in reassembly.
Cleaning is the next essential step. Use a degreasing cleaner specifically designed for kitchen cabinets. Years of accumulated grease, dirt, and grime can hinder paint adhesion. Apply the cleaner according to the manufacturer's instructions, paying close attention to areas around stovetops and sinks where grease buildup is typically more significant. Rinse thoroughly with clean water and allow the cabinets to dry completely.
Sanding is crucial for creating a mechanically sound surface for the primer and paint. Use a medium-grit sandpaper (around 120-grit) to lightly scuff the existing finish. Focus on removing any gloss or imperfections without sanding down to the bare metal. For intricate details or hard-to-reach areas, consider using a sanding sponge or detail sander. After sanding, thoroughly remove all sanding dust with a tack cloth or a damp cloth. Failure to remove sanding dust will result in a textured, uneven paint finish.
Priming is a critical step, especially when painting over a previously glossy or dark finish. A high-quality primer helps the paint adhere better, blocks stains, and provides a uniform base color. Choose a primer specifically designed for metal or painted surfaces. Apply the primer in thin, even coats using a high-quality brush or sprayer. Allow the primer to dry completely according to the manufacturer's instructions. Depending on the color change, two coats of primer may be necessary. Lightly sand the primed surface with fine-grit sandpaper (around 220-grit) to smooth out any imperfections before applying paint.
Painting St. Charles Kitchen Cabinet Doors
Painting the doors requires extra attention due to their complexity and visibility. Removing the doors from the frames allows for a more controlled painting process and ensures a smoother, more even finish. Proper door handling and painting techniques are critical to achieving a professional-looking result.
After removing the doors, carefully inspect them for any damage, such as chips, dents, or cracks. Fill any imperfections with wood filler or auto body filler, depending on the extent of the damage. Allow the filler to dry completely and sand it smooth with fine-grit sandpaper before priming.
Choose a high-quality paint specifically designed for cabinets. Acrylic latex or alkyd paints are popular choices due to their durability, ease of application, and ability to withstand repeated cleaning. Consider the sheen level carefully. Semi-gloss or satin sheens are typically recommended for kitchen cabinets because they are durable and easy to clean. However, higher sheen levels can accentuate imperfections in the door surfaces. Matte or eggshell finishes hide imperfections better but may be less durable and harder to clean.
There are two primary methods for applying paint: brushing and spraying. Brushing is a more economical option and requires less specialized equipment. When brushing, use a high-quality brush designed for the type of paint you are using. Apply the paint in thin, even coats, following the grain of the wood (if applicable). Avoid applying too much paint at once, as this can lead to drips and runs. “Tipping off” each coat involves lightly dragging the brush along the wet paint surface to eliminate brushstrokes and create a smoother finish.
Spraying provides a smoother, more professional-looking finish, but it requires specialized equipment, such as an airless sprayer or HVLP (high-volume, low-pressure) sprayer. Before spraying, practice on a piece of cardboard to get a feel for the sprayer and the paint flow. Apply the paint in thin, even coats, overlapping each pass slightly. Maintain a consistent distance from the door surface and move the sprayer at a steady pace. Multiple thin coats are better than one thick coat, which can lead to runs and drips. Properly ventilate the workspace when spraying paint.
Regardless of the application method, allow each coat of paint to dry completely according to the manufacturer's instructions. Lightly sand between coats with fine-grit sandpaper to remove any imperfections and create a smoother surface for the next coat. Apply at least two coats of paint for optimal coverage and durability.
Reassembling and Finishing Touches
Once the paint has completely dried and cured, reassemble the cabinet doors and reinstall the hardware. Allow ample time for the paint to fully cure before handling the doors extensively or placing items on the shelves. Proper curing is crucial for the paint's durability and resistance to chipping and scratching.
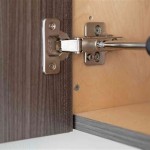
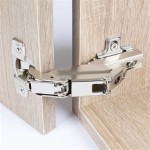
Before reattaching the doors, inspect the hinges and replace any that are worn or damaged. Clean the existing hardware thoroughly before reinstalling it. Consider replacing old hardware with new hardware to further update the look of the cabinets. Ensure the doors are properly aligned and that they open and close smoothly. Adjust the hinges as needed to achieve proper alignment.
After the doors are reinstalled, inspect the entire cabinet system for any missed spots or imperfections. Touch up any areas as needed with a small brush or touch-up pen. Clean the surrounding areas to remove any dust or debris. Apply furniture polish to the painted surfaces to protect the finish and enhance its shine.
Consider adding new shelf liners to protect the cabinet interiors. Organize the contents of the cabinets in a way that is both functional and aesthetically pleasing. Avoid overcrowding the cabinets, as this can lead to wear and tear on the painted surfaces. Post-painting maintenance involves regular cleaning with a mild soap and water solution. Avoid using harsh chemicals or abrasive cleaners, as these can damage the paint. Address any chips or scratches promptly to prevent further damage.

One Ingenious Couple Two Sets Of Vintage St Charles Kitchen Cabinets A Gorgeous Midcentury Modern Remodel Retro Renovation

Cabinet Painting In Saint Charles Certapro Painters Of

Robert And Ine S Mid Century Home With Dreamy St Charles Kitchen Cabinets Retro Renovation Cabinet Design Metal Interior

Professional Cabinet Painting St Charles Chicagoland Prime Time

One Ingenious Couple Two Sets Of Vintage St Charles Kitchen Cabinets A Gorgeous Midcentury Modern Remodel Retro Renovation

Cabinet Painting In Saint Charles Certapro Painters Of

Kitchen Cabinet Painters In St Charles Il Zip Codes 60174 60175 Blue Door Painting

Cabinet Painting In Saint Charles Certapro Painters Of

Vintage St Charles Kitchen Cabinets With Thermador Ovens And Lots More Retro Renovation

Cabinet Painting In Saint Charles Certapro Painters Of
Related Posts