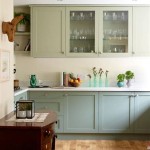
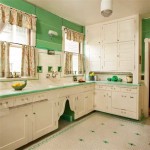
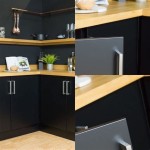
Painting Techniques for Kitchen Cabinets
Updating kitchen cabinets is a cost-effective way to revitalize a kitchen's appearance. Painting cabinets, rather than replacing them, allows for significant aesthetic changes without the substantial expense and disruption of a full remodel. Several painting techniques can achieve professional-looking results with careful preparation and execution.
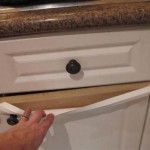
Proper preparation is crucial for a successful cabinet painting project. This involves thoroughly cleaning the cabinet surfaces to remove grease, grime, and food residue. A degreasing cleaner specifically designed for kitchen surfaces is recommended. After cleaning, lightly sanding the cabinets with fine-grit sandpaper creates a slightly rough surface for better paint adhesion. This sanding step is essential even for cabinets with a factory finish. Any existing hardware, such as knobs and hinges, should be removed before painting begins.
Protecting surrounding areas from paint splatters and drips is an essential part of the preparation process. Covering countertops, floors, and appliances with drop cloths or plastic sheeting prevents accidental damage. Masking tape should be used to protect areas that are not being painted, such as the inside edges of the cabinet boxes and any adjacent walls.
Priming the cabinets ensures proper paint adhesion and provides a uniform base for the topcoat. An oil-based primer is often preferred for cabinets due to its excellent adhesion and ability to block stains. However, high-quality latex primers also provide good results, offering lower VOC emissions and faster drying times. Apply the primer in thin, even coats, allowing sufficient drying time between coats as specified by the manufacturer's instructions.
Choosing the right paint is crucial for achieving a durable and attractive finish. Paints specifically formulated for cabinets offer superior hardness and resistance to chipping and scrubbing. Options include oil-based alkyd paints, latex acrylic paints, and acrylic-alkyd hybrids. Oil-based paints offer exceptional durability but require longer drying times and produce stronger fumes. Latex paints are easier to clean up and dry faster but may not be as durable as oil-based options. Acrylic-alkyd hybrids combine the benefits of both types, offering good durability and ease of application.
Several techniques can be employed for applying paint to cabinets. Brushing offers excellent control and is ideal for intricate details and recessed areas. Rolling is a faster method for covering larger, flat surfaces. Spraying provides a smooth, even finish, especially for cabinets with raised panel doors. Regardless of the chosen method, applying thin, even coats is crucial to prevent drips and runs. Allow ample drying time between coats according to the manufacturer's instructions.
Spray painting cabinets offers distinct advantages, particularly for achieving a smooth, factory-like finish. However, proper technique and equipment are essential for successful spray painting. An HVLP (High Volume Low Pressure) sprayer minimizes overspray and provides a fine, even coat. Practicing on a scrap piece of wood or cardboard is recommended before spraying the cabinets. Maintaining a consistent distance and speed while spraying is key to achieving a uniform finish.
When using a brush to paint cabinets, selecting the appropriate brush type is important. A high-quality angled sash brush with synthetic bristles is well-suited for painting cabinet doors and frames. Dip the brush into the paint, covering about one-third of the bristles, and tap off excess paint against the inside of the can. Apply the paint in long, smooth strokes, following the wood grain. Avoid overloading the brush, as this can lead to drips and brush marks.
Using a roller for painting cabinet boxes and larger flat surfaces can expedite the process. A small foam roller with a smooth surface provides a fine finish with minimal stippling. Pour a small amount of paint into a paint tray and roll the roller back and forth in the tray to evenly distribute the paint. Apply the paint in overlapping strokes, maintaining a consistent pressure to avoid creating roller marks.
After the final coat of paint has dried thoroughly, the cabinet hardware can be reinstalled. If desired, new hardware can be chosen to update the look of the cabinets. Carefully align the hardware with the existing holes and tighten the screws securely. Avoid overtightening, which could damage the cabinet finish.
Maintaining the newly painted cabinets will ensure their longevity. Clean the cabinets regularly with a damp cloth and mild soap solution. Avoid using abrasive cleaners or scouring pads, as these can scratch the paint surface. Promptly address any spills or splatters to prevent staining. With proper care, painted kitchen cabinets can provide years of beauty and functionality.

How To Paint Kitchen Cabinets In 7 Simple Steps

How To Paint Kitchen Cabinets Without Sanding Or Priming

How To Prep And Paint Kitchen Cabinets Lowe S

Avoid These Mistakes How To Paint Cabinets That Are Already Painted Grace In My Space

How To Paint Kitchen Cabinets

Popular Cabinet Painting Techniques Cabinets Painted Furniture Makeover

How To Paint Kitchen Cabinets In 7 Simple Steps

How To Paint Kitchen Cabinets Best Color Ideas Cost

Faux Painting Kitchen Surfaces Walls Cabinets Floors Countertops

Chalk Painted Kitchen Cabinets 2 Years Later Our Storied Home
Related Posts