Redo Kitchen Cabinets Diy: A Comprehensive Guide to Transform Your Kitchen
Tired of drab and outdated kitchen cabinets? Embark on a transformative DIY project to revitalize your kitchen's appearance and functionality. With meticulous planning and a bit of elbow grease, you can achieve stunning results that will leave your space looking refreshed and rejuvenated.
1. Preparation and Planning:
Thoroughly assess your cabinets' condition and determine the desired outcome. Consider repainting, refacing, or replacing them entirely. Create a detailed plan outlining the materials, tools, and timeline for your project.
2. Choosing Materials and Tools:
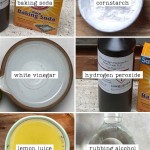
Select high-quality materials that complement your kitchen's style and durability. For repainting, opt for premium paint and primer. For refacing, consider durable veneers or laminates. Gather essential tools such as screwdrivers, paintbrushes, rollers, and a sanding machine.
3. Surface Preparation:
Thoroughly clean the cabinet surfaces to remove any dirt or grease. Remove hardware, such as knobs and handles, and sand the surfaces lightly to create a smooth base for painting or refacing.
4. Painting:
Apply a thin coat of primer to enhance paint adhesion. Allow it to dry completely before applying two coats of your chosen paint color. Use smooth, even brush or roller strokes to achieve a professional finish.
5. Refacing:
Measure and cut the new veneer or laminate to fit the cabinet frames. Use strong adhesive or nails to secure them, ensuring a secure bond. Smooth out any edges or seams for a seamless appearance.
6. Reinstallation:
Once the paint or veneer is dry, reinstall the cabinet doors and hardware. Ensure everything fits snugly and operates smoothly. Clean any excess paint or adhesive for a polished look.
7. Finishing Touches:
Step back and admire your transformed kitchen. Add small accents, such as new knobs or backsplash tiles, to complete the look and create a cohesive design.
Additional Tips:
- Consider hiring a professional if you are unsure about any aspect of the project.
- Use a dust mask and eye protection during sanding and painting.
- Allow ample drying time between coats of paint or adhesive to ensure proper adhesion.
- Protect your floors and surrounding areas from paint splatters or adhesive spills.
- Enjoy the satisfaction of creating a beautiful and functional kitchen space that reflects your personal style.

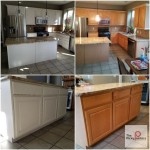
Diy Painted Oak Kitchen Cabinets Makeover

21 Diy Affordable Ways To Redo Kitchen Cabinets Extra Space Storage

How To Paint Kitchen Cabinets Budget Friendly Makeover

A Diy Project Painting Kitchen Cabinets

Diy Painting Your Kitchen Cabinets The Right Way

15 Diy Kitchen Cabinet Makeovers Before After Photos Of Cabinets

Diy Kitchen Cabinets 25 And Easy Ideas For An Update Joyful Derivatives

Diy Kitchen Cabinets Makeover How To Install New Cabinet Glass Inserts

How To Refinish Cabinets Like A Pro

8 Low Cost Diy Ways To Give Your Kitchen Cabinets A Makeover Decoist
Related Posts