Redo White Kitchen Cabinets: A Comprehensive Guide
White kitchen cabinets remain a perpetually popular choice for homeowners due to their versatility, timeless appeal, and ability to brighten any kitchen space. However, over time, even the most pristine white cabinets can begin to show signs of wear and tear, or simply start to feel outdated. Refacing, repainting, or completely replacing white kitchen cabinets are viable options for breathing new life into the heart of the home. Understanding the nuances of each approach, the associated costs, and the potential challenges is crucial for making an informed decision and achieving a desirable outcome.
This article will explore the various methods for revitalizing white kitchen cabinets, providing a detailed overview of each process, including preparation, required materials, potential problems, and maintenance considerations. The aim is to equip homeowners with the knowledge necessary to choose the best strategy for their specific needs and budget, whether they opt for a DIY project or enlist the help of professional contractors.
Assessing Existing Cabinets and Defining Goals
Before embarking on any cabinet renovation project, a thorough assessment of the current condition of the existing cabinets is paramount. This evaluation will help determine the most appropriate course of action. Factors to consider include the structural integrity of the cabinets, the type of material they are made of (wood, laminate, thermofoil, etc.), and the extent of any damage, such as scratches, dents, water damage, or peeling veneer. The overall design of the kitchen and the desired aesthetic should also inform the decision-making process.
If the cabinet boxes themselves are structurally sound and the layout of the kitchen remains functional, refacing or repainting may be the most cost-effective solutions. Refacing involves replacing the cabinet doors and drawer fronts while applying a new veneer to the exposed cabinet boxes. Repainting, on the other hand, simply involves applying a fresh coat of paint to the existing surfaces after proper preparation. However, if the cabinet boxes are damaged beyond repair, or if a significant change in the kitchen layout is desired, complete replacement may be the only feasible option.
Defining clear goals for the project is equally important. Is the primary objective to refresh the appearance of the cabinets without significantly altering the overall design? Or is the intention to modernize the kitchen with a completely new style? Understanding these objectives will help narrow down the choices and ensure that the chosen method aligns with the desired outcome. For example, simply repainting existing cabinets may be sufficient to brighten the space, while refacing or replacing them may be necessary to achieve a more dramatic transformation.
Repainting White Kitchen Cabinets: A Detailed Process
Repainting white kitchen cabinets is a popular and relatively affordable way to update their appearance. However, achieving a professional-looking finish requires careful preparation and attention to detail. The process involves several key steps, each of which contributes to the final result.
The first step is thorough cleaning. All surfaces must be cleaned to remove grease, dirt, and any other contaminants that could interfere with the paint's adhesion. A degreasing cleaner specifically designed for kitchen cabinets is recommended. After cleaning, the surfaces must be rinsed with clean water and allowed to dry completely.
Next, remove all hardware, such as knobs, pulls, and hinges. This will allow for easier painting and prevent paint from getting on the hardware. If the hardware is to be reused, clean it thoroughly. If not, consider replacing it with new hardware to further enhance the updated look of the cabinets.
Sanding is a crucial step in preparing the cabinets for paint. Sanding creates a slightly rough surface that allows the primer and paint to adhere properly. Use a medium-grit sandpaper (around 120-150 grit) to lightly sand all surfaces. Pay particular attention to areas that have a glossy finish. After sanding, remove all dust with a tack cloth or vacuum cleaner.
Priming is essential for achieving a smooth, even finish and ensuring that the paint adheres properly. Use a high-quality primer specifically designed for kitchen cabinets. The primer should be applied in thin, even coats, following the manufacturer's instructions. Allow the primer to dry completely before proceeding to the next step. Multiple coats of primer may be necessary, depending on the existing surface and the type of primer used.
Finally, apply the paint. Choose a high-quality paint specifically designed for kitchen cabinets. Oil-based paints are durable and provide a smooth, hard finish, but they require more time to dry and can be more difficult to clean up. Latex paints are easier to clean up and dry faster, but they may not be as durable as oil-based paints. Apply the paint in thin, even coats, using a brush, roller, or sprayer. Multiple coats of paint are typically required, allowing each coat to dry completely before applying the next. Lightly sand between coats with fine-grit sandpaper (around 220 grit) to remove any imperfections and create a smoother surface.
After the final coat of paint has dried completely, reattach the hardware. Take care not to scratch or damage the painted surface during this process. Consider using new screws to ensure a secure fit. The newly repainted cabinets should be allowed to cure for several days before heavy use.
Refacing White Kitchen Cabinets: A Practical Alternative
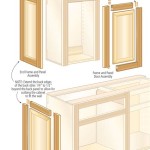
Refacing kitchen cabinets is a more involved process than repainting, but it can offer a more dramatic transformation without the expense and disruption of a complete kitchen remodel. Refacing involves replacing the cabinet doors and drawer fronts with new ones, while applying a new veneer or laminate to the exposed cabinet boxes.
The first step in refacing is to measure the existing cabinet boxes and determine the size and style of the new doors and drawer fronts. It's crucial to take accurate measurements to ensure that the new components fit properly. Consider ordering samples of different door styles and finishes to help visualize the final result.
Once the new doors and drawer fronts have been selected, order them from a reputable supplier. Many companies specialize in cabinet refacing materials and can provide custom-sized doors and drawer fronts to match the existing cabinet boxes. The materials used for the new doors and drawer fronts can vary, ranging from solid wood to MDF (medium-density fiberboard) with a veneer or laminate finish.
While waiting for the new doors and drawer fronts to arrive, prepare the cabinet boxes. This involves cleaning the surfaces thoroughly and removing any loose or damaged veneer. Sanding the surfaces can help create a better bond for the new veneer or laminate. Fill any holes or imperfections with wood filler and sand smooth.
Apply the new veneer or laminate to the exposed cabinet boxes. This can be done using contact cement or a peel-and-stick adhesive, depending on the type of material used. Follow the manufacturer's instructions carefully to ensure a proper bond. Use a roller or other tool to press the veneer or laminate firmly against the cabinet boxes. Trim any excess material with a utility knife or router.
Once the new veneer or laminate has been applied, install the new doors and drawer fronts. This typically involves attaching the hinges to the cabinet boxes and the doors, and then aligning the doors and adjusting the hinges as necessary. Install the new drawer fronts using screws or other fasteners. Ensure that the doors and drawers open and close smoothly and that they are properly aligned.
Finally, install new hardware, such as knobs and pulls. This will complete the refacing process and give the cabinets a fresh, new look. Consider using hardware that complements the style of the new doors and drawer fronts.
Replacing White Kitchen Cabinets: A Complete Overhaul
Replacing kitchen cabinets is the most extensive and expensive option, but it offers the opportunity to completely transform the kitchen layout and design. This approach is typically chosen when the existing cabinets are damaged beyond repair, when a significant change in the kitchen layout is desired, or when the homeowner wants to upgrade to higher-quality cabinets.
The first step in replacing kitchen cabinets is to plan the new layout and design. This involves considering the available space, the desired functionality, and the overall aesthetic. Work with a kitchen designer or use online planning tools to create a detailed layout that meets your needs. Consider factors such as cabinet height, depth, and width, as well as the placement of appliances and countertops.
Once the layout has been finalized, select the new cabinets. Cabinets are available in a wide range of styles, materials, and finishes. Consider factors such as budget, durability, and aesthetics when making your selection. Options include stock cabinets, semi-custom cabinets, and custom cabinets. Stock cabinets are pre-made and readily available, while custom cabinets are made to order and can be tailored to specific needs. Semi-custom cabinets offer a balance between the two.
After the cabinets have been selected, order them from a reputable supplier. Ensure that the order includes all necessary components, such as doors, drawer fronts, shelves, and hardware. Check the order carefully to ensure that all items are correct.
Before installing the new cabinets, disconnect the plumbing and electrical connections to any appliances that will be affected by the installation. Remove the existing cabinets carefully, taking care not to damage the walls or floors. Dispose of the old cabinets properly.
Install the new cabinets according to the manufacturer's instructions. Start by installing the base cabinets, ensuring that they are level and secure. Then, install the wall cabinets, again ensuring that they are level and secure. Connect the cabinets to each other using screws or other fasteners.
After the cabinets have been installed, reconnect the plumbing and electrical connections to the appliances. Install the countertops, backsplash, and any other finishing touches. Install the hardware, such as knobs and pulls.
Replacing kitchen cabinets is a significant undertaking that can require the expertise of professional contractors. Consider hiring a qualified installer to ensure that the job is done correctly and safely.

4 Smart Ways To Make White Cabinets Work

Bright White Kitchen Makeover On A Budget

Kitchen Remodel Chapter 3 The Big Reveal Young House Love

21 Diy Affordable Ways To Redo Kitchen Cabinets Extra Space Storage

White Kitchen Cabinets Pictures Options Tips Ideas

White Kitchen Remodel

Our Dark To White Kitchen Remodel Before And After Setting For Four Interiors

10 Simple Ideas To Update Your Kitchen Cabinets Jenna Sue Design

21 Diy Affordable Ways To Redo Kitchen Cabinets Extra Space Storage

How To Re Paint Your Yucky White Cabinets
Related Posts