Redoing Old Kitchen Cupboards: A Comprehensive Guide
Kitchen cupboards are a focal point in any kitchen design, contributing significantly to both the aesthetics and functionality of the space. Over time, however, they can become worn, outdated, or simply no longer suit the homeowner's evolving tastes. Replacing them entirely can be a costly and disruptive undertaking. Redoing existing kitchen cupboards offers a practical and economical alternative, allowing for a significant transformation without the expense and inconvenience of a full-scale renovation.
Redoing kitchen cupboards involves a multifaceted approach, encompassing cleaning, repairing, refinishing, and potentially altering their configuration or hardware. The specific methods employed will depend on the current condition of the cupboards, the desired aesthetic outcome, and the homeowner's budget and skill level. A thorough assessment is crucial before embarking on any project to ensure that the chosen approach is appropriate and achievable.
Assessing the Condition of Your Cupboards
Before commencing any work, a comprehensive evaluation of the existing cupboards is paramount. This assessment should address several key aspects: the material composition, the structural integrity, and the extent of any existing damage. Different materials, such as solid wood, plywood, or laminate, will require different preparation and refinishing techniques. Solid wood cupboards, for example, can typically withstand sanding and re-staining, while laminate surfaces may necessitate specialized primers and paints designed for adhesion to slick surfaces.
Structural integrity is another critical factor. Inspect the cupboard doors and frames for signs of warping, splitting, or loose joints. Minor repairs, such as tightening screws or filling small cracks, are usually manageable. However, if the cupboards are severely damaged or structurally unsound, replacement may be a more cost-effective and long-term solution. Examine the hinges and drawer slides for wear and tear. Replacing these components can significantly improve the functionality of the cupboards, regardless of their aesthetic appearance.
Finally, thoroughly inspect the cupboards for any existing damage, such as scratches, dents, water stains, or mold. Scratches and dents can often be repaired with wood filler or specialized putty. Water stains may require extensive cleaning and potentially bleaching to remove discoloration. Mold growth must be addressed promptly and effectively to prevent health hazards and further deterioration of the cupboards. Identifying and addressing these issues early on will prevent them from compromising the final result.
Preparation is Key: Cleaning and Sanding
Proper preparation is essential for achieving a professional and durable finish. The first step is to remove all hardware, including knobs, pulls, hinges, and drawer slides. Label each piece clearly to ensure easy reassembly later. Clean the cupboards thoroughly with a degreasing cleaner to remove any accumulated grease, grime, and dirt. A solution of warm water and dish soap is often sufficient, but stubborn stains may require a stronger cleaning agent. Rinse the cupboards thoroughly with clean water and allow them to dry completely before proceeding.
Sanding is a crucial step in preparing the cupboards for refinishing. Sanding removes the existing finish, creates a smooth surface for the new finish to adhere to, and helps to blend any repairs that have been made. The appropriate grit of sandpaper will depend on the type of finish being removed and the condition of the wood. Begin with a coarser grit sandpaper (e.g., 80-100 grit) to remove the bulk of the existing finish, followed by progressively finer grits (e.g., 120-180 grit, then 220 grit) to smooth the surface. Use a sanding block or orbital sander to ensure an even finish, paying particular attention to corners and edges. After sanding, remove all dust with a tack cloth or vacuum cleaner.
For laminate or other non-porous surfaces, sanding is still important, but the goal is to create a "tooth" for the primer to grip onto rather than removing a thick layer of finish. Use a fine-grit sandpaper (e.g., 220 grit) and lightly scuff the surface. It is crucial to use a primer specifically designed for laminate surfaces to ensure proper adhesion of the paint.
Refinishing Techniques: Painting, Staining, and More
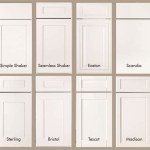
The choice of refinishing technique will largely depend on the desired aesthetic and the type of material the cupboards are made of. Painting is a popular option for both wood and laminate cupboards, offering a wide range of colors and finishes to choose from. When painting, it is essential to use a high-quality primer designed for the specific material being painted. The primer will help to seal the surface, block stains, and provide a good base for the paint to adhere to. Apply two or three coats of paint, allowing each coat to dry completely before applying the next. Use a brush, roller, or sprayer to apply the paint, depending on the desired finish and the size of the project.
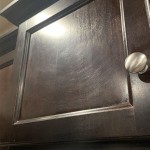
Staining is a good option for solid wood cupboards, as it enhances the natural grain and beauty of the wood. Before staining, the wood must be sanded smooth and free of any existing finish. Apply the stain evenly with a brush or cloth, following the manufacturer's instructions. Wipe off any excess stain with a clean cloth. Allow the stain to dry completely before applying a clear topcoat, such as polyurethane or varnish, to protect the stain and provide a durable finish. Multiple coats of topcoat may be necessary for increased protection.
Beyond painting and staining, other refinishing techniques can be employed to achieve unique and interesting effects. Glazing involves applying a thin layer of glaze over the painted surface to highlight details and add depth. Antiquing involves using special paints and techniques to create a distressed or aged look. Applying decorative hardware, such as new knobs, pulls, and hinges, can also dramatically change the appearance of the cupboards.
For those seeking a less traditional approach, consider using contact paper or peel-and-stick wallpaper to cover the cupboard doors. This option is particularly suitable for laminate cupboards and offers a wide range of patterns and colors to choose from. While this method is less durable than painting or staining, it is a quick and easy way to update the look of the cupboards without extensive preparation or messy cleanup.
Hardware and Configuration Changes
Upgrading the hardware on kitchen cupboards is a relatively inexpensive way to significantly enhance their appearance and functionality. Replacing old, outdated knobs and pulls with new, stylish hardware can instantly transform the look of the kitchen. When choosing new hardware, consider the overall style of the kitchen and select pieces that complement the existing décor. Ensure that the new hardware is compatible with the existing holes in the cupboard doors and drawers, or be prepared to drill new holes if necessary.
Beyond simply replacing the hardware, consider changing the configuration of the cupboards to better suit the homeowner's needs. This might involve adding pull-out shelves to base cabinets to improve accessibility, installing spice racks or utensil organizers inside the cupboards, or even replacing some of the existing cupboards with drawers. These types of modifications can significantly improve the functionality and storage capacity of the kitchen.
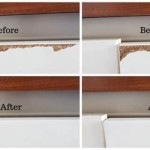
Another option is to add decorative elements to the cupboards, such as trim, molding, or glass inserts. Adding trim around the edges of the cupboard doors can give them a more finished and sophisticated look. Replacing solid cupboard doors with glass inserts can create a more open and airy feel in the kitchen, while also showcasing the contents of the cupboards. These types of additions can require more advanced carpentry skills, but the results can be well worth the effort.
In some cases, it may be possible to repurpose existing cupboards for other uses. For example, an upper cupboard can be converted into a spice rack or a display shelf. A base cupboard can be transformed into a rolling cart or a storage unit for the pantry. Repurposing existing cupboards is a creative and sustainable way to reduce waste and add unique features to the kitchen.
Ultimately, redoing old kitchen cupboards is a process that requires careful planning, meticulous preparation, and attention to detail. By following these guidelines and taking the time to do the job right, homeowners can achieve a significant transformation without the expense and inconvenience of a full-scale kitchen renovation.

15 Diy Kitchen Cabinet Makeovers Before After Photos Of Cabinets

Refinishing Kitchen Cabinets A Beautiful Mess

25 Easy Ways To Update Kitchen Cabinets

Cabinet Refinishing Guide

15 Diy Kitchen Cabinet Makeovers Before After Photos Of Cabinets

How To Refinish Cabinets Like A Pro

15 Amazing Ways To Redo Kitchen Cabinets

This Website Is Awesome How To Redo Kitchen Cabinets But Also Has Instructions On Stairs Home Diy Remodeling

How To Paint Kitchen Cabinets Like The Pros

Refinishing Kitchen Cabinets Modern Refacing Made Easy Wisewood
Related Posts