Refacing Kitchen Cabinets With Beadboard: Essential Aspects
Refacing kitchen cabinets with beadboard involves replacing the doors and drawer fronts with beadboard panels, transforming the look of your kitchen. By understanding the essential aspects of this process, you can achieve a professional-looking finish that enhances the functionality and aesthetics of your space. This article delves into the critical factors to consider when refacing your kitchen cabinets with beadboard, providing valuable insights to guide your project.
1. Choosing the Right Beadboard
Selecting the appropriate beadboard material is paramount. MDF (medium-density fiberboard) is a popular choice due to its affordability and ability to be painted or stained to match your kitchen decor. Plywood is another durable option that offers greater strength and stability. Consider the thickness of the beadboard as well, as thicker panels provide a more substantial look and feel.
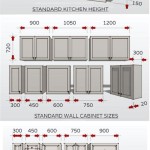
2. Measuring and Cutting
Accurate measurements are crucial for a precise fit. Measure the openings of your cabinet doors and drawers carefully, allowing for overlap where necessary. Use a sharp saw to cut the beadboard panels to size, ensuring clean edges. Test the fit before securing the panels to avoid any misalignments.
3. Applying Adhesive and Clamping
Use a strong adhesive specifically designed for bonding wood to ensure a secure hold. Apply the adhesive evenly to the cabinet frame and the back of the beadboard panel. Align the panel carefully and press it into place. Use clamps to maintain pressure while the adhesive dries, ensuring a tight bond.
4. Securing with Nails or Screws
Once the adhesive has set, reinforce the attachment with nails or screws. Countersink the fasteners slightly below the surface of the beadboard using a nail set or a drill bit. This will create a seamless appearance and prevent the fasteners from snagging or loosening over time.
5. Finishing Touches
Sand any rough edges or imperfections on the beadboard panels. Apply paint or stain to match your kitchen decor, using a brush or roller for an even finish. Consider adding decorative elements such as molding or hardware to enhance the aesthetic appeal.
Conclusion
Refacing kitchen cabinets with beadboard requires attention to detail and proper execution of the essential aspects discussed above. By choosing the right materials, measuring and cutting accurately, applying adhesive and clamps securely, securing with fasteners, and adding finishing touches, you can achieve a stunning transformation that adds value and functionality to your kitchen. Embrace these essential aspects to ensure a successful refacing project that creates a beautiful and inviting space.

Let S Talk Beadboard Cabinet Cures Of Boston

Custom Made Beadboard Knotty Alder Cabinet Doors Estate Millwork

Dear Lillie Beadboard Kitchen Cabinet Styles Cabinets

34 Diy Kitchen Cabinet Ideas Wallpaper Cabinets Makeover

White Cabinet Refacing With Bead Board Soffit Kitchen Philadelphia By Capital Houzz Ie

Beadboard Cabinet Doors For Your Kitchen Cabinetdoors Com

Beadboard Cabinet Doors For Your Kitchen Cabinetdoors Com

Our Kitchen Cupboards Transformed Beadboard Cabinets Cupboard Doors Makeover

Beadboard Cabinets Elevate Your Home Decor

Vii Kitchen Cabinet Styles To Consider For Your Next Remodel
Related Posts