Refinishing Existing Kitchen Cabinets: A Comprehensive Guide to Upgrading Your Kitchen
Refinishing kitchen cabinets is a budget-friendly and effective way to transform the look and feel of your kitchen without the hassle and expense of a complete remodel. By following a few simple steps and using the right tools and materials, you can achieve a professional-looking finish that will add value to your home.
1. Preparation:
Before starting the refinishing process, it's crucial to thoroughly prepare your cabinets. This includes removing all hardware, doors, and drawers. Clean the surfaces with a degreaser to remove any dirt or grease. Use a sanding block or electric sander to lightly sand the surfaces, creating a smooth and even base for the new finish.
2. Choose a Refinishing Method:
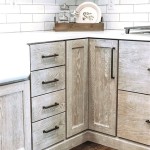
There are two main methods for refinishing kitchen cabinets: painting and staining. Painting is a cost-effective option that allows you to customize the color of your cabinets to match your kitchen decor. Staining preserves the natural wood grain while enhancing its color and depth. Consider the overall style and desired outcome when selecting a refinishing method.
3. Select Paint or Stain:
When choosing paint, opt for a durable, cabinet-specific paint designed to withstand wear and tear. For staining, select a high-quality stain that matches the desired color and finish. It's recommended to test the paint or stain on an inconspicuous area before applying it to the entire cabinet.
4. Apply Primer:
Before painting, apply a coat of primer to create a smooth surface and improve paint adhesion. Primer also helps prevent the wood grain from showing through the paint. Allow the primer to dry completely before proceeding.
5. Paint or Stain:
Using a brush or roller, apply the paint or stain evenly to the cabinet surfaces. For painting, multiple coats may be required to achieve the desired opacity. For staining, apply thin coats and wipe off any excess to prevent blotching. Allow each coat to dry thoroughly before applying the next.
6. Protect the Finish:
Once the paint or stain has dried completely, apply a clear topcoat to protect the finish from wear and tear. Choose a topcoat that is compatible with the paint or stain used. Allow the topcoat to dry and cure according to the manufacturer's instructions.
7. Reassembly:
Once the refinishing process is complete, reassemble the cabinets by attaching the hardware, doors, and drawers. Ensure all components are tightened securely and properly aligned. Clean and polish the new finish to remove any dust or debris.
Tips for Success:
- Use high-quality materials and tools for a professional-looking finish.
- Prepare the surfaces thoroughly to ensure good adhesion.
- Allow each coat to dry completely before applying the next.
- Test the paint or stain on an inconspicuous area before using it on the entire cabinet.
- Take your time and don't rush the process.
- If you are not confident in your DIY skills, consider hiring a professional refinisher.
Conclusion:
Refinishing kitchen cabinets is a rewarding DIY project that can significantly enhance the look of your kitchen. By following the steps outlined above and using the right techniques, you can achieve a professional-looking finish that will add value and beauty to your home for years to come.

Cabinet Refinishing Guide

How To Refinish Cabinets Like A Pro

Refinishing Kitchen Cabinets A Beautiful Mess

Refinishing Kitchen Cabinets Modern Refacing Made Easy Wisewood

Cabinet Refinishing N Hance

How To Refinish Kitchen Cabinets Diy

The Fast Affordable Way To Upgrade Your Kitchen Cabinet Refinishing

Refinish Kitchen Cabinets Home With Stefani

Cabinet Refinishing San Diego N Hance Of North County

Should I Paint Or Refinish My Kitchen Cabinets