Refinish Kitchen Cabinets: Before and After Transformation
Kitchen cabinets are a focal point in any home, significantly impacting the overall aesthetic and functionality of the space. Over time, they can become worn, outdated, or simply no longer reflect the homeowner's style. Refinishing kitchen cabinets offers a cost-effective and impactful alternative to complete replacement, providing a refreshed look and extending the lifespan of existing cabinetry. This process involves preparing the surfaces, applying new finishes, and updating hardware, resulting in a dramatic "before and after" transformation.
The decision to refinish rather than replace cabinets often stems from budgetary considerations. Replacing cabinets can be a substantial investment, involving demolition, installation, and potentially impacting plumbing and electrical systems. Refinishing, on the other hand, primarily focuses on the surface appearance, utilizing existing cabinet structures. This approach significantly reduces material costs and labor expenses, making it a more accessible option for homeowners seeking a kitchen upgrade.
Beyond cost savings, refinishing allows for greater customization. Homeowners can choose from a wide range of paint colors, stains, and finishes to achieve their desired aesthetic. This level of personalization is often limited with pre-fabricated cabinet replacements. Furthermore, refinishing allows homeowners to retain the existing layout and functionality of their kitchen, avoiding the potential disruptions and complexities associated with rearranging cabinet configurations.
Key Point 1: The Refinishing Process: A Step-by-Step Guide
The refinishing process is methodical and requires careful attention to detail. A successful refinishing project relies on proper preparation, application, and curing of the chosen finish. Here's a breakdown of the key steps involved:
1. Preparation: This is arguably the most crucial stage, as it directly impacts the adhesion and longevity of the new finish. The process begins with removing all hardware, including knobs, pulls, hinges, and drawer slides. Thorough cleaning is essential to remove grease, grime, and any existing wax or polish. A degreasing cleaner is typically used, followed by a thorough rinsing. Any loose or peeling paint or varnish must be removed using a scraper or chemical stripper. Once clean, the surfaces are sanded to create a slightly rough texture, providing a better grip for the new finish. Sanding also helps to smooth out imperfections and create a uniform surface. For cabinets with intricate detailing, chemical strippers and specialized sanding tools may be required.
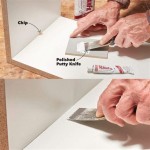
2. Repair: After cleaning and sanding, any imperfections, such as dents, scratches, or chips, should be addressed. Wood filler is commonly used to fill these imperfections, creating a smooth and even surface. Once the filler is dry, it is sanded flush with the surrounding wood. For deeper damages, more extensive repairs may be necessary, potentially involving wood patching or the application of epoxy fillers. Ensuring a smooth and even surface is critical for achieving a professional-looking finish.
3. Priming: A primer is applied to create a uniform base for the paint or stain. It helps to seal the wood, prevent bleed-through, and improve the adhesion of the finish coat. The choice of primer depends on the type of wood and the desired finish. Oil-based primers are often used for stain blocking, while latex primers are suitable for painted finishes. The primer should be applied in thin, even coats, following the manufacturer's instructions. Allow the primer to dry completely before proceeding to the next step.
4. Finishing: This stage involves applying the chosen paint or stain to the primed surfaces. The application method can vary depending on the desired look and the type of finish. Brushes, rollers, and sprayers are commonly used. For a smooth, professional finish, spraying is often preferred. Multiple thin coats are typically applied, allowing each coat to dry completely before applying the next. Sanding lightly between coats can help to remove any imperfections and create a smoother surface. The final coat should be applied evenly and allowed to cure completely.
5. Topcoat (Optional): A topcoat can be applied to protect the finish and provide added durability. Clear coats are commonly used to protect painted or stained surfaces from scratches, stains, and wear. Topcoats are available in various sheens, from matte to high gloss. The application method is similar to that of the paint or stain. Allow the topcoat to dry and cure completely before reassembling the cabinets.
6. Hardware Installation: The final step involves reinstalling the hardware, including knobs, pulls, hinges, and drawer slides. New hardware can be installed to further enhance the updated look of the cabinets. Ensure that all hardware is properly aligned and securely fastened.
Key Point 2: Selecting the Right Finish: Paint vs. Stain
The choice between paint and stain is a crucial decision that significantly impacts the final appearance of the refinished cabinets. Each option offers distinct advantages and disadvantages, depending on the desired aesthetic and the condition of the existing cabinetry.
Paint: Painting provides a solid, opaque color, completely concealing the wood grain. This is a suitable option for cabinets made of less desirable wood or those with significant imperfections. Paint offers a wide range of color choices, allowing for greater customization and the ability to match existing décor. It can also create a more modern and updated look. However, paint can be more prone to chipping and scratching than stain, especially in high-traffic areas. Proper preparation and the application of a durable topcoat are essential for ensuring the longevity of a painted finish.
Stain: Staining enhances the natural beauty of the wood grain, allowing it to show through. This option is ideal for cabinets made of high-quality wood, such as oak, maple, or cherry. Stain typically offers a more traditional and rustic look. It can also be more durable than paint, as it penetrates the wood rather than simply sitting on the surface. However, stain offers a more limited color palette compared to paint. It is also less effective at concealing imperfections in the wood. Proper sanding and preparation are crucial for achieving an even and consistent stain finish.
Ultimately, the choice between paint and stain depends on the homeowner's personal preferences, the condition of the existing cabinets, and the desired aesthetic. Consider the overall style of the kitchen and the surrounding décor when making this decision. Consulting with a professional refinisher can provide valuable insights and guidance.
Key Point 3: Before and After Examples: Real-World Transformations
Visual examples of refinished kitchen cabinets provide tangible evidence of the transformative power of this process. Examining before and after photos can inspire homeowners and demonstrate the potential for achieving a dramatic and updated look.
Example 1: From Dark Oak to Light and Airy: Imagine a kitchen with outdated, dark oak cabinets that make the space feel cramped and dreary. The "before" photo shows the cabinets with their original dark stain, yellowed varnish, and outdated hardware. The "after" photo reveals a complete transformation. The cabinets have been refinished with a light, neutral paint color, such as white or off-white. New, modern hardware has been installed, adding a touch of sophistication. The kitchen now feels brighter, more spacious, and more inviting. This transformation demonstrates the power of paint to completely alter the look and feel of a kitchen.
Example 2: From Painted to Natural Wood Grain: Conversely, consider a kitchen with previously painted cabinets that are now showing signs of wear and tear. The "before" photo depicts the cabinets with a chipped and faded paint finish. The "after" photo showcases the cabinets stripped of their paint and refinished with a natural stain, revealing the beautiful wood grain beneath. A clear topcoat protects the wood and enhances its natural beauty. This transformation highlights the potential for restoring the original character and charm of wood cabinets.
Example 3: Updating Hardware and Minor Modifications: Sometimes, a simple refinishing job, combined with new hardware and minor modifications, can make a significant difference. The "before" photo shows cabinets with outdated hardware and a worn finish. The "after" photo reveals the cabinets with a fresh coat of paint, new hardware, and the addition of glass-fronted doors on some of the upper cabinets. These small changes create a more modern and stylish look, without requiring a complete overhaul.
These examples illustrate the versatility of refinishing and the potential for achieving a wide range of aesthetic outcomes. By carefully considering the existing cabinets, the desired look, and the available budget, homeowners can create a stunning "before and after" transformation that enhances the value and enjoyment of their kitchen.
Refinishing kitchen cabinets is a complex project requiring patience, skill, and attention to detail. While it offers significant cost savings and customization options compared to replacement, it is essential to assess your capabilities and resources before embarking on this endeavor. If you lack the necessary experience or time, consider hiring a professional refinisher to ensure a successful and long-lasting result.

Cabinet Refinishing Guide

Refinishing Kitchen Cabinets Modern Refacing Made Easy Wisewood

Refinish Kitchen Cabinets With Kilz Restoration Primer

A Closer Look At Cabinet Refacing And Refinishing Kitchens Redefined

Needham Ma Cabinet Refinishing Repainting Services Me

Kitchen Cabinet Refacing Makeover A Homeowner S Experience

Cabinet Refinishing Before And After

Should I Refinish Or Replace My Kitchen Cabinets

Amazing Kitchen Refacing Transformations Resurfacing Cabinets Before And After

Cabinet Refinishing An 8 Step Guide For Pro Painters Ppc
Related Posts


