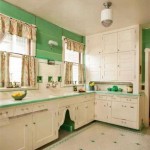
Refinishing Wood Kitchen Cabinets: A Comprehensive Guide
Kitchen cabinets are a focal point of any kitchen, and their appearance significantly impacts the overall aesthetic. Over time, wood cabinets can become worn, faded, or simply outdated, leading homeowners to consider a kitchen remodel. However, a full cabinet replacement can be a costly and disruptive project. Refinishing wood kitchen cabinets offers a more economical and less invasive alternative, allowing homeowners to update their kitchens without the expense and hassle of new cabinets. This article provides a comprehensive guide to refinishing wood kitchen cabinets, covering preparation, stripping, sanding, staining or painting, and finishing.
Why Refinish Instead of Replace?
The decision to refinish rather than replace kitchen cabinets often stems from several key factors. The most prominent reason is cost. Replacing cabinets typically involves significant material and labor expenses, especially if custom sizes or configurations are required. Refinishing, on the other hand, primarily involves the cost of materials such as sandpaper, stripper, stain or paint, and a topcoat. While labor is involved, homeowners who are willing to undertake the project themselves can substantially reduce the overall cost.
Another crucial consideration is the quality of the existing cabinets. Older cabinets are often constructed from solid wood, which is generally more durable and long-lasting than many modern cabinets made from particleboard or MDF. Refinishing solid wood cabinets preserves this inherent quality and extends their lifespan. Furthermore, refinishing allows homeowners to retain the existing layout of their kitchen, avoiding the potentially disruptive process of reconfiguring the space to accommodate new cabinet sizes or styles.
Finally, environmental concerns can influence the decision to refinish. Replacing cabinets generates waste that ends up in landfills. Refinishing reuses existing materials, reducing the environmental impact. For homeowners conscious of sustainability, refinishing offers a more eco-friendly approach to kitchen renovation.
Preparing for the Refinishing Process
Proper preparation is paramount to a successful cabinet refinishing project. This stage involves several crucial steps that ensure the cabinets are ready to accept a new finish and that the surrounding area is protected from damage.
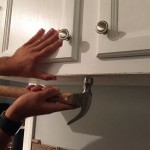
The first step is removing all cabinet doors, drawers, and hardware. This includes hinges, knobs, pulls, and any other decorative elements. Labeling each door and drawer with corresponding numbers or letters is crucial to ensure they are reinstalled in the correct positions later. A simple numbering system on the inside of each door and the cabinet frame can prevent confusion during reassembly. All hardware should be stored in labeled bags or containers to avoid loss or misplacement.
Once the doors and drawers are removed, the next step is to thoroughly clean the cabinet surfaces. This removes grease, grime, and other contaminants that can interfere with the adhesion of the new finish. A degreasing cleaner specifically designed for wood is recommended. Apply the cleaner according to the manufacturer's instructions and scrub the surfaces with a non-abrasive sponge or cloth. Rinse thoroughly with clean water and allow the cabinets to dry completely.
After cleaning, protect the surrounding area with drop cloths or plastic sheeting. This prevents damage to floors, countertops, and appliances from paint, stain, or other materials. Mask off any areas that you don't want to be painted or stained, such as walls, backsplashes, or the inside of cabinet frames. Use painter's tape to create clean, straight lines for a professional finish.
Stripping the Old Finish
Stripping the old finish is an essential step in preparing wood cabinets for refinishing. This process removes the existing paint, stain, or varnish, creating a clean, smooth surface for the new finish to adhere to. Several methods can be used to strip wood cabinets, each with its own advantages and disadvantages.
Chemical stripping is a common method that involves applying a chemical stripper to the cabinet surfaces. These strippers typically contain solvents that dissolve the old finish, allowing it to be scraped or wiped away. When using chemical strippers, it is imperative to follow the manufacturer's instructions carefully and to wear appropriate safety gear, including gloves, eye protection, and a respirator. Work in a well-ventilated area to avoid inhaling harmful fumes. Apply the stripper liberally to the cabinet surfaces and allow it to dwell for the recommended time. Use a plastic scraper to remove the softened finish, being careful not to gouge or damage the wood. Multiple applications may be necessary to remove all of the old finish. After stripping, the cabinets should be cleaned with mineral spirits to remove any remaining stripper residue.
Sanding can also be used to remove the old finish, although it is generally more time-consuming and labor-intensive than chemical stripping. Start with a coarse-grit sandpaper (e.g., 80-grit) to remove the bulk of the old finish, then gradually move to finer grits (e.g., 120-grit, 180-grit, 220-grit) to smooth the surface. Use a sanding block or orbital sander to ensure even sanding and avoid creating swirl marks. Vacuum frequently to remove dust and debris. Sanding is best suited for removing thin layers of finish or for smoothing surfaces after chemical stripping.
Heat guns can be used to soften the old finish, making it easier to scrape away. Apply the heat gun evenly over the surface, keeping it moving to avoid scorching the wood. Use a scraper to remove the softened finish. Heat guns can be effective for removing multiple layers of paint or varnish, but they require caution to avoid damaging the wood or creating a fire hazard.
Sanding, Staining, or Painting, and Finishing
After stripping the old finish, the next steps involve sanding the wood, choosing to stain or paint, and applying a protective finish. These processes determine the final appearance and durability of the refinished cabinets.
Sanding is crucial to achieve a smooth, even surface for the new finish. Even if chemical stripping has been used, sanding is necessary to remove any remaining residue and to smooth out any imperfections. Start with a fine-grit sandpaper (e.g., 220-grit) and sand the entire surface in the direction of the wood grain. Use a sanding block or orbital sander to ensure even sanding. Vacuum frequently to remove dust and debris. Pay particular attention to corners and edges, which can be difficult to sand evenly. After sanding, wipe the cabinets down with a tack cloth to remove any remaining dust particles.
The choice between staining and painting depends on the desired aesthetic and the type of wood. Staining enhances the natural grain of the wood, while painting provides a uniform color and can cover up imperfections. If choosing to stain, select a stain color that complements the existing décor and the type of wood. Apply the stain according to the manufacturer's instructions, using a brush, rag, or foam applicator. Allow the stain to dwell for the recommended time, then wipe off any excess stain with a clean cloth. Multiple coats of stain may be necessary to achieve the desired color intensity. If choosing to paint, prime the cabinets with a high-quality primer designed for wood. This will improve adhesion and provide a uniform base for the paint. Apply the primer according to the manufacturer's instructions and allow it to dry completely. Then, apply two or more coats of paint, allowing each coat to dry before applying the next. Use a brush, roller, or sprayer to apply the paint, depending on the desired finish.
Applying a protective finish is essential to protect the refinished cabinets from wear and tear. Common types of finishes include varnish, lacquer, polyurethane, and water-based sealers. Each type of finish has its own advantages and disadvantages in terms of durability, appearance, and ease of application. Choose a finish that is appropriate for the intended use and the desired aesthetic. Apply the finish according to the manufacturer's instructions, using a brush, sprayer, or rag. Multiple coats of finish may be necessary to achieve the desired level of protection. Allow each coat to dry completely before applying the next. Lightly sand between coats with fine-grit sandpaper (e.g., 320-grit) to smooth out any imperfections and improve adhesion.
Once the finish has dried completely, reassemble the cabinets by reinstalling the hardware, doors, and drawers. Ensure that all screws are tightened securely and that the doors and drawers align properly. Clean the cabinets with a mild detergent and water to remove any fingerprints or smudges. The refinished kitchen cabinets will now provide a fresh, updated look to the kitchen at a fraction of the cost of replacing them.

Cabinet Refinishing An 8 Step Guide For Pro Painters Ppc

Cabinet Refinishing Guide

Refinishing Kitchen Cabinets Modern Refacing Made Easy Wisewood

Should I Paint Or Refinish My Kitchen Cabinets

How To Refinish Wood Cabinets The Easy Way Love Remodeled

Should I Paint Or Refinish My Kitchen Cabinets

Refinishing Kitchen Cabinets A Beautiful Mess

How To Refinish Cabinets Like A Pro

Naperville Kitchen Cabinet Refinishers 630 922 9714 Geneva Refacing Resurfacing

Cabinet Refinishing N Hance
Related Posts