Refinishing Dark Stained Kitchen Cabinets: A Guide to Transforming Your Kitchen
Dark stained kitchen cabinets can create a classic and sophisticated look, but over time, they can start to look dated or worn. Refinishing your dark stained cabinets is a great way to update your kitchen without the expense of replacing them.
1. Preparation
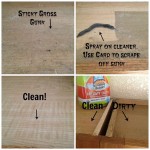
Before you start refinishing your cabinets, it is important to prepare them properly. This involves cleaning them thoroughly with a degreaser, removing all hardware, and sanding them lightly to remove any existing finish.
2. Stripping the Old Finish
Once your cabinets are prepared, you will need to strip the old finish. This can be done with a chemical stripper or by sanding. If you are using a chemical stripper, follow the manufacturer's instructions carefully. If you are sanding, use a medium-grit sandpaper and work in small sections.
3. Neutralizing the Surface
After stripping the old finish, you will need to neutralize the surface. This can be done with a solution of water and vinegar. Wipe down the cabinets with the solution and allow them to dry completely.
4. Sanding
Once the cabinets are neutralized, you will need to sand them again. This time, use a fine-grit sandpaper and sand in the direction of the grain. Be sure to remove all of the old finish and any scratches or imperfections.
5. Applying Primer
Before you apply the new finish, you will need to apply a primer. Primer helps to seal the wood and prevent the new finish from absorbing into it. Apply the primer in a thin, even coat and allow it to dry completely.
6. Applying the New Finish
Once the primer is dry, you can apply the new finish. You can use a paint, stain, or glaze, depending on the desired look. Apply the finish in thin, even coats, and allow each coat to dry completely before applying the next.
7. Protecting the Finish
Once you are happy with the finish, you will need to protect it. You can do this by applying a clear sealer. Sealer helps to protect the finish from scratches and wear. Apply the sealer in a thin, even coat and allow it to dry completely.
Refinishing dark stained kitchen cabinets is a great way to update your kitchen without the expense of replacing them. By following these steps, you can create a beautiful and durable finish that will last for years to come.

Staining Your Wood Cabinets Darker Young House Love

How To Stain Wood Cabinets True Value

Should I Paint Or Refinish My Kitchen Cabinets

How To Refinish Wood Cabinets The Easy Way Love Remodeled

Diy Staining Oak Cabinets Eclectic Spark

9 Upgrades To Make Your Outdated Kitchen Cabinets Look Brand New

Refinishing Kitchen Cabinets Modern Refacing Made Easy Wisewood

Staining Your Wood Cabinets Darker Young House Love

Diy Stain On Hall Cabinets Started With Liquid Sander Then Stained Using Minwa Kitchen Staining Makeover

5 Ideas How To Update Oak Or Wood Kitchen Cabinets Part 1 Staining
Related Posts