Refinishing Your Kitchen Cabinets: A Guide to a Fresh Look
Kitchen cabinets are a prominent feature in any home, and over time, they can show signs of wear and tear. Whether it's fading paint, scratches, or simply a desire for a new style, refinishing your kitchen cabinets can transform the look of your entire space. This process involves stripping the existing finish, sanding the wood, applying a new primer and paint, and finishing with a protective topcoat. While it can be a time-consuming project, refinishing cabinets can be a rewarding experience, allowing you to create a personalized look that reflects your individual style.
Preparing for the Refinishing Process
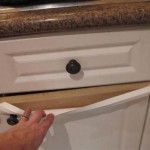
Before diving into the actual refinishing, it's essential to properly prepare your cabinets. This involves removing all cabinet doors and drawers, along with hardware like hinges and knobs. Thoroughly clean the surfaces with a degreaser to remove grease and grime, ensuring a smooth and clean base for the new finish. Next, you'll need to strip the existing finish. This step can be done with a chemical stripper or a sanding method. Chemical strippers are quicker, but they can be messy and require proper ventilation. Sanding is a more labor-intensive option but offers more control and less risk of damaging the wood.
Choosing the Right Finish for Your Cabinets
Once the cabinets are stripped and sanded, you'll need to decide on the new finish. The choice depends on the desired look and the level of effort you're willing to invest. Here are some common finishing options:
- Paint: Offers a wide range of colors and finishes, from matte to high gloss, making it a highly customizable option.
- Stain: Enhances the natural wood grain and allows for a more natural look. It's available in various shades, from light to dark.
- Lacquer: Known for its durability and high gloss finish, lacquer is a popular choice for kitchen cabinets.
- Polyurethane: Provides a tough, protective coating and comes in both oil-based and water-based formulas.
Applying the Finish and Finishing Touches
After selecting your finish, you'll need to apply it carefully to the cabinet surfaces. For paint, multiple thin coats are often better than one thick coat. Allow each coat to dry completely before applying the next. For stain, follow the manufacturer's instructions, ensuring even application and a consistent color. After the primary finish is applied, you can apply a topcoat like lacquer or polyurethane for added protection and durability.
Once the finish is dry, reinstall the doors and drawers, and replace the hardware. For a truly polished look, consider adding new hardware like cabinet pulls or knobs. These small details can make a big difference, enhancing the overall look and feel of your kitchen cabinets.
Refinishing your kitchen cabinets can be a rewarding DIY project that transforms the heart of your home. With proper preparation, careful selection of materials, and dedicated effort, you can achieve a stunning and customized look that you'll enjoy for years to come. If you're unsure about any aspect of the process, consult with a professional for guidance and assistance.

Cabinet Refinishing An 8 Step Guide For Pro Painters Ppc

Cabinet Refinishing Guide

The Fast Affordable Way To Upgrade Your Kitchen Cabinet Refinishing

How To Refinish Cabinets Like A Pro

Refinishing Kitchen Cabinets Modern Refacing Made Easy Wisewood

Cabinet Refacing Process And Cost Compared To Painting

Should I Paint Or Refinish My Kitchen Cabinets

Cabinet Refinishing N Hance

Refinishing Kitchen Cabinets A Beautiful Mess

How To Paint Kitchen Cabinets In 7 Simple Steps
Related Posts