Refreshing Oak Kitchen Cabinets: A Comprehensive Guide
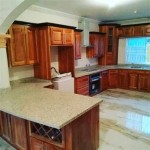
Oak kitchen cabinets, a staple in many homes, offer a timeless appeal and durability. However, over time, they can appear dated or worn, prompting homeowners to consider a refresh. Instead of a costly full replacement, updating existing oak cabinets can breathe new life into the kitchen while preserving its original character. This article provides a detailed guide to various methods for refreshing oak kitchen cabinets, covering preparation, refinishing techniques, and alternative approaches to modernization.
Oak cabinets are known for their prominent wood grain, which can be both a desirable feature and a challenge when refreshing them. The key to a successful update lies in properly preparing the surface, selecting the appropriate refinishing method, and paying attention to detail throughout the process. Thoughtful planning and execution will ensure that the refreshed cabinets complement the overall kitchen design.
Thorough Preparation is Key
The success of any cabinet refreshing project hinges on meticulous preparation. This stage ensures proper adhesion of finishes and a smooth, even final appearance. Neglecting these steps can lead to peeling paint, uneven staining, and ultimately, an unsatisfactory result.
The first step in preparation is thorough cleaning. Cabinets accumulate grease, grime, and dust over time, which can interfere with the adhesion of primers and paints. Use a degreasing cleaner specifically designed for kitchen cabinets. Apply the cleaner liberally and scrub the surfaces with a non-abrasive sponge or cloth. Rinse thoroughly with clean water and allow ample time for the cabinets to dry completely.
Next, remove all hardware, including knobs, pulls, hinges, and any decorative elements. Store these components in a safe place to prevent loss or damage. If the existing hardware is to be reused, clean it thoroughly to remove any dirt or tarnish. Consider replacing the hardware with new designs to further enhance the updated look of the cabinets.
Following cleaning, the cabinets need to be sanded. Sanding serves two purposes: it removes any remaining finish and creates a slightly rough surface that promotes adhesion. Start with a medium-grit sandpaper (120-grit) to remove the existing finish. Focus on areas with noticeable wear or imperfections. Then, switch to a finer-grit sandpaper (220-grit) for a final smoothing. Sanding should be done in the direction of the wood grain to avoid scratching. After sanding, use a tack cloth or vacuum with a brush attachment to remove all sanding dust. Dust particles can compromise the finish quality.
For cabinets with deep scratches or dents, wood filler can be used to repair the damage. Apply the filler according to the manufacturer's instructions, allowing it to dry completely. Once dry, sand the filled area smooth and flush with the surrounding surface. Spot prime these areas before proceeding with the overall priming process.
Finally, apply a high-quality primer. Primer provides a uniform surface for the paint or stain, ensuring even color and adhesion. Choose a primer specifically formulated for wood cabinets. Apply the primer in thin, even coats using a brush, roller, or sprayer. Allow the primer to dry completely according to the manufacturer's instructions. Lightly sand the primed surface with fine-grit sandpaper to smooth out any imperfections. Remove any resulting dust before proceeding to the next step.
Refinishing Techniques: Paint vs. Stain
Once the cabinets are properly prepared, the next step is to choose a refinishing technique. The two primary options are painting and staining. Each approach offers distinct advantages and disadvantages, depending on the desired aesthetic and the condition of the existing cabinets.
Painting oak cabinets offers significant versatility. Paint can completely transform the look of the cabinets, allowing for a wide range of colors and finishes. Painting is often a good choice for cabinets with significant imperfections or for those seeking a more modern, contemporary style. However, painting oak cabinets requires careful attention to detail to ensure a smooth, durable finish.
When painting, choose a high-quality paint specifically formulated for cabinets. Options include acrylic latex paints and alkyd paints. Acrylic latex paints are water-based, easy to clean up, and offer good durability. Alkyd paints, also known as oil-based paints, provide a harder, more durable finish, but they require mineral spirits for cleanup and have a longer drying time. Apply the paint in thin, even coats using a brush, roller, or sprayer. Multiple thin coats are preferable to one thick coat, as they minimize drips and ensure a smoother finish. Allow each coat to dry completely before applying the next. Lightly sand between coats with fine-grit sandpaper to remove any imperfections.
Staining oak cabinets allows the natural wood grain to remain visible. This approach is suitable for those who appreciate the warmth and character of wood. Staining can enhance the existing wood grain or change the color of the cabinets while still showcasing the natural beauty of the wood.
When staining, choose a stain color that complements the overall kitchen design. Test the stain on a small, inconspicuous area of the cabinet to ensure the desired color is achieved. Apply the stain evenly using a brush, cloth, or sponge. Allow the stain to penetrate the wood for the recommended time, then wipe off any excess stain with a clean cloth. The longer the stain remains on the wood, the darker the color will be. Apply a clear topcoat to protect the stained surface. Options include polyurethane, varnish, and lacquer. These topcoats provide a durable, water-resistant finish. Apply the topcoat in thin, even coats, allowing each coat to dry completely before applying the next. Lightly sand between coats with fine-grit sandpaper to remove any imperfections.
Consider using a gel stain for oak cabinets with a very prominent grain. Gel stain sits on the surface of the wood rather than penetrating it, which can help minimize the dark lines that can sometimes result from staining oak. Always follow the manufacturer's instructions for application and drying times.
Alternative Approaches to Modernization
Beyond painting and staining, several other techniques can be used to refresh oak kitchen cabinets and modernize their appearance. These alternative approaches often involve changing specific elements of the cabinets or adding decorative accents.
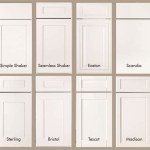
Replacing cabinet doors is a cost-effective way to significantly alter the look of the kitchen. Instead of refinishing the entire cabinet frame, simply replace the existing doors with new ones in a different style or color. This allows for a dramatic transformation without the time and expense of a full cabinet refinishing project. Options include shaker-style doors, slab doors, or doors with glass inserts. Consider updating the hardware at the same time for a cohesive look.
Adding decorative molding can enhance the visual appeal of oak cabinets. Crown molding, base molding, and other decorative elements can be attached to the cabinets to create a more custom, finished look. Molding can be painted or stained to match the cabinets or to provide a contrasting accent. This technique is particularly effective for adding a touch of elegance or updating the style of older cabinets.
Consider incorporating accent lighting to highlight the cabinets and create a more inviting atmosphere. Under-cabinet lighting can illuminate countertops and workspaces, while interior cabinet lighting can showcase dishes and glassware. Lighting can also be used to draw attention to specific features of the cabinets, such as decorative hardware or molding. This adds both functionality and aesthetic appeal to the kitchen.
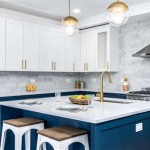
Another approach is to consider a two-toned cabinet design. This involves painting or staining the upper and lower cabinets in different colors. For example, the upper cabinets could be painted a light color to brighten the space, while the lower cabinets could be stained a darker color to ground the design. This adds visual interest and creates a more dynamic kitchen aesthetic. When selecting colors, consider the existing countertops, backsplash, and flooring to ensure a cohesive design.
Finally, consider adding open shelving to replace some of the upper cabinets. This creates a more open and airy feel in the kitchen, allowing for the display of decorative items and frequently used dishes. Open shelves can be made from wood, metal, or glass, and they can be painted or stained to complement the cabinets. Be mindful of dust accumulation on open shelves and ensure items displayed are aesthetically pleasing.

Updating A 90s Kitchen Without Painting Cabinets

How To Work With Your Honey Oak Cabinets And Trim Carla Bast Design

Updating A 90s Kitchen Without Painting Cabinets

How To Update Oak Cabinets With Briwax Honey Stained Kitchen Updating

Updating A Kitchen With Oak Cabinets Without Painting Them

How To Update Oak Cabinets With Briwax

Updating A Kitchen With Oak Cabinets Without Painting Them

Great Ideas To Update Oak Kitchen Cabinets

How To Make Oak Kitchen Cabinets Look Modern Without Painting The Diy Nuts

How To Update Oak Or Wood Cabinets Without A Drop Of Paint Part 2 Kylie M Interiors