Refurbish Kitchen Cabinets DIY: A Guide to Transforming Your Space
The kitchen is often considered the heart of the home, and its aesthetics play a significant role in creating a welcoming and functional space. While a complete kitchen remodel can be expensive and time-consuming, a more budget-friendly and achievable option is to refurbish your existing cabinets. Refurbishing kitchen cabinets offers a fantastic opportunity to transform the look and feel of your kitchen without the need for a full-scale renovation. It involves a variety of techniques that can breathe new life into tired cabinets, making them look modern, stylish, and updated. This guide will delve into the essential steps and considerations involved in a DIY kitchen cabinet refurbishment project.
1. Preparing for the Refurbishment: Planning and Supplies
Before embarking on any DIY project, a solid plan is crucial. Start by defining your desired outcome. Consider the overall style you want to achieve, whether it's a sleek modern look, a rustic farmhouse aesthetic, or a classic and timeless feel. Next, assess the condition of your cabinets. Determine if they require minor touch-ups, a complete paint job, or even a replacement of cabinet doors or drawer fronts. Once you have a clear vision, create a detailed plan that includes:
- A list of necessary supplies: This may include paint, primer, sandpaper, cleaning supplies, brushes, rollers, hardware, cabinet door hinges, and protective wear like gloves and masks.
- Time estimation for the project: Factor in the time needed for each step, including preparation, painting, drying, and installation.
- Budget allocation: Determine how much you are willing to spend on materials and tools.
Remember, the more detailed your plan, the smoother and more successful your refurbishment project will be.
2. Removing and Cleaning: Preparing for Transformation
Once you have gathered your materials, it's time to start preparing the cabinets for their makeover. This involves removing everything inside the cabinets, including shelves, drawers, and hardware. Begin by labeling each shelf, drawer, and hardware so you can easily reassemble everything after the refurbishment. Then, carefully remove the cabinet doors and drawers, taking note of how they attach to the cabinet frames.
Next, thoroughly clean the cabinet surfaces. Dust, grease, and grime can prevent paint from adhering properly. Use a mild cleaner or a combination of soap and water to remove any dirt or residue. Allow the cabinets to dry completely before proceeding to the next stage.
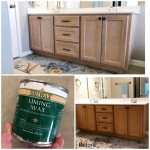
3. Sanding and Priming: Smoothing and Protecting Your Cabinets
Sanding plays a critical role in achieving a smooth, even finish for painting. If your cabinets have a glossy or lacquered finish, start by sanding with a coarser grit sandpaper (80 or 100 grit) to roughen the surface and create a good foundation for the paint. Work your way up to finer grit sandpaper (150 or 220 grit) for a smoother finish.
After sanding, vacuum or wipe away the dust thoroughly. Applying primer is essential as it provides an even surface for the paint to adhere to. Primers also act as a barrier against stains and seal in any imperfections. Choose a primer suited for your final paint type, whether it's oil-based or water-based paint.
4. Painting and Hardware: Adding Color and Style
With the priming complete, your cabinets are ready for their final transformation. Use a high-quality cabinet paint for a durable finish that will withstand daily wear and tear. You can achieve different looks with paint, such as single-color schemes, two-tone combinations, or even bold accent colors. Apply even coats of paint using brushes, rollers, or a spray gun. Ensure proper ventilation while painting and allow each coat to dry completely before applying the next.
New hardware can add a significant boost to the overall aesthetics of your cabinets. Consider replacing outdated hinges, knobs, or pulls with modern alternatives that complement your newly painted cabinets. A wide range of hardware options is available, from sleek and minimalist designs to ornate and traditional styles. Choose hardware that aligns with your desired kitchen aesthetic.
5. Finishing Touches: Final Steps for a Polished Look
After the paint has dried, you can add finishing touches to enhance the appearance of your cabinets. If you're going for a more rustic or farmhouse look, consider applying a glaze or wax to create depth and texture. For a modern and clean look, a polyurethane sealant can protect the paint and provide a smooth, glossy finish.
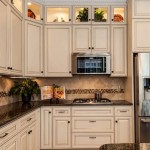
Finally, reassemble your cabinets, ensuring that the doors and drawers are properly attached and align seamlessly. Replace all the shelves and hardware. A fresh coat of paint and new hardware can significantly alter the appearance of your kitchen, making it feel bright and modern. By focusing on the details and taking your time, you can achieve a professional-looking finish that will transform your kitchen and enhance your home's overall appeal.

How To Refinish Kitchen Cabinets Diy

Diy Cabinet Refacing Budget Friendly Made Easy Wisewood

How To Paint Kitchen Cabinets Like The Pros

Refinishing Kitchen Cabinets Modern Refacing Made Easy Wisewood

Diy Kitchen Cabinets 25 And Easy Ideas For An Update Joyful Derivatives

Cabinet Refinishing Guide

Refinishing Kitchen Cabinets A Beautiful Mess

20 Diy Painted Kichen Cabinet Ideas A Cultivated Nest

9 Step Guide To Diy Kitchen Cabinet Refinishing

Budget Kitchen Renovation With Diy Shaker Painted Cabinets I
Related Posts