Refurbish Kitchen Cabinets Do It Yourself
Refurbishing kitchen cabinets is a cost-effective way to update a kitchen's appearance without the expense of full replacement. A do-it-yourself approach can further reduce costs, offering homeowners a significant return on investment in terms of both finances and improved living space. This process requires careful planning and execution but can be accomplished with readily available tools and materials.
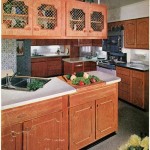
The first step in any cabinet refurbishment project is a thorough assessment of the existing cabinets. This involves inspecting the cabinet boxes for structural integrity, checking for water damage, loose hinges, and damaged doors or drawer fronts. This assessment helps determine the scope of the project and the necessary materials. Minor repairs, such as tightening screws or replacing hinges, can often be addressed easily. More significant damage might require patching, wood filler, or even replacing sections of the cabinet boxes.
Once the assessment is complete, the next step is to choose a desired finish. Several options exist, each offering a different aesthetic and level of difficulty. Painting is a popular choice due to its versatility and relative ease of application. Numerous paint colors and finishes are available, allowing homeowners to match existing décor or create a completely new look. Staining is another option, particularly for cabinets made of solid wood. Staining enhances the natural grain of the wood, providing a warm and classic appearance.
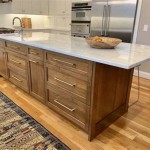
Refacing involves replacing the cabinet doors and drawer fronts while leaving the existing cabinet boxes in place. This option offers a significant aesthetic upgrade without the demolition and reconstruction required for full cabinet replacement. Refacing materials include wood veneer, laminate, and rigid thermofoil (RTF). Choosing the right material depends on the desired look and budget.
Preparation is crucial for a successful cabinet refurbishment. This includes removing cabinet doors, drawers, and all hardware. Thoroughly cleaning the cabinet surfaces is essential for proper paint or stain adhesion. Degreasing agents, such as trisodium phosphate (TSP), effectively remove grease and grime buildup. Sanding the surfaces creates a smooth base for the new finish, promoting better adhesion and a more professional result. Proper ventilation is essential during the preparation and finishing stages to minimize exposure to dust and fumes.
When painting cabinets, applying a primer designed for the chosen paint type is recommended. Primer provides a uniform base, improves paint adhesion, and helps to seal any existing stains or discolorations. Once the primer is dry, apply the paint in thin, even coats, allowing ample drying time between each coat. Multiple thin coats provide a more durable and even finish than one thick coat. Using high-quality brushes and rollers specifically designed for cabinet painting ensures a smooth, professional-looking result.
Staining cabinets requires a different approach. Applying a wood conditioner before staining can help achieve a more even stain color, especially on woods prone to blotching. Apply the stain according to the manufacturer's instructions, working in the direction of the wood grain. After the stain has dried, a protective topcoat, such as polyurethane, should be applied to seal the wood and enhance its durability.
Refacing involves careful measurements and ordering of new doors and drawer fronts. These components are typically custom-made to fit the existing cabinet boxes. Once the new doors and drawer fronts arrive, they can be installed using new hardware, providing a fresh, updated look.
Hardware selection plays a significant role in the overall aesthetic. Handles, knobs, and hinges are available in various styles, finishes, and materials. Choosing hardware that complements the new cabinet finish creates a cohesive and polished look. Replacing outdated hardware with modern options can dramatically enhance the visual appeal of refurbished cabinets.
Throughout the entire refurbishment process, safety precautions should be prioritized. Wearing appropriate safety glasses, gloves, and a dust mask protects against potential hazards. Proper disposal of used materials, such as paint thinner and cleaning solutions, is necessary to comply with environmental regulations.
Successfully refurbishing kitchen cabinets requires patience, attention to detail, and adherence to recommended procedures. Taking the time to properly prepare surfaces, apply finishes, and install hardware yields professional-looking results. This do-it-yourself project can significantly enhance the aesthetic and functionality of a kitchen while providing homeowners with a sense of accomplishment and cost savings.

Diy Cabinet Refacing Budget Friendly Made Easy Wisewood

Diy Cabinet Refacing Budget Friendly Made Easy Wisewood

How To Paint Kitchen Cabinets Like The Pros
How To Paint Kitchen Cabinets Like The Pros

15 Diy Kitchen Cabinet Makeovers Before After Photos Of Cabinets

21 Diy Affordable Ways To Redo Kitchen Cabinets Extra Space Storage

21 Diy Affordable Ways To Redo Kitchen Cabinets Extra Space Storage

The Right Way To Paint Your Kitchen Cabinets And Save Factory Finish Guaranteed Emily Henderson

Cabinet Refinishing An 8 Step Guide For Pro Painters Ppc

Diy Painted Oak Kitchen Cabinets Makeover
Related Posts