Refurbishing Wooden Kitchen Cabinets: A Guide to Revitalizing Your Space
Wooden kitchen cabinets are a staple in many homes, offering durability, warmth, and a classic appeal. However, over time, these cabinets can show signs of wear and tear, fading, and discoloration. Refurbishing wooden kitchen cabinets is a cost-effective and rewarding way to revitalize your kitchen space without the expense of a full remodel. This guide provides a comprehensive overview of the process, encompassing essential steps to achieve a stunning finish.
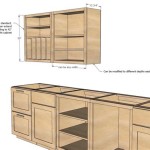
1. Preparation: The Foundation for Success
The success of your cabinet refurbishment hinges on meticulous preparation. Begin by thoroughly cleaning the cabinets with a degreaser to remove any dirt, grease, or grime. This ensures that the paint adheres properly. Sanding is crucial for removing imperfections and creating a smooth surface for the new finish. Use fine-grit sandpaper for a smooth finish and coarse sandpaper for removing stubborn stains or imperfections. Once sanding is complete, thoroughly clean the cabinets again to eliminate dust particles.
Before applying any paint or stain, consider repairing any existing damage. For minor scratches or chipped paint, use a wood filler to fill in the gaps and create a smooth surface. Larger holes or dents may require more extensive repairs. If you encounter structural issues, it's best to consult a professional carpenter.
2. Refinishing Options: Choosing the Right Approach
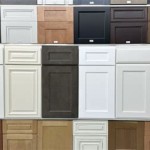
The choice between painting or staining depends on the desired aesthetic and the condition of the cabinets. Painting offers a clean slate, allowing you to select any color and achieve a modern or contemporary look. Staining, on the other hand, enhances the natural wood grain and adds depth and richness to the cabinets. It is an ideal option for cabinets in good condition that simply require a refresh.
If painting, choose a high-quality cabinet paint formulated for durability and moisture resistance. Primer is essential for ensuring optimal adhesion and coverage. For staining, select a stain color that complements your kitchen's style and complements the existing wood tone. Use a high-quality stain brush to ensure even application.
3. Applying the Finishing Touches: A Step-by-Step Guide
Once the cabinets are prepared and the desired finish is chosen, follow these steps for a professional-looking result:
- Painting:
- Apply a primer coat to ensure proper adhesion of the paint.
- Apply two to three coats of paint, allowing each coat to dry completely before applying the next.
- Use a paint brush or roller for large surfaces and a small brush for detailed areas.
- Staining:
- Apply a thin coat of stain evenly to the entire surface.
- Wipe off excess stain with a clean cloth after the recommended drying time.
- Apply additional coats if desired, allowing each coat to dry completely before applying the next.
After the paint or stain has dried, apply a protective sealant to protect the finish from scratches, moisture, and stains. Polyurethane is a popular choice for its durability and ease of application. Allow the sealant to dry completely before replacing hardware and other components.
4. Hardware and Accessories: Enhancing Functionality and Style
Refurbished cabinets offer a perfect opportunity to upgrade the hardware and accessories. Consider replacing old or outdated handles and knobs with stylish alternatives that complement your kitchen's theme. New hinges can also enhance the functionality and appearance of your cabinets.
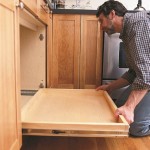
Add organizational accessories such as drawer dividers, pull-out shelves, or lazy Susans to maximize storage space and enhance convenience. These additions can significantly improve the functionality and usability of your cabinets.
Refurbishing wooden kitchen cabinets is a rewarding project that can transform the look and feel of your entire kitchen. By following these steps and paying attention to detail, you can create a stunning and functional space that reflects your personal style and enhances your home's value.

How To Refinish Kitchen Cabinets Diy

Cabinet Refinishing An 8 Step Guide For Pro Painters Ppc

How To Refinish Cabinets Like A Pro

Should I Paint Or Refinish My Kitchen Cabinets

Refinishing Kitchen Cabinets Modern Refacing Made Easy Wisewood

Should I Paint Or Refinish My Kitchen Cabinets

Refinishing Kitchen Cabinets A Beautiful Mess

How To Paint Kitchen Cabinets In 7 Simple Steps

Best Kitchen Cabinet Refacing For Your Home The Depot

Cabinet Refinishing N Hance
Related Posts