Refurbishing Kitchen Cabinets: A DIY Guide to Transform Your Kitchen
Kitchen cabinets are a vital part of any kitchen, providing both storage and style. But over time, even the most well-maintained cabinets can start to look tired, dated, or damaged. If your kitchen cabinets are in need of a refresh, you may be considering replacing them. However, this can be an expensive and time-consuming project. A more cost-effective and DIY-friendly option is to refurbish your existing cabinets.
Refurbishing kitchen cabinets is a project that can be tackled by most homeowners with a little time and effort. The following steps will guide you through the process of refurbishing your kitchen cabinets yourself.
1. Clean and Prep the Cabinets
The first step is to clean and prep your cabinets. This includes removing all of the hardware, doors, and shelves. Once the cabinets are empty, use a degreasing cleaner to remove any grease or grime from the surfaces. Allow the cabinets to dry completely before proceeding to the next step.
2. Repair Any Damage
Once the cabinets are clean and dry, inspect them for any damage. This could include scratches, dents, or even holes. If there is any damage, you will need to repair it before you can paint or refinish the cabinets. For small scratches or dents, you can use a wood filler. For larger repairs, such as holes, you may need to use a wood patch or epoxy.
3. Paint or Refinish the Cabinets
Once the cabinets are repaired, you can paint or refinish them. If you are painting the cabinets, use a high-quality paint that is specifically designed for cabinets. If you are refinishing the cabinets, you will need to use a stripper to remove the existing finish. Once the finish has been removed, you can apply a new stain or paint.
4. Install New Hardware
Once the cabinets are painted or refinished, you can install new hardware. This is a great way to update the look of your cabinets and give them a more modern feel. There are many different styles of hardware available, so you can choose something that matches your kitchen's décor.
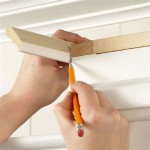
5. Install New Doors and Shelves
If you are replacing the doors and shelves, now is the time to do so. When choosing new doors and shelves, be sure to measure the existing ones so that you get the right size. Once you have the new doors and shelves, install them according to the manufacturer's instructions.
Refurbishing kitchen cabinets is a relatively simple project that can be completed in a few days. By following these steps, you can give your kitchen cabinets a fresh new look and save yourself a lot of money in the process.

Diy Cabinet Refacing Budget Friendly Made Easy Wisewood

Diy Cabinet Refacing Budget Friendly Made Easy Wisewood

How To Paint Kitchen Cabinets In 7 Simple Steps

How To Prep And Paint Kitchen Cabinets Lowe S

Diy Painting Your Kitchen Cabinets The Right Way

A Diy Project Painting Kitchen Cabinets

Painted Furniture Ideas Diy Refacing Kitchen Cabinets

Cabinet Refacing Ideas Diy Projects Craft How To S For Home Decor With

Cabinet Refacing Ideas Diy Projects Craft How To S For Home Decor With

Kitchen Cabinet Refacing The Happy Housewife Home Management
Related Posts