Renewing Oak Kitchen Cabinets: A Comprehensive Guide
Oak kitchen cabinets have long been a popular choice due to their durability, natural beauty, and versatility. However, over time, they can begin to look dated or worn. Instead of opting for a complete kitchen remodel, renewing oak cabinets offers a cost-effective and environmentally friendly alternative. This article provides a detailed guide to the various methods and considerations involved in revitalizing oak kitchen cabinets.
The process of renewing oak kitchen cabinets involves several stages, from thorough cleaning and preparation to the application of finishes that enhance their existing character or completely transform their appearance. The appropriate approach will ultimately depend on the condition of the cabinets, the desired aesthetic, and the budget allocated for the project.
Assessing the Condition of Oak Cabinets
Before embarking on any renewal project, a comprehensive assessment of the cabinets' condition is crucial. This involves identifying any damage, such as scratches, dents, water stains, or loose hardware. The type and severity of the damage will influence the subsequent steps taken. For instance, minor scratches may be easily addressed with touch-up markers, while more significant damage may require patching or even replacement of individual components.
Pay close attention to areas prone to wear and tear, such as around handles, knobs, and drawer fronts. These areas often accumulate dirt, grease, and fingerprints, which can dull the finish and accentuate imperfections. Check for signs of water damage, particularly around the sink and dishwasher, as moisture can cause warping, staining, and even mold growth.
The existing finish should also be evaluated. Is it intact and simply faded, or is it peeling, cracking, or showing signs of wear? Depending on the condition of the existing finish, different preparation techniques will be necessary. Heavily damaged finishes may require complete removal, while those in better condition may only need a thorough cleaning and light sanding.
The cabinet hardware, including hinges, pulls, and knobs, should also be inspected. If the hardware is outdated or damaged, replacing it can significantly enhance the overall appearance of the renewed cabinets. Consider whether the existing hardware complements the desired aesthetic or if a change would contribute to a more modern or refreshed look.
Cleaning and Preparation: The Foundation for Success
Proper cleaning and preparation are paramount to achieving a successful and long-lasting finish. Neglecting these steps can result in poor adhesion, uneven coverage, and ultimately, a less-than-desirable outcome. The cleaning process removes dirt, grease, and grime that can interfere with the adhesion of new finishes. Preparation involves creating a smooth and receptive surface for the new finish to bond to.
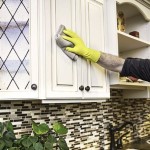
Begin by removing all hardware, including knobs, pulls, and hinges. This ensures that the entire cabinet surface is accessible and prevents these items from becoming contaminated with paint or stain. Use a degreasing cleaner specifically designed for kitchen cabinets to remove accumulated grease and grime. Follow the manufacturer's instructions carefully, paying attention to recommended dilution ratios and application methods. Rinse the cabinets thoroughly with clean water and allow them to dry completely.
Once the cabinets are clean and dry, sanding is typically necessary to create a slightly roughened surface for the new finish to adhere to. The grit of sandpaper used will depend on the condition of the existing finish. For minor scratches and a slight scuff, a fine-grit sandpaper (220-grit or higher) may suffice. For more significant imperfections or a thick, glossy finish, a medium-grit sandpaper (150-grit to 180-grit) may be required. Always sand in the direction of the wood grain to avoid creating unsightly scratches.
After sanding, vacuum the cabinets thoroughly to remove all sanding dust. Follow this with a tack cloth to pick up any remaining particles. Dust can interfere with the adhesion of the new finish and result in a textured or uneven surface. At this stage, repair any minor damage, such as filling in scratches or dents with wood filler. Allow the wood filler to dry completely and then sand it smooth to blend seamlessly with the surrounding wood.
Methods for Renewing Oak Cabinets
Several methods are available for renewing oak kitchen cabinets, each with its own advantages and disadvantages. The choice will depend on the desired aesthetic, the budget, and the level of effort one is willing to invest.
Refinishing: Refinishing involves removing the existing finish and applying a new stain and clear coat. This method allows one to completely change the color and tone of the cabinets while showcasing the natural wood grain. Refinishing is a more labor-intensive process than simply repainting, but it can yield stunning results.
Begin by stripping the existing finish using a chemical stripper or by sanding it down to bare wood. Chemical strippers can be messy, so take necessary precautions, such as wearing gloves and eye protection, and working in a well-ventilated area. If sanding, use a progression of sandpaper grits, starting with a coarser grit to remove the bulk of the finish and gradually moving to finer grits to smooth the surface. Once the cabinets are stripped and sanded, apply a wood conditioner to help ensure even stain absorption. Then, apply the stain of choice, following the manufacturer's instructions for application and drying times. Finally, apply several coats of a clear topcoat, such as polyurethane or varnish, to protect the stain and provide a durable finish. Lightly sand between coats for optimal smoothness.
Repainting: Repainting oak cabinets is a simpler and more cost-effective option than refinishing. It allows for a complete color transformation and a more contemporary look. However, repainting can obscure the natural wood grain, which may be a drawback for some. To effectively paint oak cabinets, it's necessary to use a quality adhesion-promoting primer. Apply one or two coats of primer, allowing each coat to dry completely before applying the next. After the primer has dried, apply two or more coats of paint, using a brush, roller, or sprayer. Lightly sand between coats of paint for a smoother finish. Choose a paint specifically designed for cabinets, such as acrylic-latex enamel, for durability and ease of cleaning.
Glazing: Glazing involves applying a thin layer of tinted glaze over the existing finish or a newly painted surface. This technique adds depth and dimension to the cabinets, highlighting the details and creating an antique or aged appearance. Glazing is best suited for cabinets with raised panels or other decorative elements. Apply the glaze with a brush or rag, working it into the crevices and details of the cabinets. Then, wipe away the excess glaze with a clean cloth, leaving a subtle layer of color in the recessed areas. Seal the glaze with a clear topcoat to protect it and prevent it from wearing away. Experiment with different colors of glaze to achieve the desired effect.
Updating Hardware: Replacing outdated or worn cabinet hardware can dramatically improve the overall appearance of the kitchen. New knobs, pulls, and hinges can instantly modernize the space and complement the renewed cabinets. Consider the style of the kitchen and choose hardware that reflects that aesthetic. Options range from sleek and contemporary stainless steel pulls to ornate and traditional bronze knobs. Ensure that the new hardware is compatible with the existing cabinet holes or be prepared to drill new holes if necessary.
Applying Decorative Finishes: Beyond standard painting and staining, various decorative finishes can be applied to oak kitchen cabinets to create unique and eye-catching effects. These include techniques such as faux painting, distressing, and adding decorative moldings. Faux painting involves using specialized paints and techniques to mimic the appearance of other materials, such as marble or granite. Distressing involves intentionally creating imperfections, such as scratches or worn edges, to give the cabinets an antique or rustic look. Decorative moldings can be added to cabinet doors or frames to enhance their visual appeal and add architectural interest.
Choosing the right method depends on the desired look and the existing condition of the cabinets. Each method requires careful attention to detail and proper preparation to ensure a professional and long-lasting result. Regardless of the chosen method, the key to success lies in thorough preparation, patient application, and the use of high-quality materials.

7 Reasons To Choose Oak Kitchen Cabinets For Your Renovations

How To Make Oak Kitchen Cabinets Look Modern Without Covering Them Up

How To Refinish Kitchen Cabinets Diy

How To Make Oak Kitchen Cabinets Look Modern Without Covering Them Up

How To Re Worn Kitchen Cabinets Without A Complete Overhaul The Seattle Times

How To Make Oak Kitchen Cabinets Look Modern Without Covering Them Up

Kitchen Cabinet Refacing Makeover A Homeowner S Experience

7 Simple Ideas To Modernize Your Oak Cabinets Decor

7 Simple Ideas To Modernize Your Oak Cabinets Decor

Wood Renewal Kitchen Makeovers
Related Posts