```html
Renovating Kitchen Cabinets: A DIY Guide
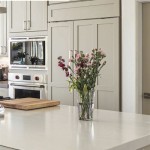
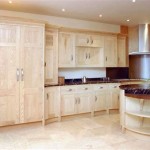
Kitchen cabinets are a significant element in the overall aesthetic and functionality of a kitchen. Upgrading or modernizing them can dramatically change the appearance of a kitchen without undertaking a complete kitchen renovation. Renovating kitchen cabinets oneself is a viable option for homeowners seeking to save money and customize their kitchen according to their specific preferences. This guide provides a comprehensive overview of how to renovate kitchen cabinets using a DIY approach, covering various techniques and considerations.
Planning and Preparation
Before initiating any physical work, detailed planning is paramount. This involves assessing the existing cabinets, determining the renovation goals, and establishing a budget. A thorough inspection of the cabinets will reveal potential issues such as damaged doors, loose hinges, or worn-out drawer slides. These issues will influence the renovation strategy and material requirements.
Defining the renovation goals is crucial. Are the cabinets merely in need of a fresh coat of paint, or is a more extensive makeover required, including new doors, hardware, and organizational features? The desired outcome will dictate the scope of the project and the necessary materials.
Establishing a realistic budget is equally important. Account for the cost of paint, primer, sandpaper, brushes, rollers, new hardware (knobs, pulls, hinges), wood filler, and any specialized tools that may be needed. Comparing prices from different suppliers can help optimize the budget. Unexpected expenses often arise during renovations; allocating a contingency fund is advisable.
Following the planning phase, preparation is key to a successful renovation. This involves clearing the kitchen, protecting the surrounding areas, and gathering the necessary tools and materials.
Remove all items from the cabinets and drawers. This will facilitate easier access and prevent damage to the contents. Empty cabinets and drawers should be thoroughly cleaned to remove dust and debris. Cover countertops, flooring, and appliances with drop cloths or plastic sheeting to protect them from paint splatters and dust. Adequate ventilation is essential, so open windows and doors or use a ventilation fan, especially when working with paints and solvents.
Gather all the required tools and materials before starting the project. Essential tools include sandpaper (various grits), a sanding block or orbital sander, paintbrushes, paint rollers, paint trays, primer, paint, wood filler, putty knife, screwdriver, drill, measuring tape, and safety glasses. Having all the necessary items readily available will streamline the renovation process and minimize delays.
Painting Kitchen Cabinets
Painting is a common and relatively straightforward method of renovating kitchen cabinets. It can dramatically alter the appearance of the cabinets and update the kitchen's overall aesthetic. Proper preparation is essential for achieving a professional and durable finish.
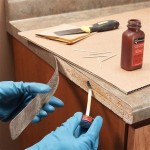
Begin by thoroughly cleaning the cabinet surfaces. Use a degreasing cleaner to remove dirt, grease, and grime. Rinse the surfaces with clean water and allow them to dry completely. This step is crucial for ensuring proper adhesion of the primer and paint.
Sanding the cabinets creates a slightly rough surface that allows the primer to grip better. Use medium-grit sandpaper (around 120-grit) to lightly sand all surfaces. Focus on removing any existing gloss or imperfections. After sanding, wipe the surfaces with a tack cloth to remove any sanding dust. This step is crucial for achieving a smooth and even finish.
Apply a coat of primer specifically designed for kitchen cabinets. Oil-based primers are generally recommended for their excellent adhesion and stain-blocking properties. However, water-based primers are also a viable option, especially if using water-based paint. Apply the primer evenly using a brush or roller, ensuring complete coverage. Allow the primer to dry completely according to the manufacturer's instructions.
Once the primer is dry, apply two coats of high-quality paint specifically formulated for kitchen cabinets. Acrylic latex paint is a popular choice due to its durability, ease of cleaning, and low VOC (volatile organic compound) content. Apply the paint evenly using a brush or roller, allowing sufficient drying time between coats. Lightly sand between coats with fine-grit sandpaper (around 220-grit) to remove any imperfections and ensure a smooth finish. A sprayer provides a more consistent and professional finish, but it requires more preparation and skill. Ensure proper ventilation when painting.
After the final coat of paint has dried completely, reassemble the cabinets. Attach the doors, drawers, and hardware. Take care to align the doors and drawers properly and tighten the screws securely. Consider replacing old hardware with new knobs and pulls to further enhance the updated look.
Replacing Cabinet Doors and Hardware
Replacing cabinet doors and hardware offers a more significant transformation compared to simply painting the existing cabinets. It allows for a complete change in style and can significantly enhance the kitchen's overall appearance. This option is particularly appealing if the existing cabinet boxes are in good condition but the doors are outdated or damaged.
Begin by accurately measuring the existing cabinet doors. Measure the height, width, and thickness of each door. It is crucial to provide precise measurements when ordering new doors. Consider the door overlay style (full overlay, partial overlay, or inset) to ensure the new doors fit properly. The overlay refers to how much the door overlaps the cabinet frame.
Select new cabinet doors that complement the desired kitchen style. Numerous styles are available, ranging from traditional raised-panel doors to modern flat-panel doors. Choose a door style that aligns with the overall design vision for the kitchen. Consider the material of the doors; options include solid wood, MDF (medium-density fiberboard), and laminate. Each material has its own advantages and disadvantages in terms of cost, durability, and appearance.
Order the new cabinet doors from a reputable supplier. Provide the precise measurements and specifications (door style, material, finish) to ensure accurate fabrication. Some suppliers offer custom door options, allowing for further personalization. While waiting for the delivery of the new doors, remove the existing doors and hinges from the cabinet boxes.
Install the new cabinet doors using new hinges. Choose hinges that are compatible with the door overlay style and the cabinet frame. Carefully align the doors and attach the hinges securely. Adjust the hinges as needed to ensure the doors swing smoothly and close properly. Using a level during installation ensures the doors are aligned correctly.
Replace the old cabinet hardware (knobs and pulls) with new hardware that complements the new doors. Choose hardware that is both aesthetically pleasing and functional. Consider the size, style, and finish of the hardware to create a cohesive look. Install the new hardware using a drill and screwdriver, following the manufacturer's instructions.
Adding Organizational Features
Beyond aesthetics, renovating kitchen cabinets also presents an opportunity to improve their functionality by adding organizational features. Implementing smart storage solutions can maximize space utilization and enhance the overall efficiency of the kitchen. Several options are available, ranging from simple shelf dividers to complex pull-out organizers.
Consider installing pull-out shelves or drawers inside existing cabinets. These organizers make it easier to access items stored at the back of the cabinets. Pull-out shelves are particularly useful for storing pots, pans, and other bulky items. Measure the interior dimensions of the cabinets accurately to ensure the pull-out shelves or drawers fit properly.
Implement shelf dividers to separate and organize items on shelves. Shelf dividers prevent items from toppling over and make it easier to find what you are looking for. Various types of shelf dividers are available, including adjustable dividers and fixed dividers. Choose dividers that are appropriate for the type of items being stored.
Add drawer organizers to keep drawers tidy and efficient. Drawer organizers are available in a variety of configurations, including dividers for utensils, spice racks, and specialized organizers for pots and pans. These organizers prevent items from shifting around in the drawers and make it easier to find what you need. Consider the dimensions of the drawers when selecting drawer organizers.
Install a lazy Susan in corner cabinets to maximize space utilization. Lazy Susans allow easy access to items stored in the often-difficult-to-reach corners of cabinets. Choose a lazy Susan that is appropriately sized for the cabinet and can support the weight of the items being stored.
Utilize door-mounted storage solutions to maximize vertical space. Install spice racks, utensil holders, or small shelves on the inside of cabinet doors. These solutions are particularly useful for storing frequently used items. Ensure that the door-mounted storage solutions do not interfere with the closing of the cabinet doors.
```
Before And After Diy Kitchen Renovation Lemon Thistle

Before And After My Budget Kitchen Remodel Toolbox Divas

Diy Kitchen Renovation One Year Later The Created Home

Diy Budget Kitchen Renovation Our Gorgeous Reveal Dwell Beautiful

Painting Your Kitchen Cabinets White

Budget Kitchen Renovation With Diy Shaker Painted Cabinets I

Our Diy Kitchen Remodel Before And After Tackling A Farmhouse Makeover On Budget Part 1 Joyfully Treasured

How To Paint Kitchen Cabinets In 7 Simple Steps

Beginner S Guide Diy Kitchen Remodel On A Budget Designing Vibes

Diy Painting Your Kitchen Cabinets The Right Way
Related Posts