Repainting Kitchen Cabinets: A Transformation Guide
Tired of the dated and dingy look of your kitchen cabinets? Repainting them is a cost-effective way to transform the heart of your home. By following these essential steps, you can achieve a professional-looking finish that will enhance your kitchen's aesthetics.
Before You Start
Before diving into the painting process, it's crucial to prepare your cabinets and materials. Begin by thoroughly cleaning them with a degreasing solution to remove any grease or dirt. Protect your floors and countertops by spreading drop cloths. Gather the necessary tools, including a cleaning solution, sandpaper, primer, paint, a paintbrush or roller, and a protective finish.
Removing Existing Paint or Stain
If your cabinets have an existing finish, you may need to remove it to ensure proper adhesion for the new paint. This can be done using chemical strippers or sanding. Wear protective gear and follow the manufacturer's instructions for safe use. Once the old finish is removed, sand the surface lightly to roughen it up and create a better surface for the primer.
Applying Primer
Primer is essential for creating a smooth and even surface for the paint. Choose a primer designed for kitchen cabinets and apply it evenly using a brush or roller. Allow the primer to dry completely before moving on to the next step.
Painting Your Cabinets
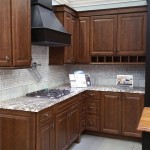
Now comes the exciting part—painting your cabinets! Select a high-quality paint specifically designed for kitchen use, as it will be more durable and resistant to wear and tear. Apply the paint in thin, even coats, and allow each coat to dry completely before applying the next. Depending on the color and coverage desired, you may need two or more coats.
Finishing Touches
Once the paint has dried, it's time for the finishing touches. Apply a clear protective finish to seal and protect your newly painted cabinets from dirt, grease, and wear. You can choose between polyurethane, lacquer, or a water-based finish based on your preferred durability and sheen.
After You're Done
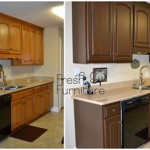
Congratulations on your newly repainted kitchen cabinets! To maintain their beauty and durability, clean them regularly with mild soap and water. Avoid using harsh chemicals or abrasive sponges that could damage the finish. Enjoy your fresh and rejuvenated kitchen!

Diy Painting Your Kitchen Cabinets The Right Way

Our Painted Cabinets Five Years Later Nina Hendrick Home

Update On Our Diy White Painted Kitchen Cabinets 2 Years Later

9 Inspiring Kitchen Cabinet Makeovers Before And After Remodel Small Builder Grade Renovation

15 Diy Kitchen Cabinet Makeovers Before After Photos Of Cabinets

Painted Cabinets Nashville Tn Before And After Photos Brown Kitchen Painting White

Kitchen Cabinet Colors Before After The Inspired Room

Painted Kitchen Cabinet Ideas And Makeover Reveal The Polka Dot Chair

Refinish Kitchen Cabinets With Kilz Restoration Primer

Tips Tricks To Paint Honey Oak Kitchen Cabinets Cottage Living And Style
Related Posts