Here's an article focusing on replacing kitchen cabinet hardware, formatted as requested:
Replacing Kitchen Cabinet Hardware: A Comprehensive Guide
Kitchen cabinet hardware, often an overlooked detail, significantly impacts the overall aesthetic and functionality of a kitchen. Replacing outdated or worn hardware is a relatively straightforward and cost-effective way to refresh the space without undertaking a full-scale renovation. This article provides a comprehensive guide to understanding the process of replacing kitchen cabinet hardware, covering everything from selecting the right hardware to the actual installation.
The benefits of replacing kitchen cabinet hardware extend beyond mere aesthetics. New hardware can modernize the look, enhance usability, and even increase the perceived value of the home. Whether aiming for a subtle update or a more dramatic transformation, carefully chosen hardware can complement the existing style and introduce a new dimension of visual appeal.
Key Point 1: Understanding Hardware Types and Styles
The initial step in replacing kitchen cabinet hardware involves understanding the different types of hardware available and selecting styles that align with the kitchen's overall design. The primary categories include knobs, pulls, and hinges. Each type serves a distinct function and contributes to the overall look.
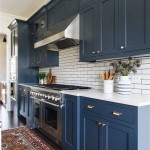
Knobs are typically small, rounded, or decorative pieces attached to cabinet doors and drawers with a single screw. They are generally less expensive than pulls and are suitable for lighter doors and drawers. Knobs come in a variety of materials, including metal, wood, ceramic, and glass, offering a wide range of stylistic options. Choosing the correct knob size is essential for both functionality and aesthetics; smaller knobs on large drawers may appear disproportionate, while oversized knobs on smaller cabinets can be overwhelming.
Pulls, on the other hand, are typically longer and provide a more substantial grip. They are generally fixed to the cabinet with two or more screws, offering greater stability and leverage, particularly for heavier doors and drawers. Pulls are available in various styles, from simple bar pulls to more ornate designs with intricate details. The selection of a pull style should consider the overall design scheme of the kitchen. Sleek, minimalist pulls complement modern kitchens, while more decorative pulls with curves and embellishments suit traditional or transitional styles.
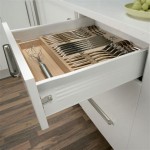
Hinges are the mechanisms that allow cabinet doors to swing open and closed. While they are less visible than knobs and pulls, their functionality is crucial. Hinges are available in various types, including standard hinges, concealed hinges, and soft-close hinges. Standard hinges are typically visible when the cabinet door is closed, while concealed hinges, as the name implies, are hidden from view. Soft-close hinges prevent doors from slamming shut, reducing noise and preventing damage to the cabinet frame.
Beyond the basic types, consider the finish of the hardware. Common finishes include brushed nickel, polished chrome, oil-rubbed bronze, matte black, and antique brass. The finish should complement the other fixtures in the kitchen, such as the faucet and lighting. Mixing finishes can be done intentionally for a unique look, but it requires careful consideration to ensure a cohesive design.
Key Point 2: Measuring and Selecting the Correct Size
Accurate measurements are crucial for ensuring a proper fit when replacing kitchen cabinet hardware. Incorrect measurements can lead to hardware that doesn't fit properly or looks disproportionate. The primary measurement to consider is the center-to-center distance of the existing screw holes. This refers to the distance between the centers of the two screw holes required to attach the pull or knob.
To measure the center-to-center distance, use a ruler or measuring tape to measure the distance between the screw holes. It is essential to be precise, as even slight discrepancies can affect the fit. If replacing existing hardware, use the same center-to-center distance for the new hardware. If installing hardware for the first time, decide on the desired placement and mark the locations for the screw holes accordingly. For pulls, a general guideline is to choose a pull that is approximately one-third the width of the drawer or door.
For knobs, consider the size of the door or drawer. Smaller doors and drawers typically require smaller knobs, while larger doors and drawers can accommodate larger knobs. A good rule of thumb is to choose a knob that is no more than 1/2 the width of the cabinet stile or rail it is mounted on. This ensures the knob doesn't appear awkwardly large. The thickness of the door or drawer front also needs to be considered to ensure that the screws provided with the new hardware are long enough to properly secure the handle or knob. Excessively long screws can be trimmed to the right length but shorter ones may require a trip to the hardware store.
Before purchasing new hardware, it is advisable to purchase a sample and test it on a cabinet door or drawer to ensure it fits properly and looks aesthetically pleasing. This allows for adjustments to be made before committing to a larger purchase.
Key Point 3: The Installation Process
The installation process for replacing kitchen cabinet hardware is generally straightforward and can be accomplished with basic tools. Necessary tools include a screwdriver (both Phillips head and flathead), a drill with appropriate drill bits, a measuring tape, a pencil, and safety glasses. A cabinet hardware jig can also be useful for ensuring accurate and consistent placement of the hardware.
The first step is to remove the existing hardware. Using a screwdriver, carefully unscrew the existing knobs or pulls from the cabinet doors and drawers. Be sure to retain the original screws, as they may be needed for comparison or if the new hardware's screws are not the correct size. Once the old hardware is removed, clean the surface of the cabinet door or drawer to remove any dirt or residue.
If using the existing screw holes, align the new hardware with the holes and insert the screws. Tighten the screws securely, but be careful not to overtighten, as this can damage the cabinet door or drawer. If installing hardware for the first time or using different screw hole locations, use a measuring tape and pencil to mark the desired locations for the new screw holes. A cabinet hardware jig can be used to ensure accurate and consistent placement of the holes.
Once the screw hole locations have been marked, use a drill to create pilot holes. The size of the drill bit should be slightly smaller than the diameter of the screws. This will prevent the wood from splitting when the screws are inserted. After drilling the pilot holes, align the new hardware with the holes and insert the screws. Tighten the screws securely, ensuring that the hardware is flush against the cabinet door or drawer.
For hinges, the process is slightly more complex. Begin by removing the old hinges from the cabinet door and frame. Carefully note the position of the old hinges, as this will help with the placement of the new hinges. Align the new hinges with the existing screw holes and attach them to the cabinet door and frame using screws. Ensure that the hinges are properly aligned and that the cabinet door swings smoothly. If using soft-close hinges, follow the manufacturer's instructions for adjusting the hinges to achieve the desired closing speed.
After installing all the new hardware, inspect the doors and drawers to ensure that they open and close smoothly. Make any necessary adjustments to the hinges or screws to achieve optimal functionality. Finally, clean the hardware and cabinet surfaces to remove any fingerprints or smudges.
Replacing kitchen cabinet hardware is a relatively simple project that can have a significant impact on the look and feel of a kitchen. By understanding the different types of hardware, measuring accurately, and following the proper installation steps, homeowners can easily refresh their kitchen and enhance its overall appeal.

How To Replace Kitchen Cabinet Hardware A Girl S Guide Home Diy

How To Replace Kitchen Hardware In Minutes Mother Daughter Projects

How To Replace Kitchen Cabinet Hardware Diy Tutorial

How To Easily Install Kitchen Cabinet Hardware The American Patriette

Replacing Kitchen Cabinet Hardware Bob Vila

How To Replace Kitchen Cabinet Hardware Yourself

How To Replace Kitchen Cabinet Hardware Diy Tutorial

A Simple Guide To Replacing Kitchen Cabinet Hardware Nestrs

How To Replace Kitchen Cabinet Hardware Yourself

Mistakes To Avoid When You Install Kitchen Cabinet Pulls Free Template
Related Posts