Rustic Kitchen Cabinet Paint Ideas
Rustic kitchen cabinets evoke a sense of warmth, comfort, and timelessness. They often feature distressed finishes, natural wood tones, and simple designs, creating a relaxed and inviting atmosphere. Painting kitchen cabinets in a rustic style is a budget-friendly way to achieve this aesthetic without replacing existing cabinetry. This article explores various paint ideas and techniques to transform your kitchen cabinets into rustic masterpieces.
Choosing the Right Paint Color Palette
Selecting the appropriate color palette is crucial for achieving a rustic aesthetic. Natural and earthy tones are fundamental to this style, reflecting elements found in nature and creating a sense of authenticity. Consider these color options:
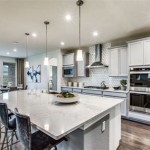
Neutrals: Off-white, cream, beige, and gray are excellent base colors for rustic cabinets. These neutral tones provide a versatile foundation that can be paired with other colors and textures. Off-white and cream offer a soft, inviting look, while beige provides warmth and depth. Gray, especially warmer grays like "greige," can add a touch of sophistication while maintaining the rustic charm.
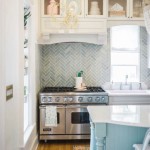
Earthy Tones: Incorporating earthy tones such as browns, greens, and blues can enhance the rustic feel. Muted greens, like sage or olive, evoke a natural, outdoorsy feeling. Warm browns, ranging from light tans to deep chocolate, add richness and depth. Dusty blues, reminiscent of worn denim or aged pottery, can introduce a calming and serene element.
Accent Colors: Strategic use of accent colors can further accentuate the rustic style. Consider using colors like terracotta, mustard yellow, or deep red sparingly to highlight specific areas or details. These colors should complement the primary color palette and not overwhelm the overall design.
When choosing colors, consider the existing elements in your kitchen, such as countertops, flooring, and backsplash. Aim for a cohesive look that ties all the elements together. Test paint samples in your kitchen under different lighting conditions to ensure the colors appear as intended. Lighting can significantly affect how colors are perceived, so it's essential to evaluate them throughout the day.
Paint Techniques for a Rustic Look
Beyond color selection, applying specific painting techniques can significantly enhance the rustic aesthetic. These techniques create the desired distressed, aged, or textured appearance, adding character and charm to your kitchen cabinets.
Distressing: Distressing is a popular technique for creating a worn and aged look. This involves intentionally removing paint from certain areas to reveal the underlying wood or previous paint layers. Several methods can be used for distressing, including sanding, chipping, and dry brushing.
Sanding: Sanding is a straightforward method for removing paint. Use sandpaper with varying grits, starting with a coarser grit (e.g., 80-grit) to remove the top layer of paint and then switching to a finer grit (e.g., 220-grit) to smooth the edges. Focus on areas that would naturally wear over time, such as edges, corners, and around knobs and handles.
Chipping: Chipping involves physically removing paint using tools like a putty knife or a screwdriver. Carefully chip away at the paint in random areas to create a more rugged and textured look. This technique works best on cabinets with multiple layers of paint, as it exposes the different layers and adds depth.
Dry Brushing: Dry brushing involves applying a small amount of paint to a dry brush and then lightly brushing it over the surface of the cabinet. This technique creates a subtle, textured effect with streaks of paint. Use a contrasting color for the dry brushing to enhance the effect. For example, if your cabinets are painted cream, try dry brushing with a light brown or gray.
Glazing: Glazing is another technique for adding depth and dimension to painted cabinets. Applying a glaze involves applying a thin layer of tinted glaze over the painted surface and then wiping it away, leaving the glaze in the crevices and details. This technique enhances the texture and highlights the architectural details of the cabinets.
Choose a glaze color that complements the base paint color. For example, a dark brown or black glaze can add a dramatic effect to light-colored cabinets, while a lighter glaze can soften the look of darker cabinets. Apply the glaze with a brush or sponge, and then wipe it away with a clean cloth. Experiment with different application techniques to achieve the desired effect.
Antiquing: Antiquing techniques aim to replicate the appearance of aged furniture. This often involves using antiquing waxes or stains to create a patina effect. Apply the wax or stain to the cabinet surface and then buff it with a soft cloth to create a sheen. The wax or stain will settle into the crevices and details, enhancing the aged appearance.
Consider using different colors of wax or stain to create a more complex and layered effect. For example, you can apply a dark wax followed by a lighter wax to create highlights and shadows. Experiment with different combinations to achieve the desired look.
Milk Paint: Milk paint is a traditional type of paint that is known for its matte finish and ability to create a naturally distressed look. It is made from milk protein (casein), lime, pigment, and water. Milk paint is eco-friendly and provides a unique texture and color that is ideal for rustic cabinets.
When using milk paint, it's important to prepare the surface properly. Milk paint adheres best to porous surfaces, so it may be necessary to sand or prime cabinets with a glossy or non-porous finish. Milk paint can be applied with a brush or sprayer, and it can be easily distressed by sanding or chipping after it dries.
Preparing Cabinets for Painting
Proper preparation is essential for achieving a professional and long-lasting paint finish. This involves cleaning, sanding, and priming the cabinets before applying the paint. Neglecting these steps can result in poor adhesion, uneven coverage, and a less-than-desirable final result.
Cleaning: Thoroughly clean the cabinets to remove any dirt, grease, or grime. Use a degreasing cleaner and a scrub brush to remove stubborn stains. Rinse the cabinets with clean water and allow them to dry completely. Consider removing the cabinet doors and drawers to make cleaning easier and to ensure all surfaces are properly cleaned.
Sanding: Sanding is crucial for creating a smooth surface and providing better adhesion for the paint. Use sandpaper with a medium grit (e.g., 120-grit) to lightly sand the cabinets. Focus on areas with imperfections or rough spots. If the cabinets have a glossy finish, sanding is even more important to remove the sheen and create a porous surface for the paint to adhere to.
Priming: Priming is an essential step that helps to seal the surface, block stains, and improve paint adhesion. Choose a high-quality primer that is compatible with the type of paint you will be using. Apply the primer in thin, even coats, following the manufacturer's instructions. Allow the primer to dry completely before applying the paint. Tinting the primer to a similar color as the paint can help to achieve better coverage and reduce the number of coats needed.
Repairing: Before painting, address any repairs needed on the cabinets. Fill any holes or cracks with wood filler and sand smooth. Repair any loose or damaged hardware, such as hinges and knobs. Addressing these repairs before painting will ensure a more professional and polished final result.
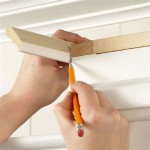
Protecting: Protect the surrounding areas before painting to prevent spills and splatters. Cover countertops, floors, and appliances with drop cloths or plastic sheeting. Use painter's tape to mask off areas that you don't want to paint, such as walls and trim. Taking the time to properly protect the surrounding areas will save you time and effort in the long run.
Hardware: Consider the hardware on your cabinets. Existing hardware can be cleaned and reused, or you can replace it with new hardware that complements the rustic style. Options include wrought iron pulls, antique brass knobs, and wooden handles. The hardware can significantly impact the overall look of the cabinets, so choose pieces that enhance the rustic aesthetic.
In conclusion, painting kitchen cabinets in a rustic style involves careful consideration of color palettes, painting techniques, and preparation methods. By selecting the right colors, applying appropriate techniques, and thoroughly preparing the cabinets, you can transform your kitchen into a warm, inviting space with a timeless rustic charm. Experimentation and creativity are encouraged to achieve a unique and personalized look that reflects your individual style.

Rustic Kitchen Ideas

Rustic Kitchen The Cabinet Paint Color In This Is Custom Blend With An Farmhouse Design Modern Kitchens

45 Best Kitchen Paint Color Ideas And Combinations For 2024

Kitchen Cabinet Paint Colors Pictures Ideas From Rustic Cabinets Industrial Decor

45 Best Kitchen Paint Color Ideas And Combinations For 2024
:strip_icc()/VirginiaBell-fd3cd606097c4e64b73ea90c6d5433ce.jpeg?strip=all "20 Best Rustic Kitchen Cabinet Design Ideas")
20 Best Rustic Kitchen Cabinet Design Ideas

Rustic Kitchen Cabinets And Design Ideas

Navy Kitchen Cabinet Paint Color Home Bunch Interior Design Ideas

Remarkable Farmhouse Gray Kitchen Cabinets Decor Ideas

15 Green Kitchen Cabinet Ideas 2024 Top Paint Colors For Kitchens
Related Posts