Sherwin-Williams Paint for Kitchen Cabinets: A Comprehensive Guide
Kitchen cabinets are a focal point in any home, impacting the overall aesthetic and value. Repainting kitchen cabinets offers a cost-effective alternative to full replacement, providing a significant refresh without the hefty price tag. Selecting the right paint is crucial for a durable, beautiful, and long-lasting finish. Sherwin-Williams, a leading paint manufacturer, offers a variety of products specifically formulated for kitchen cabinets, boasting qualities like durability, ease of application, and a wide range of color options.
This article provides a comprehensive guide to using Sherwin-Williams paint for kitchen cabinets. It will delve into the preparation process, paint selection, application techniques, and considerations for achieving a professional-looking result. Proper execution of these steps ensures a finish that is both visually appealing and resistant to the daily wear and tear inherent in a kitchen environment.
Key Point 1: Preparation is Paramount for a Lasting Finish
The success of any paint job, particularly on kitchen cabinets, hinges on thorough preparation. Neglecting this stage can lead to adhesion problems, uneven finishes, and ultimately, a less-than-desirable outcome. The preparation process involves several critical steps that must be executed meticulously.
Firstly, all cabinet doors and drawers must be removed from their frames. This allows for easier access and a more even application of paint across all surfaces. Remove any hardware, such as knobs, pulls, and hinges. Store these in labeled bags to facilitate easy reinstallation later. A power screwdriver can expedite this process.
Clean cabinets thoroughly to remove grease, grime, and food splatters. Kitchen cabinets, by their very nature, accumulate a significant amount of residue over time. A degreasing cleaner, such as TSP (trisodium phosphate) or a TSP substitute, is highly recommended. Follow the manufacturer's instructions carefully, as these cleaners can be harsh. Rinse the cabinets thoroughly with clean water after cleaning to remove any cleaner residue, which can interfere with paint adhesion. Allow the cabinets to dry completely before proceeding.
Next, assess the condition of the cabinets. Look for any damage, such as chips, dents, or scratches. Repair these imperfections with wood filler. Apply the filler according to the manufacturer's instructions, allowing it to dry completely. Once dry, sand the filled areas smooth, blending them seamlessly with the surrounding surface. This step ensures a uniform and professional-looking finish.
Sanding is an essential step in the preparation process. It creates a slightly rough surface that allows the primer and paint to adhere properly. Use sandpaper with a medium grit (around 120-150) to lightly sand the entire surface of the cabinets. Focus on removing any existing sheen from the old finish. After sanding, vacuum the cabinets to remove all sanding dust. Follow this with a tack cloth to pick up any remaining particles. A clean surface is vital for optimal paint adhesion.
Applying a high-quality primer is crucial, especially when painting over previously finished surfaces or bare wood. Primer creates a uniform base for the paint, improves adhesion, and helps to block stains or tannins from bleeding through the topcoat. Choose a primer specifically designed for cabinets and wood surfaces. Oil-based primers offer excellent stain blocking and adhesion, while water-based primers are easier to clean up and have lower VOC (volatile organic compound) levels. Apply the primer in thin, even coats, following the manufacturer's instructions. Allow the primer to dry completely before proceeding to the next step. Lightly sand the primed surface with fine-grit sandpaper (around 220) to create a smooth surface for painting. Again, clean the surface thoroughly after sanding.
Key Point 2: Selecting the Right Sherwin-Williams Paint for Kitchen Cabinets
Sherwin-Williams offers a variety of paint options suitable for kitchen cabinets, each with its own set of characteristics and benefits. Selecting the right paint depends on factors such as desired finish, durability requirements, and application preferences. Careful consideration should be given to the specific properties of each paint line to ensure optimal results.
One popular choice is Sherwin-Williams Emerald Urethane Trim Enamel. This paint is specifically formulated for trim and cabinets, offering exceptional durability and a smooth, factory-like finish. It is highly resistant to scratches, scuffs, and stains, making it ideal for high-traffic areas like kitchens. The urethane-modified acrylic formula provides excellent adhesion and leveling properties, resulting in a professional-looking finish. It is available in a range of sheens, from matte to semi-gloss, allowing for customization based on personal preference.
Another excellent option is Sherwin-Williams ProClassic Interior Acrylic Latex. This paint is known for its durability, smooth application, and excellent leveling properties. It also delivers a hard, washable finish, which is a plus for kitchen cabinets. ProClassic is often chosen for its ability to minimize brush marks and create a uniform appearance.
For a more budget-friendly option, Sherwin-Williams Showcase Interior Latex Paint offers a good balance of quality and affordability. While not as durable as Emerald Urethane Trim Enamel or ProClassic, it still provides a durable and washable finish suitable for kitchen cabinets. Showcase is a good choice for those seeking a cost-effective solution without sacrificing too much in terms of performance.
Consider the sheen level when selecting paint. Sheen refers to the amount of light reflected by the painted surface. Higher sheens are more durable and easier to clean but also tend to highlight imperfections. Lower sheens are less reflective and hide imperfections better but are generally less durable. For kitchen cabinets, a semi-gloss or satin finish is often recommended. These sheens offer a good balance of durability, cleanability, and aesthetics.
Always ensure the chosen paint is compatible with the primer used. Using incompatible products can lead to adhesion problems and other issues. Consult with a Sherwin-Williams representative or refer to the product labels to ensure compatibility. It is also advisable to test the paint and primer combination on a small, inconspicuous area of the cabinet before applying it to the entire surface. This allows for verification of adhesion and color accuracy.
Key Point 3: Application Techniques for a Professional-Looking Finish
Even with the best paint and meticulous preparation, improper application can lead to a disappointing result. Mastering the correct application techniques is essential for achieving a smooth, uniform, and professional-looking finish on kitchen cabinets. Factors such as brush or roller selection, layering techniques, and drying times all play a significant role.
The selection of appropriate application tools is crucial. A high-quality brush designed for enamel or latex paint is recommended. Look for brushes with synthetic bristles that are soft and flexible. A 2-inch angled brush is generally a good choice for painting cabinets, as it allows for precise application in corners and tight spaces. For larger, flat surfaces, a small, dense foam roller can be used. Rollers provide a smooth, even finish and minimize brush strokes.
Apply the paint in thin, even coats. Avoid applying too much paint at once, as this can lead to drips and runs. Work in small sections, overlapping each stroke slightly to ensure complete coverage. Use long, smooth strokes to create a uniform finish. If using a brush, hold it at a slight angle and apply gentle pressure. If using a roller, roll it in a "W" pattern to distribute the paint evenly.
Allow each coat of paint to dry completely before applying the next one. Refer to the paint manufacturer's instructions for recommended drying times. In general, it is best to wait at least 4-6 hours between coats. Applying paint to a wet surface can lead to adhesion problems and an uneven finish. Lightly sand between coats with fine-grit sandpaper (around 320-400) to remove any imperfections and create a smooth surface for the next coat. Clean the surface thoroughly after sanding to remove all dust particles.
For achieving the smoothest possible finish, consider using a paint sprayer. Sprayers provide a consistent and even application of paint, minimizing brush strokes and creating a factory-like appearance. However, using a paint sprayer requires practice and proper safety precautions. It is essential to mask off surrounding areas to protect them from overspray. Adjust the sprayer settings according to the paint manufacturer's instructions and practice on a piece of cardboard before painting the cabinets. Wear a respirator to protect against inhaling paint fumes.
Consider the orientation of the cabinet doors and drawers when painting. Painting them in a horizontal position can help to prevent drips and runs. If painting them vertically, be extra careful to apply the paint in thin, even coats and monitor for any signs of sagging.
After the final coat of paint has dried completely, allow the cabinets to cure for several days before reinstalling the hardware and reattaching them to the frames. Curing allows the paint to harden and fully develop its durability. Avoid placing heavy objects on the cabinets during the curing process.
With careful preparation, the right paint selection, and proper application techniques, Sherwin-Williams paint can transform kitchen cabinets, enhancing the overall aesthetic of the kitchen and providing a durable and long-lasting finish that will stand up to years of daily use. Taking your time and focusing on the details will result in a professional-looking outcome that significantly improves the look and value of the home.

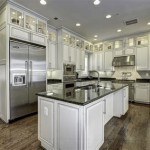
Kitchen Cabinets Sherwinwilliams

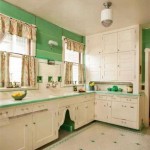
Kitchen Cabinets Sherwinwilliams

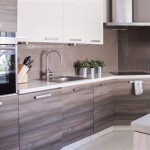
Kitchen Cabinets Sherwinwilliams

Kitchen Cabinets Sherwinwilliams

Popular Kitchen Cabinet Paint Colors West Magnolia Charm

Popular Sherwin Williams Cabinet Paint Colors Kitchen Inspirations Painted Cabinets

Popular Sherwin Williams Cabinet Paint Colors

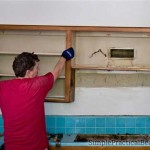
Cabinet Refinishing Guide

Gray Paint Colors For Kitchen Cabinets Sherwin Williams Grey Painted Cabinet

3 Kitchen Trends We Re Loving In 2024 Tinted By Sherwin Williams