Spray Paint for Inside Kitchen Cabinets: A Comprehensive Guide
Kitchen cabinets endure significant wear and tear, both externally and internally. While the exterior surfaces often receive the most attention in terms of cleaning and refinishing, the interior of cabinets can also benefit from a fresh coat of paint. Spray paint is a viable option for this undertaking, offering a smooth, even finish and the ability to reach tight corners and crevices. Understanding the process, selecting the appropriate materials, and implementing proper preparation techniques are crucial for achieving a professional and long-lasting result.
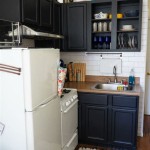
The decision to paint the inside of kitchen cabinets can stem from several motivations. Older cabinets may exhibit stains, odors, or general discoloration due to years of use. Painting provides an opportunity to neutralize these issues and create a cleaner, more sanitary storage environment. A new coat of paint can also brighten the interior, making it easier to locate items stored within. Furthermore, painting the inside of cabinets offers a chance to coordinate the interior color scheme with the overall kitchen design, creating a cohesive and aesthetically pleasing space.
While brushing and rolling are alternative methods, spray painting offers advantages in terms of efficiency and finish quality, particularly for cabinets with intricate designs or numerous shelves. The fine mist of spray paint allows for uniform coverage, minimizing brush strokes and roller marks. However, spray painting also requires careful preparation and precautions to prevent overspray and ensure adequate ventilation.
Key Point 1: Preparing Kitchen Cabinets for Spray Painting
Thorough preparation is paramount to achieving a successful and durable spray-painted finish inside kitchen cabinets. This process involves several key steps, beginning with the complete removal of all items from the cabinets. This includes dishes, cookware, food items, and any other stored objects. Empty cabinets provide unobstructed access to all surfaces that will be painted.
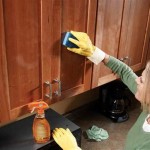
Following the removal of contents, the cabinets should be thoroughly cleaned. This cleaning process should address any existing grease, grime, or food residue. A degreasing cleaner, such as trisodium phosphate (TSP) or a TSP substitute, is often effective for removing stubborn buildup. It is crucial to thoroughly rinse the cabinets with clean water after using a cleaning solution to remove any residual chemicals that could interfere with paint adhesion.
After cleaning, the existing finish should be assessed. If the existing finish is glossy or slick, sanding is necessary to create a surface that the new paint can properly adhere to. A medium-grit sandpaper (around 120-grit) is suitable for this task. The goal is not to remove the existing finish entirely, but rather to create a slightly roughened surface. After sanding, the cabinets should be thoroughly wiped down with a tack cloth to remove any sanding dust.
In cases where the existing finish is peeling or damaged, more extensive preparation may be required. Loose paint should be scraped away, and any uneven surfaces should be smoothed with a filler or patching compound. After the filler has dried completely, it should be sanded smooth to blend seamlessly with the surrounding surface.
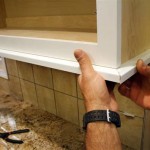
Masking is a crucial step in the preparation process. Areas that are not to be painted, such as the cabinet frame or hinges, should be carefully masked off with painter's tape and plastic sheeting or masking paper. This will prevent overspray and ensure clean, crisp lines. Pay particular attention to edges and corners, ensuring that the tape is firmly pressed down to prevent paint from seeping underneath.
Adequate ventilation is essential during the spray painting process. Open windows and doors to create airflow, and consider using a fan to circulate the air. If possible, move the cabinet doors and shelves to a well-ventilated area outside for painting. Wear appropriate personal protective equipment (PPE), including a respirator mask to protect against inhaling paint fumes, and gloves to protect your hands.
Key Point 2: Selecting the Right Spray Paint for Interior Cabinets
Choosing the appropriate type of spray paint is critical for achieving a durable and aesthetically pleasing finish inside kitchen cabinets. Several factors should be considered when making this selection, including the type of material the cabinets are made from, the desired finish (e.g., matte, satin, semi-gloss, gloss), and the specific properties of the paint (e.g., durability, ease of cleaning, resistance to mildew).
For most kitchen cabinets, either latex-based or oil-based spray paints can be used. Latex-based paints are generally considered to be more environmentally friendly, as they have lower levels of volatile organic compounds (VOCs). They are also easier to clean up, requiring only soap and water. However, oil-based paints tend to be more durable and resistant to chipping and scratching. They also provide a smoother, more enamel-like finish.
Acrylic latex paints are a popular choice for interior cabinet painting. They offer good adhesion, durability, and resistance to moisture. They are also available in a wide range of colors and finishes. For cabinets that are frequently exposed to moisture or spills, a paint specifically formulated for kitchens and bathrooms may be a good option. These paints often contain mildew inhibitors to prevent the growth of mold and mildew.
Primer is an essential component of any successful painting project. A primer provides a uniform base for the paint to adhere to, and it can also help to block stains and discoloration. For cabinets that have been previously painted with a dark color, a stain-blocking primer is particularly important. Choose a primer that is compatible with the type of paint you will be using (e.g., latex-based primer for latex-based paint, oil-based primer for oil-based paint).
When selecting a spray paint, consider the type of spray can or sprayer you will be using. Some spray paints are specifically formulated for use with airless sprayers, while others are designed for use with aerosol cans. If using aerosol cans, choose a high-quality brand that provides a consistent spray pattern and minimal dripping. For larger projects, an airless sprayer may be a more efficient option.
Self-leveling paints are designed to minimize brush strokes and roller marks, and they can be a good option for achieving a smooth, professional-looking finish. These paints contain additives that allow them to flow and level out as they dry. Cabinet-specific paints offer enhanced durability and resistance to common kitchen hazards like grease and food stains.
Key Point 3: Spray Painting Techniques and Best Practices
Proper spray painting technique is crucial for achieving a smooth, even finish without drips, runs, or uneven coverage. Before beginning, it is advisable to practice your spraying technique on a piece of cardboard or scrap wood. This will allow you to get a feel for the spray pattern and the proper distance to hold the spray can or sprayer from the surface.
Hold the spray can or sprayer approximately 8-12 inches from the surface of the cabinet. Maintain a consistent distance and angle throughout the spraying process. Use smooth, even strokes, overlapping each stroke by approximately 50%. Start spraying just before you reach the edge of the cabinet, and continue spraying past the edge to avoid build-up at the beginning and end of each stroke.
Apply thin, even coats of paint, rather than one thick coat. Multiple thin coats will result in a smoother, more durable finish and will minimize the risk of drips and runs. Allow each coat to dry completely before applying the next coat. Refer to the paint manufacturer's instructions for recommended drying times.
Avoid spraying in windy conditions, as this can cause the paint to drift and create an uneven finish. If spraying outdoors, choose a calm day and protect the surrounding area from overspray with drop cloths or plastic sheeting. When painting inside, ensure adequate ventilation and wear appropriate PPE, including a respirator mask.
Pay attention to corners and edges, ensuring that these areas are adequately covered. Use short, controlled bursts of spray to avoid build-up in corners. If necessary, use a small brush to touch up any areas that are difficult to reach with the spray can or sprayer.
Between coats, lightly sand the surface with fine-grit sandpaper (around 220-grit) to remove any imperfections or dust particles. Wipe down the cabinets with a tack cloth after sanding to remove any sanding dust. This will ensure a smooth, even surface for the next coat of paint.
After the final coat of paint has dried completely, carefully remove the painter's tape and plastic sheeting. Use a sharp utility knife to score along the edges of the tape before removing it, which will help to prevent the paint from chipping or peeling. Allow the paint to cure completely before replacing the shelves and contents of the cabinets. Curing times can vary depending on the type of paint used, but typically range from several days to a week.
Proper cleanup is essential after completing the spray painting project. Dispose of any used paint cans, brushes, and rollers properly. Clean any spray equipment according to the manufacturer's instructions. Store leftover paint in a cool, dry place.
By following these steps and best practices, it is possible to achieve a professional-looking and durable spray-painted finish inside kitchen cabinets, enhancing their appearance and creating a cleaner, more organized storage space.

How To Spray Paint Kitchen Cabinets Diy Family Handyman

How To Paint Inside Kitchen Cabinets In 7 Steps Benjamin Moore

What Is The Best Spray Paint On Kitchen Cabinets

How To Paint Unfinished Cabinets Houseful Of Handmade

How To Paint Kitchen Cabinets Like The Pros

Diy Spraying Kitchen Cabinets Like A Pro Part Two Made With Grace And Grit

How To Paint Kitchen Cabinets With A Gun Painttech Training Academy

Spray Painting Kitchen Cabinets Pictures Ideas From

3 Ways To Spray Kitchen Cabinets In The Sprayworks

How To Paint Inside Kitchen Cabinets Let S Furniture
Related Posts