Staining Kitchen Cabinets Without Stripping: A Comprehensive Guide
Updating kitchen cabinets can significantly transform the aesthetic of a home. Replacing cabinets, however, can be a significant financial investment. Staining offers a more economical alternative, allowing homeowners to rejuvenate their kitchen's appearance without the cost and disruption of complete replacement. While traditional staining often necessitates stripping the existing finish, advanced techniques and products now allow for staining without this labor-intensive step. This article provides a comprehensive guide to staining kitchen cabinets without stripping, outlining the necessary steps, materials, and best practices to achieve professional-quality results.
The process of staining kitchen cabinets without stripping involves carefully preparing the existing surface, applying a bonding primer, and then applying the chosen stain. The success of this method relies heavily on proper surface preparation and the use of high-quality materials specifically designed for adhesion to existing finishes. Understanding the nuances of each step is crucial for achieving a durable and aesthetically pleasing finish.
Key Point 1: Surface Preparation is Paramount
The single most vital element in successfully staining kitchen cabinets without stripping is thorough surface preparation. This ensures that the new stain adheres properly and prevents peeling, chipping, or an uneven finish. Failure to adequately prepare the surface can lead to a compromised final product, requiring rework or even complete removal of the new stain.
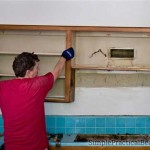
The first step in surface preparation is cleaning. Cabinets are often coated with grease, food residue, and general grime, particularly around the stove and sink. A strong degreasing cleaner specifically formulated for kitchen cabinets is essential. Apply the cleaner liberally and scrub thoroughly using a non-abrasive sponge or cloth. Pay close attention to corners, edges, and areas around handles and knobs, as these tend to accumulate the most buildup.
After cleaning, rinse the cabinets thoroughly with clean water to remove all traces of the cleaner. Allow the cabinets to dry completely. This is critical, as any remaining moisture can interfere with the adhesion of the primer and stain.
Next, the surface needs to be scuffed. This creates microscopic ridges that provide a mechanical bond for the primer. Use fine-grit sandpaper (220-grit is generally recommended) to lightly sand the entire surface of the cabinets. The goal is not to remove the existing finish entirely, but rather to create a subtle texture that will improve adhesion. Avoid excessive sanding, which can damage the underlying wood or laminate.
Once the sanding is complete, remove all sanding dust with a tack cloth or a damp cloth. Ensure that no dust remains, as this will prevent the primer from adhering properly. The cleanliness of the surface directly impacts the quality and longevity of the stain job.
Finally, inspect the cabinets for any damage, such as scratches, dents, or chips. These imperfections should be repaired before priming. Wood filler can be used to fill in any gaps or imperfections. Once the wood filler is dry, sand it smooth to blend seamlessly with the surrounding surface. Again, remove all sanding dust before proceeding to the next step.
Key Point 2: Selecting the Right Primer and Stain
The selection of appropriate primer and stain is crucial for successful staining without stripping. Not all primers and stains are created equal, and choosing products specifically designed for adherence to existing finishes is essential for achieving a durable and attractive result.
Primer serves as a bonding agent between the existing finish and the new stain. It provides a uniform surface for the stain to adhere to and helps to prevent the stain from being absorbed unevenly. The key is to select a bonding primer that is formulated to adhere to glossy or non-porous surfaces. These primers typically contain ingredients that etch into the existing finish, creating a strong mechanical bond.
Consider using a stain-blocking primer, especially if the existing cabinets are made of wood that is prone to bleeding through the new stain. Stain-blocking primers prevent tannins and other substances from seeping through the finish, ensuring a consistent and even color.
When selecting a stain, consider the type of material the cabinets are made of. If the cabinets are made of real wood veneer, a traditional wood stain can be used. However, if the cabinets are made of laminate or a similar synthetic material, a gel stain specifically designed for non-porous surfaces is recommended. Gel stains sit on top of the surface rather than penetrating it, making them ideal for materials that won't absorb a traditional stain.
Water-based stains are generally easier to clean up and have lower VOC (volatile organic compound) emissions compared to oil-based stains. However, oil-based stains tend to provide a richer color and better durability. Consider these factors when making your selection.
Before applying the stain to the entire cabinet, it's essential to test it in an inconspicuous area to ensure that the color is what you expect and that the stain adheres properly. This will help you avoid any unwanted surprises once the entire project is complete.
Always follow the manufacturer's instructions for both the primer and the stain. This includes recommended drying times, application methods, and safety precautions. Using the products according to their specifications will help ensure optimal performance and a long-lasting finish.
Key Point 3: Application Techniques for a Flawless Finish
The application technique plays a vital role in achieving a professional-looking stain job. Proper application ensures even coverage, prevents drips and runs, and maximizes the adhesion of the stain to the primer. Rushing this process or using incorrect techniques can lead to an uneven, unprofessional finish.
Before beginning the application process, ensure that the work area is well-ventilated. This is particularly important when using oil-based stains, which can have strong fumes. Protect the surrounding surfaces with drop cloths or plastic sheeting to prevent any accidental spills or splatters.
Apply the primer in thin, even coats using a high-quality brush or a foam roller. Avoid applying the primer too thickly, as this can lead to drips and runs. Allow the primer to dry completely according to the manufacturer's instructions. Depending on the type of primer, this may take several hours or even overnight.
Once the primer is dry, lightly sand it with fine-grit sandpaper (320-grit or higher) to smooth out any imperfections. Remove all sanding dust with a tack cloth before proceeding to the stain application.
When applying the stain, work in small sections and apply the stain evenly using a brush, foam pad, or rag, depending on the type of stain and the desired effect. If using a traditional wood stain, apply it in the direction of the wood grain.
After applying the stain, allow it to sit for the recommended amount of time according to the manufacturer's instructions. This allows the stain to penetrate the surface and develop its color. The longer the stain sits, the darker the color will be.
Once the stain has sat for the appropriate amount of time, wipe off the excess stain with a clean, lint-free cloth. This will remove any stain that hasn't been absorbed and will help to create a more even and consistent finish. Wipe in the direction of the wood grain (if applicable).
Allow the stain to dry completely according to the manufacturer's instructions. This may take several hours or even overnight. Once the stain is dry, apply a topcoat of polyurethane or another clear protective finish. This will protect the stain from scratches, moisture, and other damage, and will help to ensure a long-lasting finish.
Apply the topcoat in thin, even coats using a brush or a sprayer. Avoid applying the topcoat too thickly, as this can lead to drips and runs. Allow the topcoat to dry completely according to the manufacturer's instructions. Depending on the type of topcoat, this may take several hours or even overnight.
Lightly sand the topcoat with fine-grit sandpaper (400-grit or higher) between coats to create a smooth, even surface. Remove all sanding dust with a tack cloth before applying the next coat of topcoat.
Apply two or three coats of topcoat for maximum protection. Allow each coat to dry completely before applying the next coat.
Finally, reattach any hardware, such as handles and knobs, to the cabinets. Clean up any spills or messes and dispose of all materials properly.
By following these steps carefully and using high-quality materials, homeowners can successfully stain their kitchen cabinets without stripping, achieving a professional-looking finish that will last for years to come. The key is to take your time, pay attention to detail, and follow the manufacturer's instructions for all products used.

Staining Your Wood Cabinets Darker Young House Love

Refinish Kitchen Cabinets Without Stripping

Gel Stain Kitchen Cabinets Without Sanding Fast Easy Diy

How To Refinish Kitchen Cabinets Without Stripping Ron Hazelton

Darken Cabinets Without Stripping The Existing Finish Pneumatic Addict

Refurbish Old Cabinets Without Sanding Using Gelstain

How To Paint Kitchen Cabinets Without Sanding Or Priming

How To Refinish Wood Cabinets The Easy Way Love Remodeled

How To Use Gel Stain Update Cabinets Without Sanding

How To Paint Cabinets Without Removing Doors House Mix