Stain or Paint Old Kitchen Cabinets: A Comprehensive Guide
Refacing or replacing kitchen cabinets can be a significant investment. For homeowners seeking a budget-friendly alternative, revitalizing existing cabinetry with either stain or paint presents a viable option. This article provides a detailed comparison of staining and painting old kitchen cabinets, outlining the process, considerations, and factors that influence the decision-making process.
The choice between stain and paint generally involves considering the existing cabinet material, desired aesthetic, time commitment, and skill level of the individual undertaking the project. Both options offer distinct advantages and disadvantages, and a careful evaluation of these factors is crucial for achieving the desired outcome.
Understanding the Existing Cabinet Material
The material composition of the kitchen cabinets is a primary determinant in deciding between staining and painting. Solid wood cabinets typically offer the most versatility, as they can be either stained or painted. However, the type of wood itself can influence the final appearance of the stain. Woods with prominent grain patterns, such as oak or hickory, will showcase the stain more dramatically. Conversely, finer-grained woods like maple or birch may require a wood conditioner to ensure even stain absorption.
Cabinets constructed from wood veneer or laminate present a different set of challenges. Staining veneer cabinets is generally discouraged, especially if the veneer layer is thin. The sanding process required to prepare the surface for staining can easily remove the veneer, exposing the substrate underneath. Attempting to stain laminate cabinets is usually unsuccessful, as the non-porous surface prevents the stain from penetrating.
Paint, on the other hand, is a more forgiving option for veneer and laminate cabinets. With proper preparation, including thorough cleaning, sanding, and priming, paint can adhere effectively to these surfaces, providing a durable and aesthetically pleasing finish. The key is to use a high-quality primer designed for adhesion to non-porous surfaces.
Aesthetic Considerations: Appearance and Style
The desired aesthetic plays a crucial role in the stain versus paint decision. Stain preserves the natural wood grain and texture, creating a warm, rustic, or traditional look. It allows the inherent beauty of the wood to shine through, enhancing the character of the kitchen. Staining is particularly suitable for homeowners who appreciate the natural imperfections and variations in wood grain.
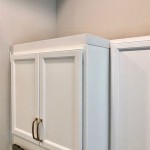
Paint, conversely, offers a wider range of color options and provides a more uniform and contemporary appearance. It can effectively conceal imperfections in the wood and create a sleek, modern look. Paint is ideal for homeowners seeking to update their kitchen with a specific color palette or to achieve a clean, minimalist aesthetic.
Ultimately, the choice depends on personal preference and the overall style of the kitchen. If the goal is to highlight the natural wood and create a warm, inviting space, staining is the preferred option. If the objective is to achieve a specific color scheme and a more contemporary aesthetic, painting is a better choice.
Furthermore, consider the existing hardware on the cabinets. Darker stains tend to pair well with brushed nickel or bronze hardware, while lighter stains may complement brass or stainless steel. Painted cabinets offer even greater flexibility in hardware selection, as virtually any finish can coordinate effectively with a painted surface.
The Process: Preparation, Application, and Finishing
The preparation process is crucial for both staining and painting cabinets. Thorough cleaning is essential to remove grease, grime, and dirt. A degreasing cleaner should be used to scrub the cabinets, followed by a rinse with clean water. Allow the cabinets to dry completely before proceeding.
Sanding is the next critical step. For staining, sanding is necessary to open the wood pores and ensure proper stain absorption. Start with a medium-grit sandpaper (120-grit) to remove any existing finish and then progress to a finer-grit sandpaper (220-grit) to create a smooth surface. For painting, sanding is primarily intended to roughen the surface and provide better adhesion for the primer. A medium-grit sandpaper (150-grit) is generally sufficient for this purpose.
After sanding, remove all dust and debris with a tack cloth or vacuum cleaner. This will ensure a clean surface for either staining or painting.
Staining Process: Apply the stain evenly using a brush, rag, or foam applicator. Allow the stain to penetrate for the recommended time specified by the manufacturer. Wipe off the excess stain with a clean rag, following the grain of the wood. Apply multiple coats of stain to achieve the desired color intensity. Allow each coat to dry completely before applying the next. Once the stain is dry, apply a clear topcoat, such as polyurethane or varnish, to protect the stained surface and enhance its durability. Apply multiple coats of the topcoat, sanding lightly between coats to achieve a smooth finish.
Painting Process: Apply a primer to the cabinets to create a uniform surface and improve paint adhesion. Choose a primer specifically designed for the type of cabinet material. Apply the primer evenly using a brush, roller, or sprayer. Allow the primer to dry completely before proceeding. Apply two or more coats of paint, allowing each coat to dry completely before applying the next. Use a high-quality paint formulated for cabinets, such as acrylic latex or alkyd paint. For a smooth, professional finish, consider using a paint sprayer. After the final coat of paint has dried, apply a clear topcoat, such as polyurethane or varnish, to protect the painted surface and enhance its durability (optional, but recommended for high-use areas).
Regardless of whether staining or painting, proper ventilation is essential during the application process. Wear appropriate personal protective equipment, such as gloves and a respirator, to avoid inhaling harmful fumes.
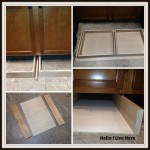
Consider labeling each door and drawer clearly before removing them. This will simplify the reinstallation process and prevent confusion. Take photos of the cabinet layout before disassembly to serve as a visual guide during reassembly.
Allow sufficient drying time between coats of stain, primer, paint, and topcoat. Rushing the drying process can result in a poor finish and reduced durability. Follow the manufacturer's recommendations for drying times.
Inspect the cabinets thoroughly after each step of the process. Address any imperfections, such as drips, runs, or uneven coverage, before proceeding to the next step.
Practice on a small, inconspicuous area of the cabinet before applying stain or paint to the entire surface. This will allow you to refine your technique and ensure that you are satisfied with the color and finish.
Using a level when reinstalling the cabinet doors and drawers will ensure that they are properly aligned.
Clean brushes, rollers, and sprayers immediately after use. This will prevent the paint or stain from drying and ruining the equipment.
Store leftover stain, paint, primer, and topcoat properly to ensure that they remain usable for future projects. Follow the manufacturer's recommendations for storage.
Investing in high-quality brushes, rollers, and sprayers will significantly improve the quality of the finished product. Cheap tools can result in uneven coverage, brush marks, and other imperfections.
Consider hiring a professional painter or cabinet refacing specialist if you are not comfortable undertaking the project yourself. Professionals have the experience and expertise to achieve a flawless finish and avoid common mistakes.
Ultimately, the success of a cabinet staining or painting project depends on careful planning, meticulous preparation, and attention to detail.
By carefully considering these steps, the homeowner can make a well-informed decision on whether to stain or paint their cabinets. Both options can provide an updated look to the kitchen, each providing a unique aesthetic.

Painted Vs Stained Cabinets Which Fits Your Style Best

Stained Vs Painted Kitchen Cabinets

Painted Cabinets Staining Kitchen

Custom Kitchen Cabinets Painted Vs Stained Apico Kitchens

Cabinet Refinishing Guide

Painted Wood Cabinets Vs Stained A Questionnaire Kylie M Interiors

Kitchen Cabinet Color Should You Paint Or Stain

Painted Vs Stained Cabinets Jm Kitchen And Bath Design

Painted Vs Stained Cabinets How To Compare When Use Both

Should I Paint Or Refinish My Kitchen Cabinets
Related Posts