Staining Kitchen Cabinets: A Comprehensive Guide to Achieving a Professional Finish
Transforming your kitchen cabinets with a fresh coat of stain can significantly enhance the overall aesthetic appeal and functionality of your living space. Whether you're seeking to update outdated cabinetry or simply desire a change in color, staining your kitchen cabinets can be an incredibly rewarding DIY project. To guide you through the process, we've compiled a comprehensive guide covering all the essential aspects of staining kitchen cabinets, ensuring you achieve a professional-looking finish that will add value to your home.
Materials and Preparation
Before embarking on your staining adventure, it's crucial to gather the necessary materials and prepare your cabinets adequately. This includes:
- Sandpaper in both coarse and fine grits
- Wood cleaner
- Tack cloth/lint-free cloth
- Stain of your desired color and finish
- Polyurethane for sealing
- Applicators (brushes, rags, or sponges)
Thoroughly clean the cabinets using a wood cleaner and a lint-free cloth to remove dirt and grime. Subsequently, sand the cabinets using coarse sandpaper to remove the existing finish, followed by fine sandpaper to smoothen the surface. Wipe down the cabinets with a tack cloth to eliminate any debris.
Choosing the Right Stain
The stain you select will significantly influence the final appearance of your cabinets. Consider factors such as the natural wood grain, the desired color, and the type of finish (e.g., matte, satin, or glossy). Test the stain on an inconspicuous area of the cabinet to ensure you're satisfied with the outcome.
Applying the Stain
Apply a thin, even coat of stain using your chosen applicator. Allow the stain to penetrate the wood for the specified time, as per the manufacturer's instructions. Wipe off excess stain with a clean rag. Depending on the desired intensity, you can apply additional coats, allowing ample drying time between each coat.
Sealing the Stain
To protect the stain and enhance its durability, apply a polyurethane sealer. Choose a polyurethane that complements the finish of your stain (e.g., matte polyurethane for a matte stain). Apply the polyurethane in thin, even strokes using a clean brush or roller.
Tips for a Flawless Finish
To achieve a professional-looking finish, follow these additional tips:
- Always test the stain and polyurethane on an inconspicuous area before applying them to the entire cabinet.
- Ensure proper ventilation during the staining and polyurethane application processes.
- Use high-quality brushes and applicators to minimize brushstrokes and ensure an even finish.
- Allow ample drying time between coats and before using the cabinets to prevent smudging or damage.
- Clean your brushes and applicators promptly after use to prevent staining.
By following these steps and adhering to the tips provided, you can successfully stain your kitchen cabinets, transforming them into a stunning focal point of your home. Enjoy the satisfaction of a well-executed DIY project and the enhanced beauty and value your freshly stained cabinets will bring to your living space.

Staining Kitchen Cabinets Pictures Ideas Tips From

Staining Your Wood Cabinets Darker Young House Love

How To Stain Oak Cabinetry Tutorial The Kim Six Fix

How To Make Rustic Kitchen Cabinets By Refinishing Them The Best Stain Color Amanda Katherine

15 Stunning Kitchens With Stained Cabinets Sincerely Marie Designs

Painted Vs Stained Cabinets Jm Kitchen And Bath Design

Gel Stain Kitchen Cabinets Without Sanding Fast Easy Diy

How To Stain Wood Cabinets True Value

Painted Vs Stained Cabinets Which Fits Your Style Best

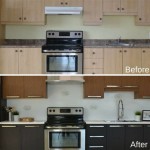
How To Stain Dark Or Yellow Kitchen Cabinets Lighter
Related Posts